


Building Lighting
Lighting a building on a model railroad can provide a considerable enhancement to the model, particularly if it has a detailed interior. This is true even if the layout room is lit to imply daylight, as it exposes interior details you couldn’t otherwise see. However, the real benefit comes if you turn the room lights down to simulate evening or nighttime operation. For this to work, exterior lights, such as streetlights, traffic lights, and advertising sign lights, will be needed as well. This section describes issues and solutions related to lighting models. If you want more basic information about the electronics, see the Lighting page.
The Color of Light
There are several ways to measure the color of light, but the important aspect is how well this recreates the look of real-world lights and illumination, not specific numbers. Something that complicates this is that we perceive color relatively, so in a room with reddish light (such as from incandescent bulbs), a “white” light might appear blue, while in a room with more bluish light (such as from fluorescent tubes), the same “white” light might appear reddish. If you build models with lights, it’s important to evaluate how they will look in a room lit the same way as the layout room (ideally by checking them “on the layout” during construction).
One standard measure for evaluating room lighting is to describe the color of the light as a temperature (a “black body” temperature) in Kelvin, where lower numbers are “more red” than higher numbers. A typical incandescent bulb puts out light around 2700K, while a “cool” fluorescent puts out light closer to 4500K. And some people prefer “daylight” lights of 5000K or higher. Today you can buy room lights with a specific color stated on the box, however note that the Color Rendering Index (CRI) is also important, and should be in the middle or high 90’s (on a 100% scale) for best accuracy. Cheap lights often do strange things to colors. For more about the room lighting issue, as well as info on some tests I did of various systems, see the Layout Lighting section.
For most models, the question is: would this model use incandescent (bulb) lighting or fluorescent lights? The former is more typical for houses, the latter for offices and some exterior commercial lighting. Depending on the time period, either might be used to light up exterior signs. Exterior lights can have other colors; many highway streetlights used very yellow sodium lights, although bluer halogen lighting became widespread towards the end of the 20th century.
White LEDs are now available in both “warm” and “cool” varieties. The exact color can vary, but warm is usually close to incandescent, while cool can range from fluorescent to “too blue”. The latter may be good for exterior halogen lights used at night.
When I lit my subway station platforms I used LED Strip lights that came in “warm” (3100K) and “white” (6000K) colors. While the “white” was too blue on its own, mixed evenly the two produced a reasonable “fluorescent” color. For houses and smaller apartment buildings, I’ll typically use “warm” white LEDs.
Here’s an example:
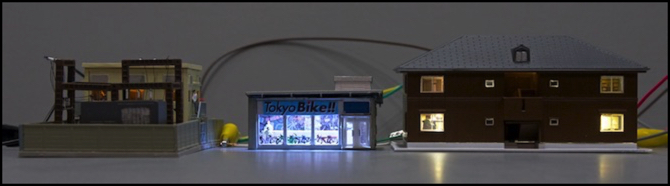
The power substation on the left used a pair of yellow LEDs, just barely illuminating the interior. These are rather dim, but provided a nice “dimly lit by bulbs” look, that allowed some detail to be seen through the windows. The bike shop was lit with a LED strip containing a couple of cool white LEDs. This was quite blue, but because the interior had lots of color, and a fairly “warm” floor color, this wasn’t overwhelming (it looks worse in photos) and did provide a good “brightly lit store” ambiance. If I had several of these buildings together, I might want to reduce the brightness of each (by using larger resistors) though. Finally, the apartment building on the right used “warm white” strip lights, with one LED above each room. On the lower floor, the LED was on the ceiling, and rather too bright, on the upper floor it was in the attic, shining down through some cut-outs in the ceiling, and the result was a bit on the dim side.
One thing this points out is that intensity matters, and it’s worth the time to find the “right” size resistor (or to use an intensity control, as described in my LED Intensity Control section).
Light Blocking and Leakage
Small lights are surprisingly bright up close, and plastic is actually somewhat translucent, rather than truly opaque. The result is that if you just put a white LED inside an ordinary building, the walls will glow. That’s fairly unprototypical, to say the least. Light can also leak out where sections of buildings meet (e.g., floors in modular towers or multi-story houses) and where the building sits on its foundation.
The solution to the first problem, is to add opacity between the light and things other than windows. Some people simply use aluminum foil for this, as it can be shaped to fit the ways and is not simply opaque, but will reflect light towards the opening. It can also reduce the risk of heat melting plastic when working with small bulbs, although that’s not generally an issue with LEDs (those can get warm, but not typically warm enough to weaken styrene).
The method I prefer is to paint the inside of the structure. Brush-painting can work, but if you plan to paint the exterior also, using spray paint can be faster. Before painting, make any changes you want to the model, such as adding interior walls, or cutting or drilling holes for wires. Allow any glue to dry overnight, and never use super-glue on a model with windows; emissions from the glue will fog transparent plastic days or even weeks after it “dries”.
Remember to wash the model before painting (and after any modifications) in warm, soapy water (but not hot water; that could deform the styrene), ideally scrubbing with an old, worn, toothbrush. This will remove any dust, dirt and skin oil from storage or handling, and will also remove any chemicals left over from the injection-molding process used to create the structure. Then rinse thoroughly in clean water, blow or blot any excess water off, then leave it to dry completely before painting.
My approach is to put down two coats of flat black from a spray can, letting them partially dry between coats (read the manufacturers instructions on dry-to-recoat times, these are typically 15 to 30 minutes). This lets you spot any gaps in the first coat, and makes the whole thicker. Flat black is a very opaque paint, unlike some colors, so this provides an effective light block. Then I add a third coat of flat white. This makes the interior more reflective, enhancing the effect of the lighting. It also serves as a good primer for any colored paint you might add to interior (or exterior) walls.
Light leakage at joints can be fixed by gluing strips of square styrene inside, adjacent to the joint, to block any direct path the light could take. It’s better to do this before painting, if you can identify potential light leaks in advance.
