


Cars and Roads
There are many techniques for modeling roads, and I use several on my layout. Here is an overview of a couple of the more interesting methods.
For additional information on actual street dimensions, see the Roads and Highways and the Shuto Expressway pages in the Prototype section, and for descriptions of how the techniques here were specifically used on my layout, see the Modeling Roads page in the Scenery section of The Model Railroad.
Dimensions
How big should a road be? This depends a lot on the kind of road, and also on the country. A modern expressway is wider than a 1950’s highway, and often has more lanes. A large avenue in a city will be bigger than a side street. American roads tend to be larger than ones in old European cities that weren’t designed for automobile use. I model Japan, and Japanese roads tend to be smaller than American ones for the same reason, and because space in Japanese cities for highway/road construction was and is even more constrained than in cities elsewhere. I’m also working in 1:150 Japanese N Scale, not the usual 1:160, which has a minor effect. But I also have to use automobiles designed for both scales (I use a lot of European-manufacturer vehicles, and those are built to 1:160 scale).
Per the information I’ve collected on the prototype, modern Japanese highway lanes range from 3m (10’) to 3.5m (11’ 6”), most expressways in the city have lane widths of 3.25m (10’ 8”) with a shoulder of 0.5m (18”), and side streets in residential areas can be as narrow as 2m. Technically street parking in Japan is only allowed if there is 3.5m (11’ 6”) of clearance past the parked vehicle, but I think you can find lots of exceptions to this, and the regulation probably applies to marked spaces more than side-of-the-street parking. A typical “ample sized” commercial lot space is 2.3m x 5.0m (7’ 6” x 16’ 5”).
For smaller streets, I did some research with Google Earth to size up the lane widths and found a lot of variation, with lanes as narrow as 2.4 m or 2.8 m in several places, but more often 3.1 m or even over 4m. The widest lanes seemed to occur on the smallest streets with marked lines, probably to allow room for side-of-road parking (although there are no marked spaces, on-street parking is not uncommon, particularly for delivery vehicles). The smallest roads typically don’t have lane markings, even when they are bi-directional (which you can tell by the position of “stop” lines at both ends, with the line not running full width: a one-way street will have a full-width stop line at one end only).
Let’s break this down for lane widths in 1:150 scale:
- Expressway: 20mm to 23mm
- Tokyo expressways: 22mm + 3mm shoulder
- Small one-way side street: 13mm minimum, but 16 - 18 mm more typical
- Small two-lane side street: 25 mm (per lane)
- Street allowing parking: 23mm (not counting parking space)
- Multi-lane avenue: 19 mm, 20 mm, 21 mm and less common 25 mm
- Parking space (ample): 15mm x 33mm
Next I measured some typical vehicles (for more about these, see the Model Cars and Trucks page):
- Tomix open-bed truck: 13mm x 32mm
- Tomix panel van: 15mm x 42mm
- Tomix car (modern): 14mm x 30mm
- Tomix car (smaller): 11mm x 22mm
- Tomix car (older): 9mm x 21mm
- Tomix car (largest): 13mm x 33mm
- DDF cars: 13mm x 33mm (cheap China-made cars)
- European sports car: 13mm x 30mm
There’s a rather significant increase in size from some of the older-prototype cars in my Tomix sets (where even vans were small) to more modern designs. Many of the modern cars are still small (the Honda Today is just 10mm x 22mm) but many are quite large. And those “cheap Chinese” cars you can get off EBay or from companies like DDF are not small, which is important to keep in mind when planning to use them to fill out more distant parts of the layout.
What I take from this, aside from the highway dimensions, is that city streets with parking need lanes of 23mm plus parking spaces of 13mm width to be prototypical (parallel parking is the norm where it exists at all), and side streets can be as narrow as 13mm but may be better off slightly larger (15mm+). And parking spaces shouldn’t be shorter than 30mm or narrower than 14mm, but could be slightly larger.
Sanity-checking that against Google Earth shows that actual marked parking spaces, while they exist, aren’t normal on even fairly large roadways, and parking is often done with cars extending into the roadway over the white stripe that marks the edge of the road. Marked spaces are most common adjacent to public spaces, like parks (often along rivers where there are linear parks on the riverbank).
Where parking occurs, there seems to be between half and 2/3 of a car width outside the lane marking for traffic (more space is allowed on roads where higher speeds are likely). Cars often park with the wheels in the concrete gutter along one side of the road, and counting this space it appears I should allow 6-8 mm for “outside the lane” roadside space where there is parking (which can exist even on tiny one-lane side roads). I’ve evolved the dimensions in the following diagram from this, with lanes varying from 15mm in an alley with no parking, to 18mm on a one-lane side street with parking to about 25 mm on heavily-travelled two-lane roads with side-of-street parking or 29 mm total on a two-way side street without markings (or 14.5 mm each way) . I may diverge from this in some places, but this is my baseline for planning. The dimensions of the gutter and side-of-road outside the white lines vary as well, although not as dramatically.
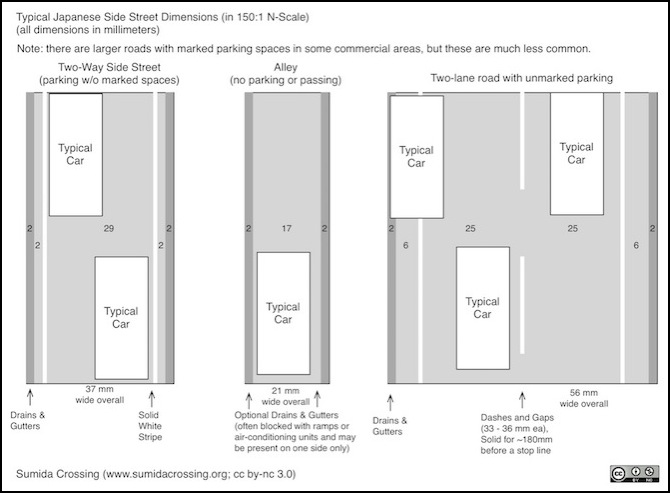
Some typical side-street road dimensions
Mask and Paint on Plastic
This is a technique I learned of from an online site. In essence it is quite simple: use sheet styrene for the roadway surface, spray paint it with a coat of flat white and allow to dry overnight (wash the plastic in soapy water and rinse clean and allow to dry first), add masking where you want white lines (lane markings, stop lines, etc) then spray paint with a light gray color. When you peel the masking off, what you see looks quite real from a typical viewing distance, despite the uniform color of the lanes. And an expert with an airbrush could add details like darker stripes where tires go (slight weathering with black), or faded lines where traffic crosses (overspray with a faint amount of the same gray). But the basic technique can be used with canned spray paint (use paint for styrene models).
The tricky part is masking, but tape used for masking stripes on model cars works well (made by Tamiya and others).
You could simply lay the roadway surface on your support and glue it in place with something like liquid nails once it’s painted, then add scenic material to the edges to hide them. I did something a bit more complicated for my “expressway”, since I wanted a raised median with lights (and power to those lights) and side walls, and I wanted the expressway build in sections that I could remove. One advantage of this method is that the road surface can be removed, in case I later want to improve the paint job.
In the expressway, the ends didn’t need to meet up with anything else, and I wanted there to be plenty of room for routing power feeds, as well as a strong support structure, so I ended up with two layers of 2mm x 2mm square stock at right angles, supporting a 2mm sheet styrene “under deck”. The roadway is painted on 1mm sheet styrene that rests on the under deck, and is held in place at the edges by “concrete” edging that is really thin (1mm) strips that stick out over it slightly. The technique is discussed in some detail on my JNS Forum 2011 Contest page.

Expressway Deck with painted and removable road surface.
Photographs on Decals
This one occurred to me recently, as a result of a similar technique being used by one of the JNS Forum members (Mardon aka macdon) to make station platforms (thread entry with photo here, original decal idea from Jeff). The idea is simple, although the execution is perhaps a bit more complex than the mask-and-spray method. But one thing it lends itself to is creating complex roadway markings in multiple colors. Particularly if, like me, you’re more comfortable with a digital drawing program than an airbrush.
My first thought was to use screen grabs from Google Earth as elements for the roadway. The problem is that while these can suggest what markings go where, and typical colors for urban asphalt, they don’t have sufficient resolution to look good printed to N scale. So I’ve turned to Flickr for data. Fortunately there are a number of people who take top-down photographs of manhole covers there, so I can get some useful graphics for those, and there are enough pictures of streets to allow me to identify colors. There’s more on this topic on the Roads and Highways page.
Other Methods
Other methods often involve use of plaster for the roadway surface, or some equivalent material that can be spread on and sanded smooth after drying, and brushed-on paint for the roadway. Similar masking techniques can be used for painting stripes, but Woodland Scenics makes rub-on (dry transfer) lines for street marking that are popular.
