


Modeler’s Table Saw
I bought a table saw to use in my modeling, and not just any saw, but a Byrnes saw. This is, as the English would say, a serious piece of kit. It’s also not cheap, with accessories mine ran a bit over US$700. For that you get a table saw that takes 3” and 4” blades with 1/2” and 20mm arbors (adapters for other sizes are available on request), suitable for cutting light wood or plastic to tolerances of several thousandths of an inch. One of the options is a micrometer for the fence, so you can cut precise, narrow, strips of sheet material, suitable for making planks for model shipbuilding. My needs aren’t quite that extreme, although I did get the micrometer.
The saw comes in 120V and 230V models (mine is 120V) and has a one-year warranty. It comes with a 24-tooth, 0.055” kerf (cut thickness), 4” carbide blade suitable for cutting wood. A 36-tooth version of this blade suitable for cutting plastic is an option for $17, but for real precision work you can use a 3” slitting blade, available in 0.020” and thicker kerfs. I ordered several blades: the two carbide blades were both made in China by Tenryu, the 3” slitting blade was made in Rhode Island by Thurston (model I-291, 0.020” kerf, which turned out to be a 110-tooth blade--although Byrnes’s website calls it 80-tooth the Thurston catalog disagrees--designed “for cutting aluminum, brass, soft metals and plastic in the form of tubing, sheets, and light extruded rods, bars and shapes”). I also bought the larger 0.040” kerf Thurston blade mentioned on Byrnes’ site. Thurston has a good reputation, so I’m pleased that a blade of this quality was supplied.
The metal insert around the saw blade is screwed in place, and blanks are available so you can make zero-clearance inserts (you raise the blade through the solid metal and let it cut a slot exactly the size of the blade, to minimize vibration in thin stock when cutting it; an excellent feature).
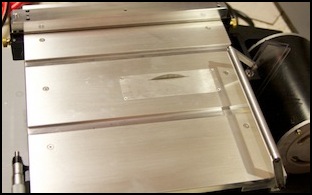
The saw has a heavy metal base with a power switch and a knob for raising the blade, plus a dust port for hooking up a vacuum. The top is machined from a solid slab of aluminum 12” across. A rod is attached under the front and rear edges of the table, and both the fence and micrometer slide along this and can be locked in place. It’s built like a tank, and reportedly does not need to be clamped to the table when cutting, as its weight will hold it stable. That matches my experience, as there was no vibration or movement of the saw when I used it.
Per the specs it has a 3/8” arbor flanged to 1/2” and 20mm (the later done with a spacer) and spins at 3650 rpm with a 1/3 hp motor that draws 2 Amps @ 110 Volts.
Accessories
I bought mine with the following:
- Extended Rip Fence (taller fence for working with thicker stock)
- Rip Taper Jig (for making long angled cuts)
- Miter Extension (taller and longer miter)
- Metric Micrometer (for precision fence moves; I prefer to work in metric when modeling)
The only accessory I didn’t get was the tilt table, as I couldn’t think of any possible use for it in my modeling, and the cost of $125 was too high to buy one on spec.
BTW, not included is a hex wrench, and you’ll need several to adjust/remove things like the blade guard, the rip fence extension (if you get it) or to move the micrometer. You also need a pair of open-ended wrenches to change the blade (one each of 11/16” and 3/8”) and a #1 phillips to change the blade insert. Perhaps most people would already have these, but I actually didn’t have a set of hex wrenches and had to go to the store in the middle of using the saw, when I realized I needed to take off the rip fence extension to use the rip taper jig, and that meant removing four hex screws.
I’m going to be using this to cut thin (up to 2mm) plastic sheet stock into strips wider than those I can buy in the shop, and to cut more complex angular shapes where the scribe-and-snap technique takes too long. By all accounts the saw will do this fine, as long as the right blade is used and the stock isn’t fed too quickly (which could cause it to melt or chip, rather than being smoothly cut). More teeth are better when cutting thin stock, so my plan is to use the slitting blade for this.
The first project with it will be the deck for my elevated Expressway, which I’m scratchbuilding from styrene. I’d built the first segment of that by hand, and that experience convinced me I needed something better.
Advice
I’ve never used a table saw before, so I spent some time googling around for experiences. Here are some key tips I collected from that:
- Read a book on table saw safety before you use a table saw the first time.
- Always use a push stick to push the stock through the blade, never your fingers (you like them attached, right)?
- Never take your eye off the blade.
- Always wear eye and ear protection.
- Unplug the saw when not in use and when working around the blade. Don’t depend on the switch.
- When changing the blade, make sure the blade is fully seated on the arbor before tightening it.
- The top of blade should only be as high as the top of the stock you’re cutting (or 1/16”, 1.5mm, above it).
- The thick part of the material goes between the fence and the blade. (I found I often couldn’t do this).
- Push on the material between the fence and the blade. (another bit of problematic advice; often you have to push using the miter on the opposite side of the blade from the fence)
- Be prepared in case the material slips past the blade (don’t fall on or slide into the blade).
- Never stop mid-cut, push smoothly through.
Most of that seems really obvious, at least now that I’ve read it, but a lot of people learned the hard way. I’d rather not be one of them.
Experience
I haven’t used the saw much yet, but I did do some fairly complex cutting of a piece of 0.080” (2mm) styrene for the Expressway using the 0.020” kerf Thurston blade and a zero-clearance insert, and it worked quite well. I’ve also done some cutting of sheet styrene into strips wider than those commercially available for other projects.
The saw is fairly quiet (much quieter than the shop vac I use to clean up the plastic dust). Cuts were clean, with no significant melting. The edge did blacken a bit when I stopped feeding and turned the saw off at the end of the cut. The blade guard is also a nuisance, since even with the rip fence out of the way, it prevents cutting in the middle of a wide sheet, which I had to do a couple of times. For those cuts, I unscrewed it from the base and removed it, which rather removes the benefit of a guard, but at least that’s easy to do (one hex screw).
One thing I discovered is that the micrometer prevents moving the rip fence very far to the right, to the point where you really can’t use the miter and fence on the right hand side of the blade. It can’t really go all that far to the left either, just about 95mm, due to the end stops. This latter issue causes some problems and makes me wish it were easier to remove the fence altogether.
The rip fence also rides a short distance above the table surface, far enough for 0.015” sheet styrene to slip under it, which makes feeding that kind of thin sheet a bit troublesome.
Lesson learned: the miter gauge with extension (photo below) can have the extension moved to either side. This is easy, but requires removing/replacing two small hex screws. I end up doing this a lot, and I really need to buy a second one so I can leave them set up in both arrangements.
Overall, it’s well-machined, with no rough spots or mis-alignments. Everything moves smoothly and locks in place precisely.
You can see larger versions of these photos in the Tools photo album.
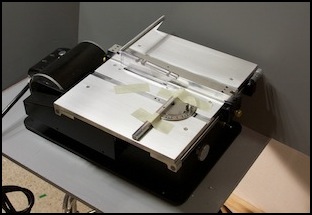
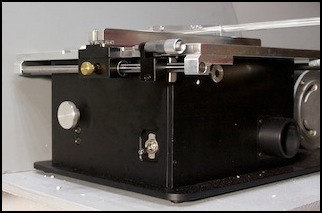
L: Saw being unpacked; R: power switch and blade-height adjustment knob, with dust port on right.
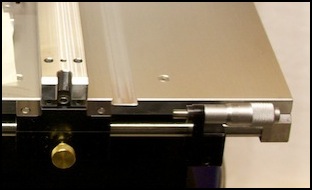
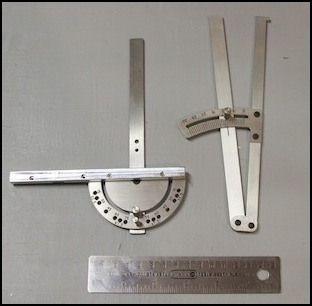
L: Extended-height rip fence and micrometer; R: accessories for angled cuts: miter with extension, and rip-taper jig. The miter extension is removable and can be attached with the extension on either the right or left of the semi-circle.
One issue: Note the hook on the top-right corner of the rip taper jig, which is used to push the stock towards the blade. This means it can only be used in one orientation (which is probably good, as it keeps you from cutting the semi-circular scale off with the saw blade). But using it requires the left part to slide along the rip fence, which means you can’t use it with the height extension on the fence, as that blocks the semi-circular scale from extending over the fence. The extension removes with a couple of hex screws so that’s not a big problem.
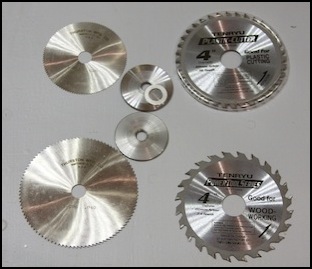
L: Saw blades and arbor (from lower right): standard wood carbide blade, 4" Thurston slitting blade, 3" Thurston slitting blade, plastic carbide blade; R: slitting blade with zero-clearance insert.
