


Using Relays with Arduino
Let’s get this out of the way up-front: the best way to drive a relay, or relays, from an Arduino is to buy a shield or other circuit board designed for that purpose. It will save you a lot of soldering, and avoid most of the potential for Arduino-damaging mistakes. If you’re really on a budget, you can do it yourself, but I’m inclined to think of that as a false economy.
The problem with relays is that they aren’t “logic” devices. They may have an on/off state, but fundamentally they behave more like motors (inductive analog devices) than transistors (resistive digital devices). When you turn one on, energy has to be pulled into and stored in a coil inside the relay, and when you turn one off, that energy has to go somewhere, and if you forget to give it that somewhere, it’s going into your Arduino (the results will almost certainly be permanent damage to the circuits behind the pin driving the relay).
Note that relay boards are usually Single-Pole, Double-Throw (SPDT) relays, so you need two of them to switch track power (unless you use common rail wiring and only switch one, but that’s not a good idea with DCC). You can buy DPDT relays if you plan to build your own circuit.
A relay is ultimately a mechanical device, even though the mechanical bits are hidden away inside a box. They means that it makes a noise when it switches and that it will ultimately wear out and break, much sooner than a transistor circuit would. Although a typical relay is rated for 100,000 cycles, so they won’t wear out soon. People still use relays because they’re a much simpler and cheaper way of managing higher currents and voltages than transistors, and make for simpler circuits as well. Even at model railroad voltages, a transistor that can handle currents of several amps is no simple device.
Safety
Relays can be used to control power much larger than the 5V of the Arduino. The inputs and outputs have a rating, and you should not exceed that. However, keep in mind that bare wires with high voltage are dangerous. If you use the relay to control wall power (to turn on a room lamp, for example) exercise all the usual caution (i.e., put the circuit inside a grounded metal box and wrap any exposed wires with electrical tape). And be very careful to keep the control lines (lines to the Arduino) and the relay power (lines to the wall-wart supply) very well separated from the controlled high-voltage lines.
Note: a metal box without a ground is more dangerous than a plastic box, and the ground must be a wire rated for the current in the circuit being controlled (i.e., a thick one) connected to a good earth ground.
And really, don’t use high voltage with relays unless you know what you’re doing. Mistakes with even 120V power can kill you or someone else. Stick to the safe voltages (like 5V and 12V).
Relay Shields
A shield is distinct from other circuits in sitting atop a standard Auduino (such as an Uno) using the headers. This is simple to prototype, and with standoffs and screws to lock the two together can make a good permanent system. Several companies make relay shields for the Arduino.
The problems I’ve run into with similar motor shields is that it’s hard/impossible to isolate the Arduino power supply from the shield power supply, and in any real system that’s something you want to be able to do. Relays are electrically noisy and cause dips and surges in their power supply. That can affect the proper operation of the Arduino when they share a supply. It may not matter with one small relay that isn’t switched often, but with multiple relays if two switch together, things will get worse. Best to just avoid it with isolated power. Of the ones I know, only the DFRobot shield claims to do this.
DFRobot Relay Shield for Arduino V2.1, US$12
Compatibility: “Arduino Uno Rev 3”
Relays: 4x SPDT
Power:
Limits: 3A @ 24 VDC or 120 VAC (some material claims 5A with various voltages)
Requires an external power supply for relays (not clearly specified but I think it’s 7 - 12V @ < 200 mA).
Evil Mad Scientist Relay Shield V2.0 (kit), US$12 (also sold by Sparkfun)
Compatibility: “Arduino or compatible”
Relays: 1x SPDT
Power:
Limits: 5A @ 24 VDC or 40VAC
No option for independent power.
Seeed Relay Shield V2.0
Compatibility: Uno, Leonardo (and probably others compatible with those)
Relays: 4x SPDT
Power: 250 mA @ 5V
Limits: 8A, 35 VDC
No option for independent power.
Relay Circuit Boards
There are also circuit boards designed to drive relays without being pin-compatible with an Uno. This means you’ll have solder or screw-terminal connections on the relay board, and you’ll need some way to connect that to the Arduino. Connecting a wire with a pin on one end to the relay board and plugging the other into the Arduino header is good for prototyping, but it’s not a very reliable permanent solution. You’ll probably end up soldering to the Arduino in the end (or to a breakout shield plugged into the Arduino). These use SPDT relays (two inputs, one output) unless otherwise noted.
SainSmart markets a line of relay control boards with screw-terminal connectors. They also sell “solid state relays” that are semiconductors that work similarly, but these appear from the specifications to be limited to high-voltage (40 - 480V AC), low-current (2A or less, one model handles 5A) AC applications. So you could turn on room lights with them, but not a toaster or a model train. The documentation on these is terrible, but someone wrote a PDF manual for them, and it’s available from this page. However, it may not be 100% correct; for example it describes use of a 12V supply, and some of the boards are clearly using 5V relays (that’s printed on the side of the relay as part of its part number).
2/4/8 Channel Signal Relay Module (US$11, US$20, US$22)
This is for switching low-current signals (2A @ 30V DC or 1A at 125V AC)
Relay power supply 5V, amperage requirements vary but under 20mA/relay (larger ones are more efficient).
2/4/8 Channel 5V Relay Module US$6, , US$12
This has high-current relays (10A @ 30V DC or 250V AC).
There is also a 16-relay version that uses a 12V relay power supply (but is still controlled by a 5V signal) for US$16.
4/8 Channel 5V Relay Module (with opto-isolated outputs) US$21, US$27
This has high-current relays (10A @ 30V DC or 250V AC) with opto-isolation of the relay from the control logic.
Homebrew Wiring
Or you can do it yourself. As noted above, this carries with it some risks, but is going to be cheaper.
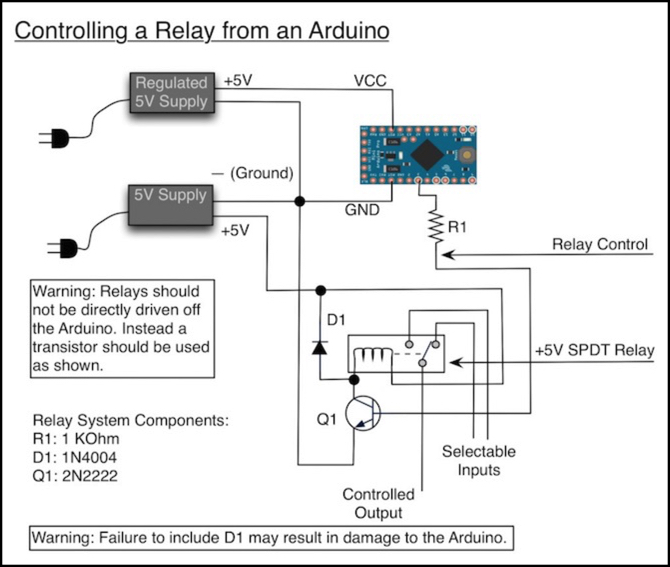
The above diagram shows how a single relay would wire up to an Arduino (using the 5V Pro Mini as an example). How this works is that the transistor (Q1) is controlled by the Arduino. When it is turned on (pin is HIGH) the relay’s coil can pass power from the supplies + line to ground, causing the contacts inside the relay to move to the “on” position.
A couple of key points to make:
- The transistor doesn’t use much power, so R1 is typically 1 KOhm and current requirements about 5 mA.
- The grounds for the Arduino power (upper) and Relay power (lower) can be shared.
- The positive lines of the two power supplies do not connect anywhere.
- D1 is absolutely essential.
Note: while the control current into Q1 is around 5mA at most (and much, much less once it stabilizes) the current through the transistor is the current through the relay coil. There’s a rating on the relay for this (and typical sizes are a few hundred mA for small relays), but there will be a much higher short-lived surge current to start. So oversize the power supply (a 1A supply for four relays should be a good choice).
So what’s D1 for, and why is it “backwards”? In the normal case, power won’t flow through D1 becuase it’s pointing towards the + line rather than towards the - line. But when Q1 turns off, the magnetic field in the relay’s coil begins to collapse, releasing the stored energy in it (it’s an inductor; storing energy is what they do). That has to go somewhere, and the transistor is no longer connecting it to ground.
Without D1, the energy builds up between the relay and Q1, causing a very sharp rise in voltage. Eventually this exceeds the rating of the transistors junction and it fails. When that happens the power can get to ground, but it can also get to the pin on the Arduino. You’ll definitely fry Q1, but you’ll quite likely fry the circuits inside the Arduino that control that pin.
Because D1 creates a path from the - side of the relay to the + side, it creates a loop, and power can flow out of the coil, around and back into the coil, being gradually dissipated as heat in the resistance of the coil. Which may seem a bit counter-intuitive (getting rid of the energy in the coil by stuffing it back into the coil), but without flow there’s no current, and without current there’s no heat, just voltage, which is why creating a path to allow a current to exist works.
The exact choice of R1, D1, and Q1 depend on the specific relay used. I’ve listed common ones for small 5V relays (and shown a separate 5V supply for the relay). You can use larger relays if you want, but you’ll need to adjust the circuit. Search the internet, and you’ll find a fair bit of advice on that if you need it.
