


Servos and Arduino
That an Arduino can control a servo-motor shouldn’t be a big surprise, although it was to me when I first discovered it. In hindsight, it’s obvious. And it brings whole new realm of possibility to what you can do with them on a layout. Google around, and in addition to the obvious (turnout control, semaphore signals and crossing gates) you’ll find people building animated engine-house doors, not to mention prairie dogs.
There are specialized controllers for servos, but you can do a lot with just an Arduino. There’s a simple servo-control library for them, allowing you to wire one up to a switch with a few lines of code, and have a fascia control to open an engine-house door for about US$15 (with a cheap servo and Arduino).
I have a separate page in the Model Trains section discussing servos themselves, so this page will focus on using them with the Arduino. I’ll have more to say in the future, but this provides a start.
Servo Basics
A quick recap of what a servo is: it’s a small motor with a reduction gear inside a sealed box (some of them you can take apart to replace worn gears). Typically the gearbox on a cheap servo uses nylon, and that’s good enough for most things. Some slightly more expensive models use a composite gear that’s a bit stronger, or you can buy metal ones, which might last longer. But really, nylon is fine. There’s one knurled knob on the outside (the “spline”), and to that you attach various arms that provide leverage. The arms are called “horns”, perhaps because some of them look like one. Four-armed star-shaped horns seem common, but one with a single arm is probably more useful in constrained mounting positions. You can buy extra horns from many stores, although getting one that fits your spline can be a guessing game. Horns are held on with screws, and have holes in them through which you can thread stiff wire use to push/pull something else. They could also pull on a string if there was a spring on the far end pulling back. A longer horn (or horn plus wire) can move something a greater distance with less force.
Servos are not stall motors, although some people insist on using them that way. The idea is to move them to a desired position without stalling, then turn the motor off. The gears will probably hold the servo in position, and if they don’t the controller should move it back. But you don’t want the motor running continuously. This is not a Tortoise, and using it like one will burn it out.
Servos come in several sizes, but the “micro” size, also known as 8g, is sufficient for most model railroad applications. One of these shouldn’t cost more than US$10 (and you can get cheap versions for less than half that).
Servos need their own power supply (a 1 Amp supply can probably run 3-4 servos, but using a 500 mA supply for one servo might be a bit lightweight; peak power can be surprisingly high). In order for the two to have a common reference, the ground wires from the servo supply and the Arduino supply need to connect together (but not the positive wires). The Arduino needs a single wire to the control line on the servo from one of its pins. Coded signals sent down the wire cause the servo to move, but you don’t need to deal with that detail; it’s handled by a library of servo control routines.
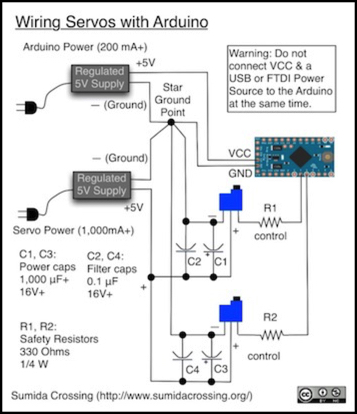
See the servos page for more detail on power wiring.
The Servo Library
First things first, if you have an Arduino, you already have their servo library. This provides several functions (all described on this page) that you can use to position a servo across its range of motion (most servos have a 180-degree range, from 0 to 180, although some are limited to 120 or even 90 degrees of motion). The torque produced by even a cheap US$5 servo is more than enough to move a fairly heavy object. You probably wouldn’t use one to lift a bridge, that’s more an application for a high-speed motor and a gearbox, but you could move a magnet under a street to have pedestrians cross at a traffic light, for example.
Servos typically move at a fairly high rate of speed, going their full range in around 1/4 to 1/3 of a second. The servo library has an example (the “sweep” sketch) of how to slow this down using simple delay statements. If you’re a programmer, you can write more complex programs, but just about anyone can edit an existing sketch to change timers and add things like an on/off switch (I recommend getting one of the starter kits that run around US$100 and just playing with switches and LEDs as a start, if you’re new to this, see my Software page for more on those).
Here’s an extract from the sweep sketch to show how simple this is:
for (pos = 0; pos <= 180; pos += 1) { // move from 0 to 180 degrees,  1 degree at a time
      myservo.write(pos);
      delay(15);              // waits 15ms for the servo to move
}

for (pos = 180; pos >= 0; pos -= 1) { // now go back
      myservo.write(pos);
      delay(15);
}
You need a bit more to set up the program, but not a lot. Programming an Arduino is designed to be something relatively easy for beginners to learn.
Mounting the Servo
You can get a lot of different mounting brackets for micro-size servos (I mention several on the servos page). But the simplest approach is just to glue a small block of plywood on the underside of your table (or expoxy on a block of foam, if you use a foam surface) and use double-sided tape to mount the servo sideways. The block holds the active end of the servo far enough from the table (if you use a “horn” with only one lobe, not one of the star shaped ones) and for most things, tape holds the servo in place reasonably well. You can also buy small brackets used to mount servos inside RC-controlled model boats or airplanes, if you want something more rigid.
