


Making Signs (and Sign-like Structures)
A city needs signs, and quite a lot of them. There are a number of ways to do this: commercial offerings, decals (including decals you make yourself) and scratchbuilding. But the latter approach is the only one that will give you variety, and it can be fairly simple in practice.
Note: this method could also be used to make decals, and decals may be preferable to printed paper for some applications, but it’s very hard to make decals with white areas, which can be problematic.
Found Photographs
I start with photographs of signs, in my case signs from Japan. These are quite easy to find using keyword searches in English on Flickr because many western tourists find Japan’s signage, and particularly its use of striking images, western celebrities and idiosyncratic English, to be noteworthy. You can also get suitable GIF files from commercial sites (company logos, etc) using right-click (control-click for Mac users) and “Save Image As..”
The ideal sign to use is one shot front-on in daylight or a well-lit interior, showing the complete sign with nothing in front of it. Dim or spotlight-lit signs make poor starting material. However, a sign doesn’t have to be photographed straight-on to be used, if you have suitable editing software. For these, the image needs to include things outside the sign, as part of the image is typically lost when skewing it.
Tools
To make a sign from a photograph you need something structural (i.e., the signboard) and the sign itself (a printed final version). You may have an existing signboard from a kit or pre-built structure, but for most situations you’ll need to make one from styrene (or cardstock if you’re making a paper structure kit, but I haven’t made any of those yet, so I’ll confine my comments to styrene).
For tools, I use a NWSL Chopper II for cutting strip styrene, as well as other tools such as an X-acto knife, plastic scribing tool, or even scissors as appropriate. When working with a knife, a steel straight-edge is an essential tool, and one marked in millimeters is useful for other purposes. A set of small needle files are useful for smoothing cut edges. A self-healing cutting mat is also very handy, although a sheet of glass can work (but you’ll dull blades quicker with that). I prefer the green style, which can be found in most craft stores and some hobby stores.
And for cutting out the final signs I used pair of small straight-bladed scrapbooking scissors, specifically a pair of Honey Bee non-stick craft scissors, with precise and very sharp blades, which I don’t use for any other purpose. I found these at a local crafts store, and you can probably find something similar, but they’re available from Amazon as well.
You’ll also need image editing software that can work with JPEG images (and being able to work with other formats, such as PNG, GIF and TIFF, may be helpful). The software needs to include a “layer” capability, as well as the ability to scale and skew images. I use Adobe’s Photoshop Elements for this.
Finally, you need a photo ink-jet printer (a normal ink-jet can work, if it supports use of photo-quality coated paper) and glossy photo paper ( I use 4x6 snapshot paper, as I don’t need much and waste less this way).
Although not specifically a tool, an appropriate glue (or glues) is also necessary. In addition to styrene glue for attaching plastic to plastic, a glue that can attach paper to plastic is also needed. And it should be an acid-free glue to avoid long-term yellowing of the sign. I use 3M Scotch Quick-Dry Tacky Adhesive. This is a thick acid-free white glue that is easy to spread and won’t run even on a smooth surface. It stays tacky long enough to reposition a sign, but holds them in position well until it sets, and sets quickly.
Sizing
If you’re working with an existing signboard, the size is a given (unless you decide to modify it to fit a found image), but for scratch-built signs the first thing to decide is how large the signboard must be. This depends on what it is used for, and where it is located. The same image may appear on a small sign within a train station, and on a huge billboard outside. In other cases, like street-side instructions such as speed limits or routes, signs are specific to their use and have a standard size. The best way to decide is to look at photos showing such signs in use, and decide the scale from surrounding objects, make a test image, and try it out on the layout to see if it looks correct.
When deciding sign sizes, I work in millimeters as these are easy to measure and most N-scale signs are only a few millimeters across, but you could just as easily work in fractions of an inch if you’re more comfortable with those.
Scratchbuilding and Resizing Signboards
A sign made from photographic paper needs some kind of support. I use styrene, preferable 1mm (0.040”), although thinner styrene could be used if well-supported. If you’re using a pre-existing sign that isn’t large enough, you can glue a new piece of styrene onto the existing one to enlarge it. What I did to make some large signs on a Kato passenger platform was to take one of the small signs (about 3mm x 10mm) and add a new board of about 3.5mm x 20mm to each side. I also extended the support posts using hollow tubes.
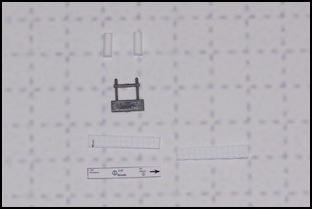

Sign Components and Finished Sign
When a sign needs to be mounted to something, rather than mounting it directly you can stand it off with a couple of small squares of styrene. There are times when direct mounting is appropriate, but more commonly setting it off provides a dimensionality to the sign, representing whatever structure would normally be used to attach it. When mounting a sign, be sure to sand paint off the surfaces to be glued.
Sign Mounting Points and Mounted Signs
Making Signs from Photographs
To convert a photograph to a photographic sign, it needs to be resized and printed. If the original photo wasn’t square it may also need to be adjusted.
1) First turn on the reference grid (View / Grid), then use the Skew (Image / Transform / Skew) to make the sign square.
2) Next select the sign with the rectangular marquee tool, and copy it, then paste into a new image (Edit / Copy followed by File / New / Image from Clipboard) and save the result as a JPEG (I usually use compression setting 8, High Quality). Note: it’s best to copy just inside the frame to avoid a color change at the border, but a small amount as seen below will be invisible in the final sign.


Adjusting a photo to make a sign (click on first photo for original); Photographer: Allergic to Work
Second image shows photo after Skew, third shows selected sign.
A sign may be a single image, or it may be a composite of several. In either case the process is the same. Each component is placed in one layer of a document sized to print on a single sheet of paper with reference marks on a separate layer to allow image size to be adjusted.
As I was printing to 4x6 photo paper, I created a Photoshop document (PSD) with a resolution of 300 dpi of 4x6 inches (1200 x 1800 pixels). Separately I created a 4x6 document in a graphics program of the same resolution, with marks every centimeter, saved it as a JPEG, then imported it into the PSD to create a reference layer.
Each image was added to a separate layer above this (the reference layer can be turned off for printing, but as long as the images layered above it are opaque it doesn’t matter since it only appears outside the part you’re going to keep). Then the individual images are resized (Image / Resize / Scale ) to the size needed, and repositioned (they can be dragged around while being resized).
If one sign contains multiple components, they can be positioned next to each other so that you only need to cut out the whole composite.
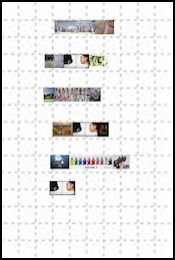
Composite of 15 images for six signs, and one sign (made from three images)
With the sign printed, it is cut to size and then glued to the signboard. Usually I attach the sign to the signboard before attaching the signboard to the structure, although it could be done in another order.
Other Uses
The technique can be used for things other than signs. For example, I’ve attached photos of the front of vending machines to the vending machines supplied with Kato’s new station platforms (20-120 Island Platform Set, etc).
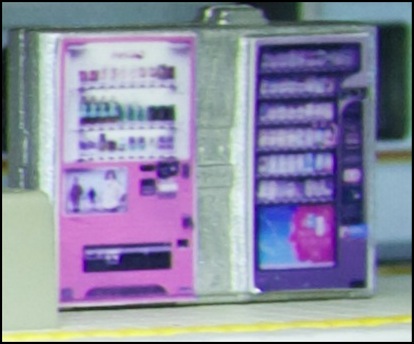
Photograph of vending machines mounted to Kato vending machines
