


Lighting Valance
I haven’t been entirely happy with my current layout lighting system. The existing one, which I developed following a series of tests a couple of years ago, uses track lighting with R20 floodlights containing Compact Fluorescent Lights (CFL). These are a compromise in a number of ways. First, they’re essentially spot lights, and tend to produce bright spots. Second they’re less efficient than tube fluorescents, but suffer from the same general problems these have (a green cast in photographs, and bulbs that contain hazardous mercury). I’d originally hoped to use incandescent or halogen bulbs, which is what I’d used in this track lighting system on my first railroad, but my tests convinced me that this would be even worse in terms of bright spots, and very power-hungry, which is mainly an issue due to the limits I have on outlets for the railroad to use and the amount of heat produced.
So at the time, I resolved to use the CFLs and keep (and even expand) my old lighting system. But I haven’t been happy with it. When I installed the new, higher, backdrops, the lights made bright spots on them which were very obvious. And CFLs have some risk of UV light escaping, which could fade both the backdrops and painted models. And finally, it still wasn’t producing enough light for good photography, and it was producing a fair amount of heat so adding more lights was not only an expensive prospect, but one that would make the layout room hard to work in during the summer months.
So, after living with it for a couple of years, I’ve finally reached the point where I want to replace the original system with one using fluorescent tubes. This page describes the new approach, and some testing I’m doing relative to that.
Note: I built these as plug-in modules, each with a plug and socket, so they can chain together, with the first connected to a grounded extension cord (of suitably heavy gauge). You could also make them permanently-wired (depending on your local electrical code). Particularly in the latter case (but also true of mine), these use wall current, which can easily kill you or start a fire if improperly handled. If you try to make these, please know what you’re doing, or hire an electrician.
What’s Wrong with Fluorescent Lights?
Fluorescent lights work by exciting an ionized gas to emit high-frequency (ultraviolet) light, which strikes a coating on the outside of the tube that absorbs it and emits visible light. This has a number of problems. First, the bulbs contain mercury, and are thus hazardous waste which can’t be disposed of in normal trash (they’re also dangerous if broken, since mercury is one of the last things anyone wants to be inhaling). Second, because they use UV internally, there is a danger that some will escape, and cause pigments in paint and photographs to fade. Third, because of they way they convert UV to visible light, they don’t output a continuous spectrum like an incandescent bulb, but rather emit a number of specific frequencies of light, which can be problematic for photography. Finally, older ones used 60 Hz directly, which caused the light to flicker visibly, and the fixture to emit an audible hum.
Modern bulbs address several of these concerns. Although they still use mercury, and have some risk of UV emissions, the latter has largely been eliminated by improved coating methods. The mercury risk to humans is also very low; the real risk is groundwater contamination if the coated glass ends up in a landfill. Also, electronic ballasts (the circuit that creates the high-voltage current to the bulb) operate at much higher frequency than the older systems, eliminating the noise and flicker problems. Finally, light quality has improved significantly, from CRI ratings in the 60s, to 85 or higher today (at least on specialty bulbs); still well short of the 100% rating of an incandescent bulb, but acceptable.
Still, the bulbs remain hazardous waste, and the light is not an even spectrum, which causes some issues for photography, primarily a faint green color-cast that needs to be removed during image post-processing. If LED-based lights were practical, they’d be preferable. But LEDs today have their own issues with photography (due to the same kind of spectrum issues that fluorescents have) and have a very high cost per lumen of output. It’s going to be some time before we see a cost-effective replacement for very bright fluorescent light tubes.
A Lighting Valance
Technically, the “valance” is the part at the very front of the assembly that blocks the light from shining in your eyes, equivalent to the “fascia” on the layout itself, although the term is sometimes used generally to describe the whole overhead assembly. What I’m really talking about here is a suspended light fixture that hangs above the layout table, with a valance on the front to bounce stray light back towards the layout. The idea is to have one of these that’s four feet long above each four-foot table on the two sides of the layout (I may keep the track lighting for the River Crossing scene, or do something slightly different there. Although the tables are two-feet deep, the fixture assembly is only one foot deep, to ease placement issues and make it lighter. Due to the rather complex ceiling above the layout (lots of pipes, ducts, wires and other junk) the fixtures hang on chains from the ceiling beams, putting them roughly at the level of the top of the backdrops (which stand 29” above the table surface).
Note: I’ve built two of these to experiment with over the Riverside Station scene.
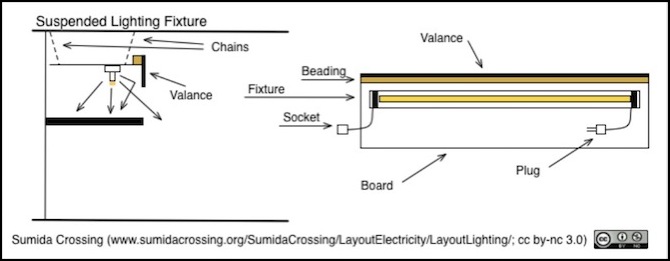
The structure of this is a sheet of 1/2” (12mm) plywood 1’ x 4’ (30.5 x 122 cm) with a strip of 3/8” (9mm) hardboard that sticks down about six inches (15cm). This is set high enough to not block my view of the backdrop. The hardboard is glued to a strip of beading (1x2 pine board) that is screwed to the plywood, so it can be removed and replaced if necessary. The inside (side facing the layout) of both the board and the hardboard is painted with white primer to reflect light toward the layout. Each fixture will have a plug and socket with a short length of cord, allowing me to link these together and connect them to extension cords. Initially I’m using one single-tube lamp unit per fixture, but if this turns out to be dimmer than desired, there will be room on the board to add a second.
My goals here are: first, to remove the “hot spots” created by the current track lighting, both the visible spots on the backdrop, and the uneven lighting on the layout. Second, to provide a better quality of light (the tubes I’m using are CRI 85, whereas the CFLs are some undocumented value in the 70s). And third, through the use of a plastic diffuser (which also helps with the “even lighting” aspect) to eliminate all risk of UV light.
Ambient Lighting
People working around the layout need to be able to see, and one problem with lights behind a valence is that they’re going to shed minimal light to the rest of the room. This may be sufficient if the rest of the room can be fairly dim. That may even be an advantage. But there probable needs to be some way to light the rest of the room brightly for work on the layout. I’m going to keep my existing track lighting system for this, and just point the lights away from the layout. This has the advantage that the lights are the same color temperature, so if I have both (e.g., to add more light for photography) on it won’t affect the colors on the layout.
Construction
The first order of business was to build one of these, and test it against my existing lighting to see how it compares. I actually bought the parts for two, so I could also test a dual-fixture approach if I wanted to, and if not I could build a second with the other half of the plywood panel I bought. I also bought the electrical cord on a 100’ spool, which will save me about 30% if I ever use it all, and it makes very good extension cords (I’ve used it before), so even if it doesn’t get used for the layout lighting, I’ll have a use for it sooner or later. I’m going to start by building both, but I can relocate the second fixture fairly easily (they’re held on by wood screws in keyhole-shaped holes for quick removal) if I want to experiment with two lamps on one section.
Parts List:
- T5 28W single-lamp fixture (Lithonia “MNS5 1 28 LP”), $28.97
- Phillips PLC46T528 Cool White bulb (4100K, CRI 85), $11.78
- Diffuser, 2x 2’ @ $3.98 = $7.96
- Plywood handypanel, half (1/2”, 2x4), $14.17/2 = $7.09
- Hardboard handypanel, one-third (3/8”, 2x4), $7.15/3 = $2.38
- 4’ 1x2 pine, existing stock
- 15A Plug, $3.48
- 15A Socket, $4.98
- Cord, black rubber SOOW 14/3, 10’ @ $0.71/ft = $7.10
- Zinc Sash Chain, 10’ @ $0.87/ft = $8.70
- Misc hardware & paint, ~$10.00
Total cost: ~$92 / fixture
After cutting and painting the wood, and letting it dry, assembly time is about two hours per unit, much of it spent on the wiring. The wiring isn’t complex, but since this is high-voltage AC, it pays to be slow and deliberate, and this is obviously not something to do if you aren’t comfortable with that kind of work in the first place.
Note: the fixture I’m using actually comes with a 3000K bulb of unspecified CRI that I have to discard (recycle). It’s possible I could find another fixture cheaper without one. Also, while there’s theoretically a 4’-long diffuser for this fixture, nobody seems to stock it, so I’m using a pair of 2’ ones, which fit fine.
These aren’t cheap, but they’re about the same cost as four feet of track lighting with four fixtures and bulbs, and maybe slightly less. However, nearly $70 of that is in the light unit and its wiring, so if I were to add a second, the cost becomes closer to $160. And I couldn’t find a compact two-tube fixture that could take a diffuser in my local supply store, although somebody probably makes one. I could have used T8 bulbs rather than T5 and saved a little, but that seems like a false economy given the better lifespan and lesser light-loss due to age of the T5.
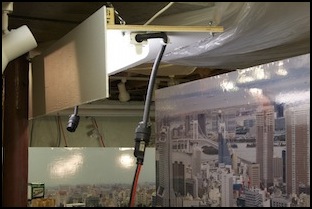
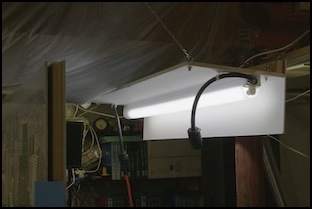
Front and Rear View of the new Assembly (the power cords will be tucked up out of sight in the final form)
With the first fixture built and tested, the results are quite good. I’m getting roughly twice the table-top illumination (using half the power) as with the track lighting, and it’s a more even illumination. It’s not perfect: because of the post seen in these photos, the edge of the valence is right above the edge of the layout, and so trains at the edge of the table don’t get much light on the front. Ideally, the valence would be a few inches in front of the first track. I may be able to do something about that by angling the fixture a bit, but space to do so is limited. I haven’t completely eliminated the reflection of the light by the backdrop either, although I don’t think it’s quite as bad as the spotlight reflections (as seen on the end backdrop on the right photo above).
But nonetheless, this is a success by any measure.
