


Detailing Buildings
Most of the structures on my layout are pre-built, or “ready to plant”, buildings from Kato, Tomix or other manufacturers. Some represent U.S. or European prototypes, but Japan has borrowed a lot of architecture from the west over the years, and one office building is much like another, so foreign buildings don’t need to feel out of place. It’s generally best to avoid bricks and stone-block construction, as earthquake-prone Japan makes minimal use of these materials. Minimal isn’t “none” however, and some Tōkyō-area construction with these materials predating the Great Kantō Earthquake of 1923 remains.
But to make these buildings look their best, some detailing is required. The Japanese ones typically come with stickers for signs, and sometimes additional railings or other small parts, to be added. Others may have signs pre-applied in other languages that need to be removed. On the other hand, many western chains (like McDonalds, Mobil gas, Shell, or Denny’s) have a presence in Japan, and so while minor signs will differ, the big ones can likely remain. These buildings are also pre-cast in colored plastic, and aside from looking like plastic, sometimes the colors just don’t seem right. Kato’s modular buildings also suffer from color variation, so if you try to build a taller tower our of several models, there may be obvious changes of color every couple of floors. For that reason, I typically paint them. Mostly that’s done with spray cans of model paint, although I also brush paint.
I should note that while I’ve had years of experience with plastic kits, and in my younger days did a lot of brush painting of models, my experience in the kind of painting I’m doing now is very limited. This is a new skill for me, and my descriptions below may not be of the best process. It’s simply the one I’m using at present.
Safety Notes
When painting with spray cans I work outdoors (or using a spray booth with an airbrush, but I haven’t used that much yet). The solvents used in sprayable paint are toxic stuff, and the propellant used in spray cans even moreso, so painting in air that you or anyone else won’t be breathing until it’s had time to dissipate is very important. Paint is also an aerosol, which means it is composed of very fine particles of color mixed with air (or other gasses) and this is very bad for your lungs if you breath it, so I always wear a respirator (the kind sold in home-improvement stores for painters) with organic solvent cartridges attached (the latter for the gasses used in the propellant; that’s less important with an airbrush although a respirator with particle filters is still a really good idea).
I also wear disposable nitrile gloves (the blue kind) when painting. Typically I use the powder-free variety, not the powdered kind sold for house painters, although you can use those and just wash the powder off; but you don’t want powder getting on the models while you paint them. The gloves keep the chemicals off my hands, as well as making clean-up easy between coats, as I can strip off the gloves and put another pair on. I buy these by the 100-count box at auto-supply stores.
Glue can also be bad for you. It’s best to work where there’s ventilation (near a window you can open for example), although when working for short periods with small amounts of glue I routinely violate that precaution, particularly in the winter. Some glues are worse than others, and while plastic cement for styrene isn’t good for you, the MEK glue used for ABS or other specialty plastics is really nasty stuff, and I avoid using it. Super-glue isn’t too bad, but you can’t use it on models with plastic windows, as it will give off gases long after drying that can fog the plastic. I have a page on Material Safety summarizing some of the information found on Material Safety Data Sheets (MSDSs) for glues and other chemicals if you want to know more.
Detailing Process
The process of detailing a building is pretty simple. First comes a research/planning phase, where I try to find photos (on Flickr and by googling for other online sources) of similar buildings in the area I’m modeling, to serve as inspiration. These can also serve as sources for signs as I’ve previously described, if the sign appears complete and close to straight-on. Next I’ll tear it down (most of the Kato ones simply snap together, or use a couple of screws, and are easy to take apart. Tomix can be harder, as they’re more likely to make use of glue. If you can’t take it apart, you’ll be more limited in what you can do.
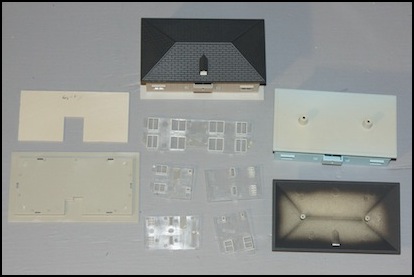
Two Kato Apartment Buildings, with one disassembled
Structural Changes
After it is apart it is time to make any modifications to the structure (cutting, or gluing in permanent changes). In some cases you’ll want to do this after painting, but in general it’s best to glue things when you can glue plastic to plastic without having to sand paint off the joint (and you always want to glue plastic to plastic). The lines on the “floor” piece show where I plan to put walls. Those will all eventually be covered by paint, although I’ve found a black sharpie line hard to hide, and won’t use that in a place that would be obvious. This part ends up being a ceiling when I’m done, and can’t be seen at all. The walls go on a separate sheet of plastic that rests atop it.
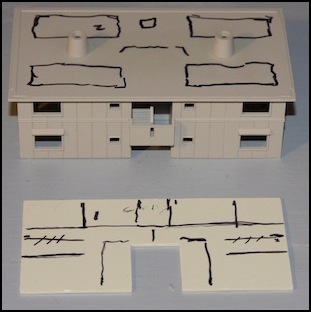
Planning the interior and cuts (for lighting in this case)
Cleaning and Painting
Even if these models hadn’t been collecting dust and fingerprints for several years, cleaning them would be the next step. This is important to remove any oils or other compounds left on the body from the manufacturing process or added later by handling (less likely where these were painted rather than bare plastic, but still a good idea).
I’ll wash the parts in lukewarm water with a small amount of dish detergent, scrubbing with an old and soft toothbrush where I can (but carefully, to avoid damaging small parts). I don’t wash the windows since I’m not painting them, although I may clean them separately. Washed, each part is carefully rinsed in running water to get all of the soap off, and then blotted dry with a paper towel and set down to dry on more towels. I may also use a can of compressed air to blow water out of corners, to make sure it doesn’t dry and leave sediment behind. The part will then be left to sit, typically overnight, to fully dry before painting.
Note: I wear gloves for this, partly so my hands don’t turn into prunes, but mostly so I don’t put oils back onto the model. As noted above, I use powder-free disposable nitrile gloves .
Painting usually involves a base coat color sprayed on the whole part. For a building shell, I’ll typically mask the outside with tape or “frisket film” and paint the inside with a couple of coats of flat black to serve as a light block, followed by a coat of white as a reflector. After removing the masking I’ll paint the outside in the final exterior color (I don’t usually mask the interior, as a little bit of overspray doesn’t really cause a problem, although I may block up windows with tape on the inside to minimize the overspray. Spray paint should be allowed to dry for a couple of minutes between coats of the same color, and for a half-hour or so before removing masking and doing the outside. However, if you let it set too long, then you need to wait 24-hours or more before painting, to let the existing paint cure. I’ll usually allow paint to cure for several days before masking again and doing a second exterior color, or before brush-painting detail colors (like silver air vents or similar).
I usually use the white paint that’s the final interior coat as the primer for the exterior, so the masking comes off before the white is added, then after that dries I’ll mask off the interior (to the extent needed) and paint the exterior.
My current preferred paints for this kind of work right now are Testors Flat Black #1249, and Tamiya Fine Surface Primer (L) (White), #87044. Both go on smoothly and need few coats for a complete finish, and both dry quickly between coats if properly applied. The Testors can notes that additional coats can be applied within three hours, after which you need to wait for 48 hours for the paint to cure before applying additional coats. The only downside is that it doesn’t take many models to use up a whole can of each, and I’ve taken to keeping spare cans on hand so I don’t get stuck (it’s a one-hour drive to the store where I buy them).
Interior and Exterior Painted, with some overspray on the inside
I always paint with “flat” paints. When using decals it may be a good idea to paint with glossy paints, add the decals, and then seal with a coat of transparent “flat” paint (Dullcote or similar), but so far I haven’t done a building needing that.
Interiors - Walls, Floors and Lighting
Some pre-made buildings have molded interiors, but many are just open space. At a minimum you need interior walls to keep people from seeing through the building, and while you can block windows with “curtains”, having every window curtained will look a bit odd. So some number of rooms ought to be detailed. You don’t need a lot of detail. Even with a big window, N-scale is small and these will be viewed from several feet away (except in photographs).
I start by deciding which rooms need to be visible, and where any interior lighting will go. Quinntopia is my go-to source for building lighting information, particularly his two-part series on LED lighting and his articles on the building’s he’s lit. I have my own info on LED Lighting (LEDs and LED Strips) but it’s more basic reference info. I’ll use yellow LEDs where I want to suggest older, incandescent-style lights, and white LEDs in the “warm white” variety for newer, yet still warm, lighting. I’ll use “cool white” LEDs where I want to suggest a harsher, bluer light, such as in parking lots and train station platforms (yellow could also work there, suggesting older sodium lights). However, the “color” of the LEDs will in part depend on how your layout is lit (unless you turn all the lights off). Any white LED is going to look bluish under incadescent lighting, and even a cool white LED won’t look all that blue if you light the layout with “daylight” fluorescents, as some do. I use a “bright white” compact fluorescent lightbulbs (around 4100°K), so anything with a lower number than that will look reddish (warmer) and anything with a higher number will look bluish (cooler) by comparision.
One important point is that the light should be near the window, shining into the room, so that figures and furniture aren’t backlit by it. This can be tricky to do in the limited space of a house, and one way around that is by not having physical objects in the room at all, but just photos of them on the walls. I’ve also found that “white” LEDs are quite bright, and placing one just millimeters above the scene to be lit may be too bright. Indirect use, however, can easily be too dim. I need to do more work on this.
But first, I need to build a wall/floor structure unless the building came with one, or modify the existing one (by adding walls, most likely) if I don’t think it’s correct for my needs. With that done, I’ll paint it black then white to create a opaque structure that will reflect the maximum amount of interior light off any untreated walls. I can then brush-paint walls and floors in rooms that don’t need scenery, or prepare photographs to be glued to the walls/floors as needed.
Here are photos I made of Tatami-mat flooring, in full 300-dpi size. Feel free to use them for your own models. Just download them, and print them (you’ll need to scale the print to the right size, or use an image-editing program like Photoshop Elements to put them together on a sheet that can be printed full size at 300 dpi. These were sized for some rooms I needed to fit, but you could easily cut out one mat and make your own arrangements for other rooms (again requiring photo-editing software).
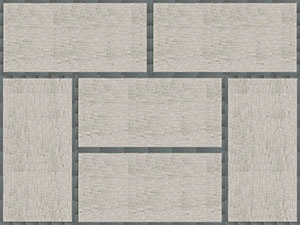
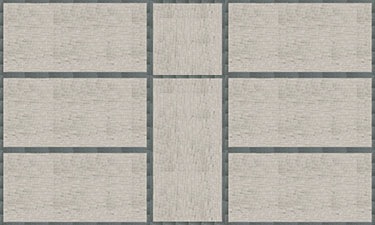
Six and 7.5-mat floor arrangements (N-scale: 225x300 and 225x375 pixels for 300 dpi printing)
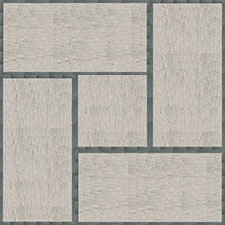
4.5-mat floor arrangement
Note: the photos were made from patterns taken from real online images that included tatami mats to get the color and texture correct, but I sampled small areas and replicated them to make mats, so this clearly falls under the Fair Use provisions of U.S. copyright law, regardless of the status of the original image.
Interior - Walls and Figures
Walls are painted as described above (first black as a light block, then white as a reflector, then hand-painted as needed). After this interior photos are added, as well as figures.
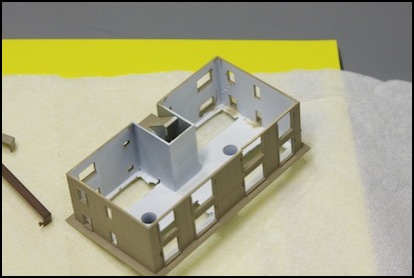
With a few photos selected and printed, I tested them out on the unpainted wall structure to see how the result looked:
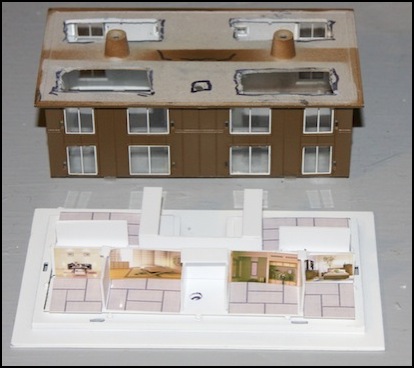
Interior wall assembly (unpainted) with photos of wall/floor detail
The interior gets brush-painted flat black in any areas I don’t want visible, in this case the central corridor and a couple of small windows that flank the entryway. Also note the hole in the floor in an out-of-the-way place, which is for wiring from lights above to go down. Finally I’ve put brown on the walls in case any of that is exposed around the edges of photos. I’m less concerned about that issue on the floor, as line-of-sight doesn’t tend to include much of the edge, so as long as I get the joint against the back wall correct, minor errors elsewhere won’t be too noticeable.
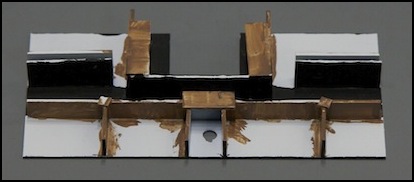
Interior wall assembly, with paint but no photos
The photos are cut to fit exactly, then glued in place with 3M Scotch Quick-Dry Tacky Adhesive. This is a thick acid-free white glue that is easy to spread and won’t run even on a smooth surface. It stays tacky long enough to reposition a photograph, but holds it in position well until it sets, and the glue sets quickly.
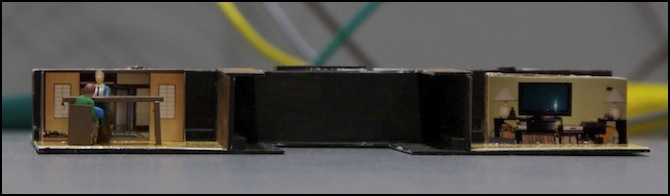
Ground floor front side, with figures and table on left
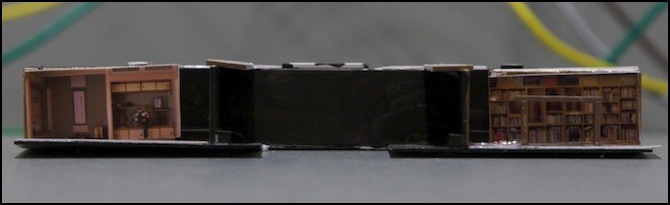
Ground floor back side
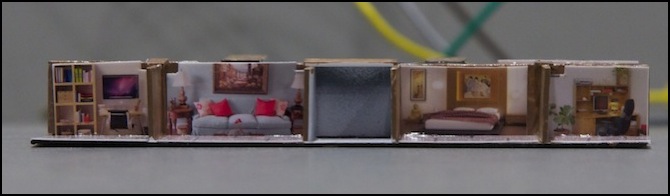
Upper floor, front side (note table in library on right)
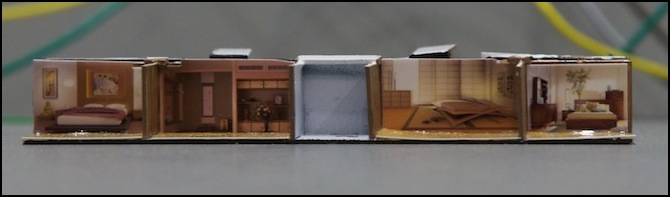
Upper floor, back side
Lighting
Lighting is an important feature: compare these two photos:
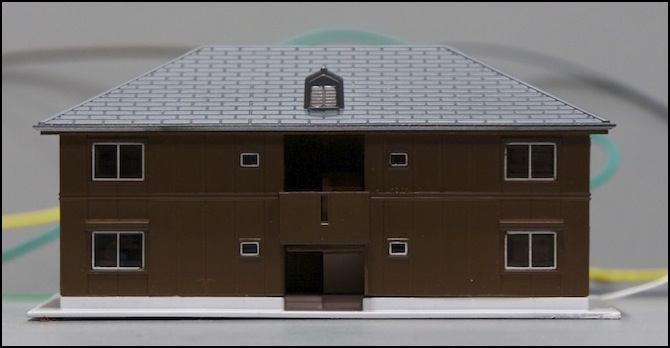
Apartment Building, unlit
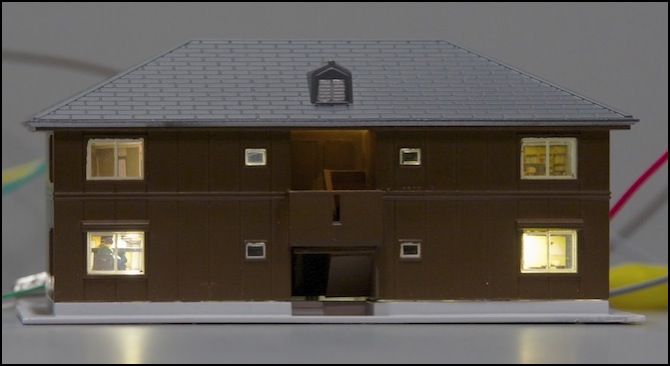
The finished apartment, lit
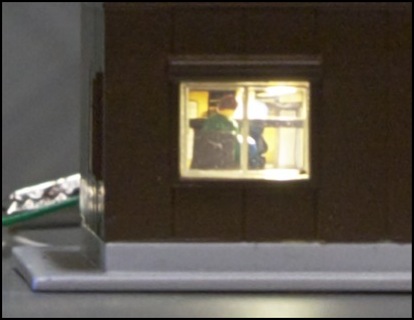
The figures at the dining table (ground, front)
To create the lighting, I used Warm White (3100K) LED Strips, a total of four.
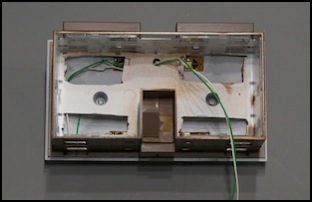
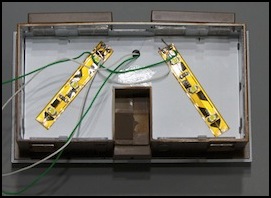
Installing the Lighting Strips (inside the roof, and under the upper floor)
