


Depth of Field
A camera has a “focal point”, a location at which the image is exactly in focus. This is actually a plane, and all points at that distance from the camera’s image sensor are in focus. But because you point the camera at one point on that plane to focus it, it’s usually called the “focal point” rather than the more technically correct “focal plane”.
As you move away from the focal plane, either towards or away from the camera, the image gradually becomes less in focus. This isn’t immediately obvious, due to limitations of the human eye, the recording media (film or pixels on a sensor) and the reproduction method (prints or pixels on a screen). As a result, there’s a zone centered on the focal plane that appears to be in focus, and as you move away from the focal plane, eventually things start to be come a little blurred, and then gradually more blurred. The distance in which things appear to be in focus is known as the Depth of Field.
But depth of field depends on several factors, and it is ultimately somewhat subjective: one person may see blurring where another does not. It also depends on how the image is reproduced: the same JPEG printed at 8x10 or reproduced on a screen as a 1024 x 768 pixel image will have two different depths of field. And in fact the same 8x10 viewed from three feet away will have a different depth of field when viewed at two feet. A lot of this is, however, rather subtle, and you probably can’t see the difference between the JPEG image on a screen at two feet and the 8x10 on the wall at two feet.
The conventional interpretation of depth of field dates from the film era, but most people consider it to still be applicable in the digital age. For a dissenting view, see this interesting discussion of why the current method of computing depth of field may be obsolete with modern digital cameras. The counter-argument is that while what he says may be true for certain kinds of landscape photography, it doesn’t invalidate the existing method, only renders some of the details slightly different and perhaps changes some of the techniques photographers have derived from those details. For the rest of this page, I’ll stick to the conventional interpretation.
Note: some of the formulas used for this (and much of my knowledge on the subject) came from this article by Bob Atkins. I also used Wikipedia articles on Depth of Field and the Circle of Confusion. Any errors are, of course, my own. For calculating DOF for specific cameras, there’s a nice online calculator here. Note: I didn’t use this for my examples, but instead calculate them, apparently using slightly different assumptions, so my numbers are a bit larger.
Circle of Confusion
There’s a fundamental limit in the ability of the human eye to resolve detail, just as there are fundamental limits of film or sensors to capture detail. One way to deal with these limits is to consider the smallest diameter circle that can be separated from adjacent detail as a unique point, given those limitations. This is referred to as the “circle of confusion”, and living up to its name, it tends to be confusing.
But fundamentally applying this concept is nothing more than high school geometry. If the eye can perceive things θ degrees apart as separate, then at some fixed distance D a cone of angle θ will draw a circle of diameter C. And a cone is nothing more than a triangle made solid, to be precise an isosceles triangle, where the two sides are equal length. A “typical” human eye can resolve an angle of one minute of arc, or 1/60th of a degree. The formula for the length of the base “C” of an isosceles triangle with angle “θ” and height (aka distance) “D” is derived from the formula for a right triangle, and is simply C = 2D tan (θ/2). So for an image viewed at a distance of 50 cm (500 mm), the size of the smallest spot that can be separately resolved is C = 2 x 500 x tan (0.01666/2) = 2 x 500 x 0.00014544 = 0.1454 mm. Thus, for a print hung on a wall viewed from 50 cm (about 19 3/4”) away, a typical person with 20/20 eyesight has a “circle of confusion” of 0.1454 mm. If the print were further away, the circle would be larger (at twice the distance, it would be twice the diameter), because the limiting factor is the eye’s ability to separate things by angle. Note: I’ve seen this stated in photography texts in a way that implies about twice the angular sensitivity, so a spot half that size. This may be the limit for people with very good eyesight, but I’m not sure why that commonly used value differs from the one I derived from other sources (the other number is 0.029 mm at 25 cm).
This gets applied in a number of related ways, to describe the ability of a camera sensor to discern details projected onto it by a lens, and for that to be mapped to points (circles) on a print or display which will then be viewed by a human.
Hyperfocal Distance
For any camera/lens/aperture combination there is a distance at which focusing causes all objects from there to infinity to become in focus. This is called the hyperfocal distance. The exact value depends on the definition of “in focus”, and what that means is subjective, but there’s a standard definition related to typical enlargement sizes and average human visual acuity. Actually there are several standard definitions (pick the one you like!). In the following, I used one calculated from the specific camera sensors and the standard “8x10 print at 50cm viewing distance” metric.
Example
Let’s compare two cameras, a Canon PowerShot G15 (street price US$450) and their EOS T3i DSLR (aka 600D aka Kiss X5, with street price about US$600 with an 18 - 55mm Image Stabilized lens). All prices as of mid-2013, with typical online discounts. For reference I’ve also used a Canon 5D mark III full-frame camera.
The G15 is a 12MP camera (3000 x 4000 image size), with a 28 - 140mm (equivalent) fixed lens, using a 7.44 x 5.48mm ‘1/1.7”’ sensor. Individual pixels on the sensor are about 1.5 microns apart. As “point and shoot” cameras go, this is a very good one, with the ability to export RAW image data and fully manual exposure control. It can focus as close as two inches (5cm) in normal mode, and closer in macro mode. At f/11, with the lens set to 50mm equivalent, the hyperfocal distance is just under 1 meter, meaning that if you stand one meter (39”) back from the front of the layout, and focus on the fascia, the entire layout will be in focus regardless of depth.
The T3i is an 18 MP camera (3456 x 5184 image size), with a 29 - 88mm (equivalent) removable lens, using a 22.3 x 14.9mm “APS-C” sensor. Individual pixels on the sensor are about 5 microns apart. Like any good entry-level DSLR, this has fully manual controls as an option, and can export RAW image data. It can focus as close as 9.8” (25 cm) with the lens used in this example (which is a standard lens often sold with the camera). The hyperfocal distance for this camera and lens (with the same assumptions) is 2.6m (102”), which is a rather impractical distance to stand back from a layout.
The 5DmIII is a 22 MP camera (3840 x 5760 image size), with an assumed 50mm lens for these examples, using a 36 x 24 mm “full frame” sensor. Individual pixels on the sensor are about 6.25 micros apart. he hyperfocal distance for this camera and lens (with the same assumptions) is 4.9m (192”), which is also a rather impractical distance.
The hyperfocal distance may not be all that useful anyway. For one thing, calculating it is a pain and it’s different for every focal length and aperture combination you use. Additionally, the field of view is going to be pretty wide at that distance. So you probably want to get in closer to take useful photographs, and that means that you’ll have less than infinite depth of field with either camera.
It’s also important to mention that depth of field grows exponentially as you approach the hyperfocal distance, so even if you can’t focus at it, focusing close to it will have an advantage.
Let’s assume you want to place the camera 2’ (61 cm) from the subject of the photograph. The total distance in front of and behind the subject in which things are “in focus” (for a typical observer at a typical enlargement) is going to be 131 cm (51”) for the G15 and 29 cm (11”) for the T3i (again assuming f/11 and a 50mm-equivalent lens). The full-frame camera has a DOF of just 14.1 cm (5.6”). I’m leaving the math off here because it’s rather complex.
I don’t have a G15 or a T3i, but I do have a 40D which has the same sensor as the T3i, as well as a full frame camera. Here are a pair of test photos I took. The camera’s lens is located at the end of the wooden ruler, and in both it was focused on the near corner of the brown house on the right, roughly in the middle of the red ruler and perhaps 20” (~63 cm) from the camera’s sensor. Both were taken with the lens at 50 mm equivalent (actually 28 mm for the 40D, which is close to the needed 30 mm) and at f/11.
Now these images are 650 pixels across (unless your browser rescaled them), or a bit more than 7” across on a typical screen. So you need to view them from slightly closer than 50 cm to get the same angle as that “8x10 at 50 cm” image.
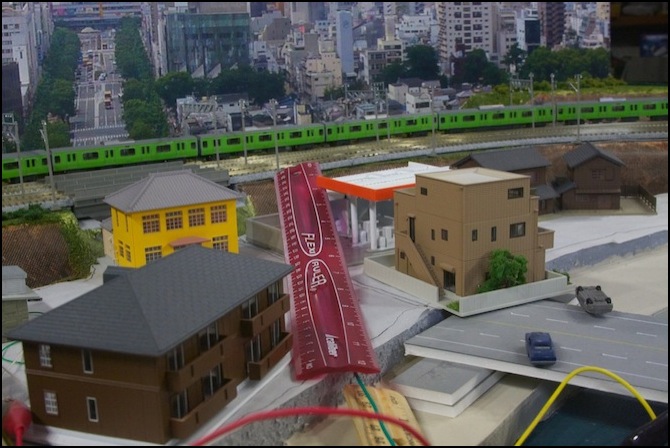
40D Image (APS-C sensor), focused at ~18”
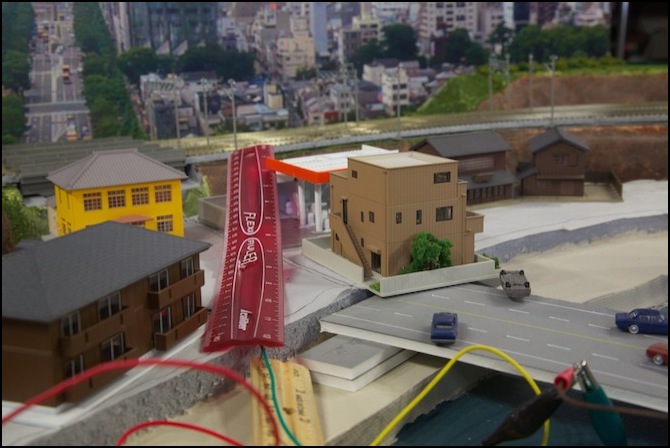
5D3 Image (Full Frame sensor), focused at ~18”
What you can probably make out is that the full frame sensor blurs both ends of the red ruler significantly more than the 40D does. In fact, if you look at the backdrop, it’s noticeably crisper in the 40D image. So while I’m not sure if it’s exactly the 29 cm (11”) vs 14 cm (5.6”) difference predicted, there is a substantial variation between the two. And by extension, a smaller sensor would be significantly better than that of the 40D in placing the whole scene crisply in focus.
You can increase the aperture beyond f/11, but as this gets larger, the actual aperture (opening) inside the lens gets smaller, and a blurring due to “diffraction” starts to become a problem. Thus it is usually better to choose a smaller sensor to improve depth-of-field at typical layout distances, rather than trying to stand further back or increase the f-stop beyond f/11 or perhaps f/13. Nothing is free, of course, and cameras with smaller sensors are more prone to poor quality images due to the small lenses they use, and increased noise due to the smaller sensors. The smaller sensors also require more light, leading to longer exposures and more vulnerability to vibration.
Now let’s look at a couple of less-expensive cameras. First up, a decade-old Olympus Stylus 400, a 4 MP camera with essentially no customization. You can set a style present, and I chose Landscape in the hope of maximizing depth-of-field. You can also set white balance to auto or one of four presets. I chose Auto, which produced “ok” results in two our of three images, and gave the third a bright pink tint for no apparent reason. I adjusted the white balance and exposure somewhat. This also resulted in exposures around 1/10 of a second, so I used a mini tripod and the camera’s self-timer.
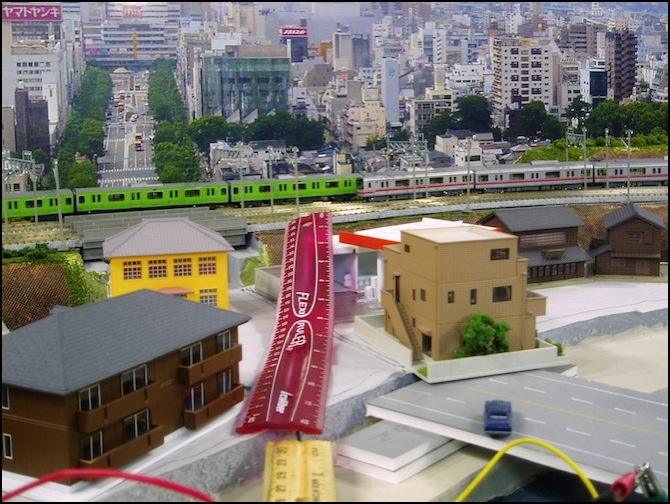
Olympus Stylus (1/2.5” sensor, 4.29 x 5.76mm) - f/3.6, 1/10-sec, ISO 125
The first thing to note is that it only closed the f-stop to f/3.6 (the camera can go to at least f/5.6, and its widest is f/3.1), so we’re not getting full advantage of the potential of the small sensor, thanks to the preset. With this, I could either get the back half of the scene in focus (as above) by focusing on the far end of the ruler (which left the light brown building slightly blured but acceptable and the dark brown building visibly blurred) or the middle of the scene as shown here. The trains and backdrop are slightly blurred here, but it’s not very obvious unless compared to the sharper photo. This is about an 8 - 10” depth of field. It’s not really better than the APS-C sensor, because the camera couldn’t be set to optimal settings, but it does appear to be slightly less blurred at the extremes.
Next is a photo taken with my iPhone (an iPhone 4s), using the 645 Pro app (which let me lock focus on a particular point). The camera was hand-held, but braced on the bridge. I couldn’t get it to zoom in (I don’t use this camera much, so I may have overlooked something), so I cropped the image to match the framing of a 50mm lens. The iPhone has a rep for good low-light photography, with a well-made lens for clear pictures. It also uses a tiny but 8 MP sensor, so it ought to have good depth of field and lots of detail (most of the latter I throw away resizing for the web page since a JPEG here is about 0.3 MP).
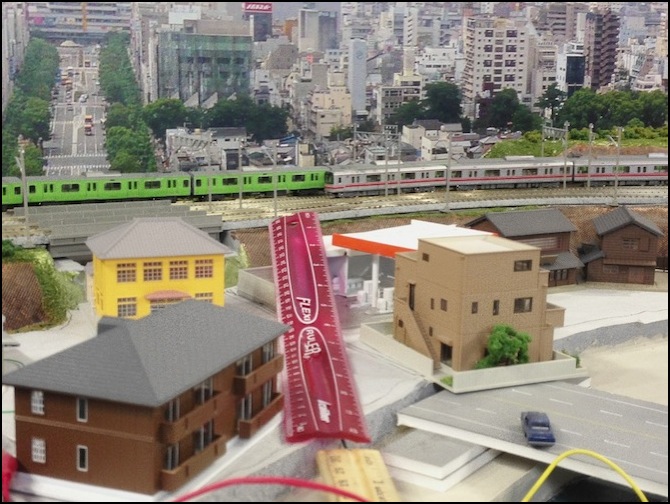
iPhone (1/3.2” sensor, 3.42 x 4.54mm) - f/2.4, 1/15-second, ISO 50
What I saw was terrible. First, the f-stop is fixed at f/2.4, and it set shutter speed to 1/15-second, and ISO to 50. This would allow me to either get the backdrop and trains in focus and the buildings blurred, or the buildings (mostly) in focus and the trains blurred. The 1/15-second speed appears to be the slowest shutter, but it’s not clear why it’s choosing such a fast ISO (it could have made the shutter faster to reduce shake by increasing ISO). There may be apps that give you better control over shutter/ISO (or perhaps mine does and it just isn’t obvious), but depth of field depends on the f-stop and sensor size, and those aren’t changing. The camera appears to be optimized for shallow depth of field.
Follow-up: on further reading, this is a known problem of the iPhone: it always makes a bad tradeoff of ISO vs shutter speed indoors, and usually keeps shutter speeds around 1/15 - 1/20 second. The hardware is actually much more capable, but apparently it was programmed by an orangutan, or at least someone who doesn’t understand how cameras work. And all of the apps that claim to provide “control” and “manual” modes are only talking about control over focus points, not over ISO or shutter speed. Neither of those is exposed in the current API, making it impossible for any App programmer to provide control over them. The iPhone is not a good choice for layout photography today. This could change, as iOS 6 had some private (meaning only used by Apple) APIs that allowed such control. If they become public in a later iOS, better Apps could be created.
Summary
To wrap up: a cheap point-and-shoot probably isn’t going to do the job, because camera presents just aren’t designed for this kind of photography, nor is a smartphone the right tool for the job. A point-and-shoot with greater control (aperture priority) or a fully-manual camera is going to work better. That said, even the 4 MP Olympus produced wonderfully crisp photos used with a timer and tripod. You could make a dumb point-and-shoot work. And you don’t really need a whole lot of camera to take this kind of photo. Certainly even an entry-level SLR is massively over-qualified for the task, and generally too bulky to fit “in” the scenery.
