


A Final Track Plan, I Hope
11 February 2010 23:27 Filed in: Design
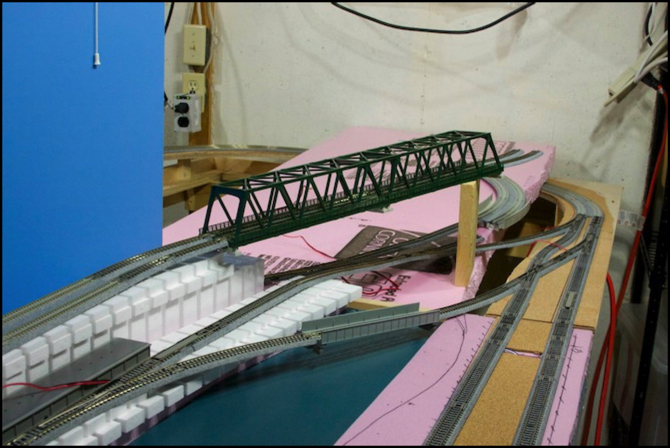
I spent most of the last month refining the track plan, first with the height and approach tracks of the Urban Station, and more recently with the mess of track at the right end of the Riverside Station scene (above). This last part has always been a headache, as I just couldn’t get everything I wanted to come together.
I finally set up some temporary track, and decided to see just how far reality could differ from a strict track plan in a software tool. The answer is quite a bit, due to the flexibility of the unijoiners between track segments, although there are some risks with electrical connectivity or derailment if you bend a supposedly straight track too far. However, it didn’t take much to come up with something that appears to work. I won’t know for sure until I actually build the supporting structure for it (the test track above is just set on a sheet of foam I leaned against the table, and is the wrong height and angle to actually try running a train across it).
The final design lets me use both tracks that diverge from the commuter line in their appropriate direction (the commuter line is yellow on the track plan, the diverging tracks are dark blue). This involved connecting each to both the planned helix, and to the subway tracks, as can be seen in the photo above. At first I didn’t think that I could connect to both sides of the subway, but after a bit more thought, I realized that the wider spacing of the tracks in the underground station gave just enough room to do it. I did have to use three of the Kato expandable track segments to make all the straight pieces match up, but they do. See the photos in the Construction photo album for the above picture and a couple of others (including the original “only connects to one side” version of the subway tracks).
Assuming that it actually works with real benchwork and trains, I can now smoothly run trains in and out of the hidden storage tracks to the commuter line, and between the commuter and subway lines, without needing to reverse the trains in an unprototypical manner. That’s important, since operating through trains between the commuter and subway loops is something I want to do. It’s prototypical for a number of lines, and it gives me four stations a commuter train can reach, rather than just two. A move from storage to subway will need to come up to the (blue) platform track, then reverse into the subway, and may have to cross from outer subway track to inner, if I want to run it counter-clockwise (remember that Japanese trains run on the left). But that’s not going to be the usual way I’d operate during a session (more on that another time).
Now that it’s done, I’m starting to work on carving and gluing the second layer of foam down. This is the 2 inch layer that raises the commuter/rapid tracks above the subway tracks on the first layer. That means the Subway loop (the only working track at present) is out of operation for a time, but when the dust settles I should have the Commuter loop and Rapid/Shinkansen loop closer to operational. But for now, the end of the table you can’t see in the above photo is quite the mess. I’ll eventually add some photos to the Construction pages.
Maybe I’ll even get plaster down, and paint at least the River Crossing scene grass-green. I’m getting really tired of pink foam.
Other site updates:
- Updated the track plan to reflect the final arrangement (also updated the copies in the Diagrams album).
- Added a “roster” page for Subway Trains, to contain my newest addition, a Greenmax Tōkyō Metro Series 10000. Although this train is used on run-through service with some surface commuter lines, it was developed as a general-purpose subway train, to replace the aging 7000 series developed in 1974.
- Added photos of my more recently acquired trains (in both the photo album, and the roster pages). These include a Chūō E233, a Sōbu Series 205, an E351 Super Azusa, and the Tōkyō Metro Series 10000. Most of these trains were bought last fall, and just never photographed for the roster page until now.
- Added some photos of the test trackwork described above to the Construction photo album.
