


Viaduct Station Extensions
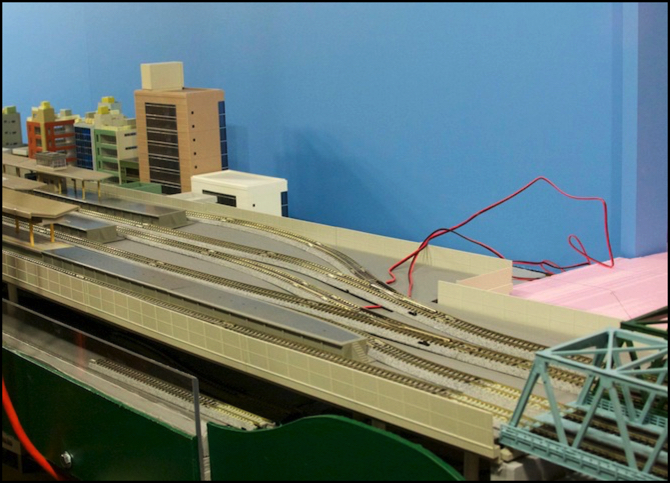
The elevated station was originally intended to be made entirely using Kato’s Viaduct Station (23-230) and Viaduct Platform Extension Set (23-232) sets. The problem was that at the ends, the flat supports I was using to hold it up would come down into the space needed by the subway train, and raising it up another quarter inch wasn’t very desirable. Without those supports, the plastic tended to sag where it was unsupported.
The solution was to use a method described by cteno4 (Jeff) on the JNS Forum: a sandwich of hardboard for strength, foamcore to allow the plastic sides to snap in (and to make it the same thickness as Kato’s platform) and a topping of styrene (or linoleum) to waterproof and strengthen the surface. I’m using this, although at least for now I’m leaving off the top layer. Additionally the center section of the station remains plastic, since that part was okay, although considering how well the two end sections turned out, I may eventually replace the middle section also.
In the above picture, can you tell which part is new and which is the Kato? There’s a larger picture in the Construction photo album, and I’ll provide the answer at the end of this posting.
There’s a diagram of the structure cross-section in the Diagrams photo album (it’s also on the “phase 2e” Construction page).
Construction was fairly straightforward: cut the hardboard, drill some holes where the supports fit into it, glue down the foamcore, paint the underside of the hardboard, and snap on the plastic sides from Kato’s Viaduct Platform Extension set. The hardest part was snapping on the sides. One important lesson: put the smooth face on the bottom if the hardboard is only hardened on one side (I did one each way, because I did the first one wrong and put the rough side down). The soft face tends to peel when the side is pressed into it (this can be repaired by pressing it back together with a pair of pliers), which made it much harder to attach the sides on that end.
My platform is 14 sections (each 248mm) of the Kato sets long. That’s 11 feet 5 inches, extending into both the River Crossing scene and the “unsceniced” end. Had I built it entirely of hardboard and just bought the platform extension sets to get the sides I would have needed only four sets, as each comes with four low walls and four high walls with windows. As it was, I used about three times that. Someday, when I have a larger basement, I can build two more elevated stations.
But this is a major milestone. I’m finally ready to put the track in place semi-permanently (at least until I start working on the “scenery” of the subway station), and between this, the River Crossing scene, and the unsceniced end, I’ll have three-quarters of the loop completed on both subway and upper levels. Now I need to turn my attention to the Riverside Station scene, although I’ll probably fix a few loose ends here before I get to that.
Other website changes:
- I’ve updated the “phase 2e” Construction page with some additional photos, as well as more info about the work I’ve been doing in the “unsceniced” end section.
- I’ve updated the Urban Station scene page with some of the same photos (the “scene” pages will change to reflect the current status of each scene, while the “construction” pages will remain as they are to provide a history of the evolution of the layout.
Answer: the hardboard runs from the bridges on the right, to just about where the tiled platform ends to the right of the orange extension cord (three 248mm side sections attach to the hardboard, and the fourth is part of a Kato platform.
