


DC Signals I: Kato
27 June 2011 22:22 Filed in: Electrical,DC
This is the first of what will probably be two postings about simple trackside signals for DC layouts. This one will discuss the basics common to the Kato and Tomix signal systems, and then provide details about Kato. Since I’m partly looking at the Kato to see if it’s a good candidate for modification for my DCC layout, I’ll have a few comments on that as well. A future posting will cover Tomix’s richer offering, which I’m looking at for use on my DC Urban Tram Layout (which will probably use the Tomix signals), although the four-color signal heads might be something I could use for my DCC layout (nobody in the U.S. makes a four-lamp signal of this kind).
Without modification, both brands of signals are for use on DC layouts only. In fact, use with DCC has been reported to damage Kato signals, although I haven’t attempted to verify this. Both operate on 12 volt DC power. And both are based on a simple timer system, where each signal operates in isolation from any others on the layout, based on the time a train most recently passed it.
Both are “color light” signals with multiple lamps arranged vertically on a single target. This style is common in Japan, and is prototypical for some U.S. railroads, but not all. Kato makes only one model, with three lamps, in a Green / Yellow / Red arrangement, while Tomix makes several different sizes (two, three and two different four-light heads).
Kato Signal
The Kato signal is part 20-605, which has a MSRP in the U.S. of $45.50 per Kato’s website, although discounting is fairly common. The Japanese version has an MSRP of 3,675 yen ($45.48 at current conversion rates), although again this can be found discounted.
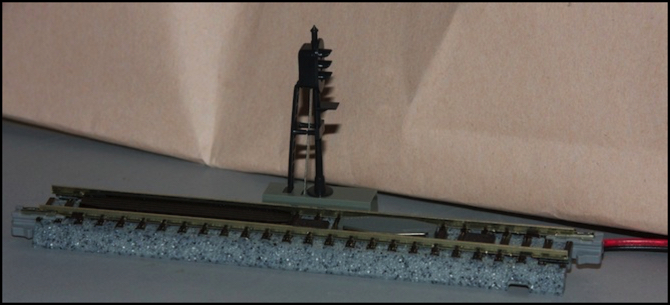
There is a very important distinction between the U.S. and Japanese models, however: despite the same part number being used for both, they are located on opposite sides of the track and cannot be reversed. In addition all of the U.S. ones I’ve seen use a black pole, while the Japanese ones use a black target face and ladder with a white pole (or at least all the photos I’ve seen do; I haven’t bought one). What prevents the signal from being reversed is that the circuit board carrying the power up to the signal (seen in the photo above between the ladder and pole) is soldered to the main circuit board, and located to one side of the signal; Kato obviously uses a slightly different main circuit board for their Japanese signals.
The Kato signal is mounted on a 124mm (4 7/8”) section of Unitrack. The base of the signal is narrow enough to fit between two parallel tracks at Kato’s standard double-track spacing without intruding on the space marked by Kato’s standard blue clearance gauge, but only barely; a taller than usual car might hit the signal target, and a wide car would likely hit the number placard on the front. The U.S. version is mounted to the right of the track, as is appropriate for right-side Engineers on U.S. trains. The Japanese version is mounted to the left, as is appropriate for left-side Engineers there.
DC Operation
The Kato signal acts on two inputs, the polarity of track power (which indicates the direction of travel of the train) and the detection of a metal wheel shorting the sensor on the track. The green light is normally lit. If a DC voltage is present that would cause a train to move from the back of the signal towards the front, the red light will be lit instead, indicating that it would be dangerous to pass the signal.
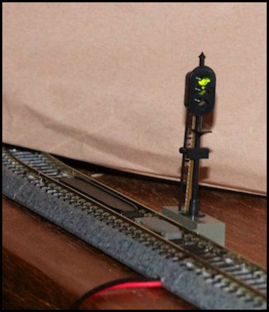
Signal Lit
With a train moving towards a green signal from the front, the signal remains green until the first wheel of the locomotive shorts the detector (the barely-visible metal strip on the gray diamond between the tracks in the photo above). This happens about the time the nose of the locomotive passes the signal. A timer starts when the signal is set red, and is restarted each time another metal wheel shorts the detector (cars with plastic wheels won’t short the detector and thus aren’t resetting the timer). Approximately 3-5 seconds after the last metal wheel has shorted the detector, the light changes to yellow. After another 3-5 seconds, it turns green if another train hasn’t come along to turn it red. Kato says the timer is 3 seconds in all of their documentation, but both of the signals I have take about 4.5 seconds to switch colors. At a scale 100 kph (62 mph) that’s about long enough for a train to move a meter (or yard) past the signal before it turns green again, which is rather short but works well for small layouts and short trains.
The signal requires a 12V DC source, and the documentation says it draws about 50 mA (I suspect that’s peak, rather than continuous, unless it’s wasting a lot of power somehow). You could probably use just about any fixed-voltage 12V DC supply, although I haven’t tried that. Kato makes a box that can power up to three signals from inputs at 12V DC or 17V AC (and probably at intermediate voltages), the Automatic Signal Power Supply (24-844). To use this with a Kato power pack, you need the Accessory Adapter (24-829), which clips on the side of the Kato power pack along with any turnout controls. The adapter just connects the throttle’s DC output to the Signal Power Supply cord, and does nothing more. For each three signals you’ll need another adapter and power supply. To use the Signal Power Supply with an ordinary DC throttle having a 17V AC accessory output, just cut off the connector from the power supply’s cord and wire it up.
While simplistic, this behavior actually looks pretty good in practice, unless you make a point of stopping just past (or across) the signal, where having it cycle to green would be quite wrong, or running long trains where the gap between them would be too small to look good.
Use with an External Driver Circuit
I’m eventually going to signal my layout using the Digitrax SE8C with TSMK, which provides a 5V DC output with a 100 ohm dropping resistor to each lamp, with up to six lamps per TSMK (one four-to six aspect or a pair of two to three-aspect signals per TSMK). This is suitable for driving a typical 20 - 30 mA LED directly, or a more sensitive LED with additional resistance. It would be too low to drive a 12V bulb, however, so knowing the required voltage at the signal is important.
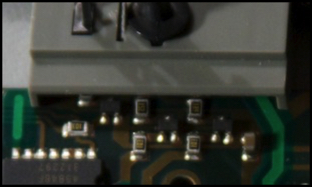
The Kato signal could be converted to be driven by an external circuit by cutting traces on the circuit board and soldering to the leads, but given the tight constraints under the non-removable plastic housing, removal of the gray box (by cutting) and replacement with one fashioned from styrene would likely be required. Because part of the driver circuit (some four-lead chips I haven’t identified and a pair of surface mount resistors for each light) is right under the edge of the gray plastic housing, the traces cannot be cut elsewhere, or at least not obviously. The resistors nearest the signal appear to be 1500 ohm (marked “152”), which suggest a surface-mount LED is being used (on a 12V source, R=1500 would be correct for a 2 volt LED drawing 7mA, typical values for a surface-mount LED).
If you’re curious, I’ve placed additional photos of the circuit board in the Electronics photo album.
Aside from the difficultly of connecting to it, I think the Kato signal would be a good match for the TSMK. Given the high cost of the Kato signal, and the difficulty of conversion, I’m probably better off using a signal designed for the purpose, such as Tomar’s N856, which lists for $21, but retails for about $16, less than half the cost of the Kato signal.
Kato Signal driver circuits
Other website changes:
- I’ve added some more material to my DC Signals page, but that will gain yet more once my Tomix signals arrive later this week.
- I’ve added diagrams to the page about my expressway, and put larger versions on the Diagrams page. I also updated the Tōkyō Expressway page with additional reference photos.
- I’ve created a page to track construction of the Urban Tram layout, including information about the backdrop I’m making for it. I also added a photo to the Urban Tram Photos page. Construction is ongoing and I may have an update soon.
- I’ve updated my Roster and Subway pages to add the White Kato “Centram” light rail vehicle I broke down and bought on impulse the other day (in my defense I’ll note that it was selling well below the normal price).
- I’ve added a couple of more photos to my Background Photos page, including the one I ended up using for the Urban Tram layout.
