


In Search of the Perfect Post
Hi, My name is Ken. I’m a perfectionist, but I’m in recovery.
One of the hardest lessons in model-railroading, at least for me, has been that “good enough” really is good enough. I spent fifteen years on my HO layout doing very little, in large part because what I did do fell short of what I’d set out to do, and I’d get frustrated and go do something else for six months. With Sumida Crossing, I started with the premise that I wasn’t trying to do a picture-perfect layout of the kind featured in magazines. Neither my skills nor my available time were up to that.
And I’ve mostly succeeded. Version 1 was a loop of Unitrack on a table, with an eight-foot long sheet of “grass” and a bunch of ready-built structures plunked down without any roads, just gaps between them. Artistic it wasn’t, but I had a lot of fun with it. The current layout attempts to do more, but it’s really just “Unitrack on a table”, with a bit more sophistication. The scenery is approximate (for a long time the best was just a coat of green paint over carved foam), the track isn’t ballasted, and the structures are the same old ready-to-plant ones except for a couple of recent additions.
It hasn’t all been smooth: the expressway has languished for over a year with just 1/8th of it “finished”, because I ran into a snag on one section and set it aside. I haven’t gone back to it, because all of the solutions I could come up with were compromises of one form or another. I really need to accept that it’s not going to be perfect and just do it.
When I started keeping this blog, one promise I made myself was that I’d post something, anything, weekly, just to avoid stagnation. And that’s been a spur to continued work on the layout. The need to have something to write about helped keep me interested past the rough spots of the work. I didn’t actually write about the layout itself every week, but my limited store of other things to discuss kept me coming back to it. And as a result, I’ve made far, far, more progress in the past three years than I did in fifteen years on the HO layout, and I’m still having fun with it. That’s success in my book.
But the pace of work has shifted. In large part this is because I’m now working on things that take weeks to accomplish, and intermediate reports aren’t all that interesting when all you have to say is “I painted the body, waited three days for it to set up, and then painted the walls”. Yep, about as exciting a post to read as watching the paint dry was.
This summer, with less to write about, I ran out of weekly topics to post about (time lost to external distractions didn’t help).
And after I got out of my weekly pattern, getting back in turned out to be hard. After all, if I’m going to restart, I don’t want to start on a “watching paint dry” post, I want to have something interesting to say.
And I had just the topic in mind: converting my newest E233 to DCC and adding interior lighting. It was similar to my earlier discussion about DCC and Lights for these cars, but with the added wrinkle that it was one of the newer models that touted compatibility with the new “version 2” lighting, and the manual failed to mention EM13 motor decoders even though it discussed cab and interior decoders. Plus it had double-decker cars, and I’ve never lit one of those. Lots of material for a substantive post in that.
I just had to do that work, and how hard would that be?
Well, hard, it turns out. First, the train works fine with an EM13. But getting there wasn’t trivial. It’s absolutely identical to my previous E231. My problem was with the DCC base station (a DCS100) on my layout, which wouldn’t provide track power. This led to a long and fruitless search for a short, before I finally tracked the problem back to the base station, which just wasn’t working, and reset it (thankfully it worked enough for the “reset to factory defaults” command to be accepted). Then I discovered that the decoder I’d installed was defective (I’d thought it was one of the ones I’d previously tested and confirmed good, but apparently not).
I finally got it running, and proceeded to start working on the interior lighting for a double-decker, thinking the combination of the two would make for a “perfect” post to get back into the cycle of things. I think you can see where this is going.
Already well behind my “new week, new post” schedule, the double-decker lighting hit a snag and simultaneously I got very busy at work and didn’t have many evenings free for anything. What I should have done at that point was assemble a post around the EM13 and its problems. Instead I waited, and waited, to get back to work on the lighting so I could write up the post I’d been thinking of. I’d fallen into the “perfection” trap and didn’t even realize it.
Ok, time to reboot. The E233 works fine on DCC. That’s today’s post (along with a bunch of me whining about how indecisive I am). As an add-on, I’m going to have a monthly status section below and recap some of the problems with the double-decker I’m still working on. But now I really am going to get back to my weekly cycle. It keeps me focused on the layout, and it keeps me from letting little things frustrate me into idleness.
On a related note, I’ve thought about switching to an every-two-weeks schedule, with a minimum one post a month about the layout, and the other used for either more layout or some other Japanese railroading topic. I might yet do that, if I can’t maintain a weekly pace, but for now I’m going to try for weekly again.
September 2012 Status
Well, it’s almost worth skipping this time, but I have gone three years without ever missing a monthly status, and I’m not going to start now. So I’ll tack this on. September was, as noted, mostly me procrastinating. I did do some more work on the electrical system, and now have the outer pair of tracks back in operation for both DC and DCC, so I’m back to where I was in February. Except that I need to reprogram the DCC base station with some of the custom settings I lost, but to do that I have to find the old paper manual, because that’s where I wrote them down. And since I switched to PDF manuals on an iPad, I filed the paper one somewhere “safe” and need to rediscover it, or else start over.
I also got the E233 running on DCC. Well, the EM13 anyway. I haven’t done the cab decoders yet, but those appear to be absolutely standard.
And I made a start on the lighting. Here’s where it gets interesting. When I did my subway train’s lighting last winter, I noted that the interior support posts had been redesigned. The lighting kits will fit in older cars, but you don’t gain the “hold it in place” advantage of the new posts. Well, this car claims support for the new lighting, but it’s still the old plastic mold, with the old shape posts. Installing the new lighting works fine, but it’s exactly the same as installing it in a five-year-old E231 model. I’m a bit disappointed, to tell the truth.
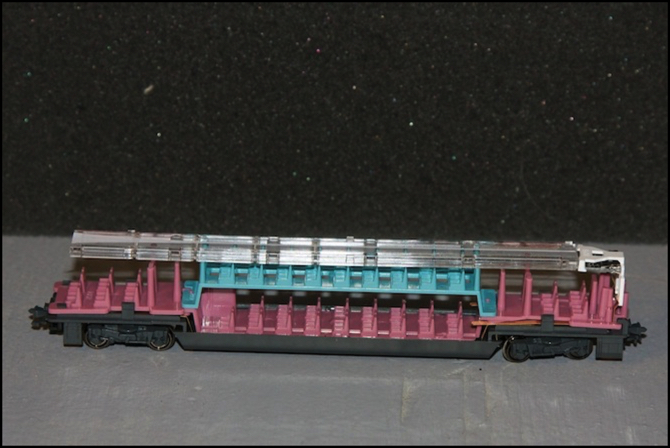
The double-decker car was also problematic. These do take the new decoder (or the old one; physically the decoders are identical except for the kind of LED and the new one being preassembled onto the plastic bracket). And perhaps others have seen this issue before, but this is my first double-decker, so I was quite surprised to find that the pre-installed diffuser doesn’t align properly with the LED. Or so I thought.
For the diffuser to work, the LED needs to shine into one end. With the old bulb system, this didn’t have to be exact, because bulbs throw off light in all directions. But SMD LEDs are highly directional, and the edge of the LED assembly needs to line up with the edge of the diffuser. I managed to convince myself that it wasn’t lining up, and attempts to “fix” this didn’t make reliable electrical contact. Lack of time also led to haste, which meant I didn’t stop and think long enough to realize I was chasing shadows for some time.
I’ve finally decided that while it’s not perfectly aligned, it’s closer than I’d thought, and close enough to be doing a fairly good job of illuminating the car’s interior. Even the lower level is fairly well lit; there’s a slot in the floor between levels that lets a good deal of light down to the bottom, helped by lighter-colored plastic there.
These cars are a bear to work on, because of the way the body-shell and windows attach. I’m going to update my Disassembly and Lighting pages about this, and it might even be worth another post. But that’s for the future. Aside from a test rig (with no windows) I don’t have either car fully reassembled yet, and won’t until I put passenger figures in it. But I’m back on track with that project.
Note: the photo at the top of the page shows a double-decker with a standard light strip laid atop it. This is part of what convinced me the lighting unit needed to be raised up (as is shown here). What I failed to realize was that the pre-installed diffuser, which is curved, actually comes down lower at the end, and lines up much better. I’m amazed this caused me to waste two weeks (well, very little of that was “layout time”).