


Camera Car

HD Camera on Camera Car #2
I’ve long wanted to take some “engineer’s eye” video of the layout, both because I think it’s more immersive, and because close-up views help to reveal weak areas in the visual design of the layout. At first I considered buying a train with a pre-installed camera (Kato has made one in the past) or buying the wireless camera and installing it myself. I actually ended up buying a camera, but never doing the work to install it, because it was clear that there were a lot of compromises in the system.
Wireless cameras are good for shows, where the camera shouldn’t be obvious, and the monitors displaying the view from a train provide an excellent hook to draw in crowds. But mine is a stay-at-home layout, so that’s not really an important consideration for me. And a wireless camera suffers from two big problems: low quality video and erratic operation. The video quality is ultimately limited by the bandwidth of the wireless signal, and the result is low frame rate (which makes for a somewhat jerky video) and poor resolution (which makes it look like the scene was filmed through a layer of cling-wrap plastic). Power can also be a problem: although there are battery-operated models, these usually use 9-volt batteries that won’t fit in trains, and “battery eliminator” circuits that use track power tend to be erratic, causing drop-outs in the video.
Now with sufficient time and energy, a lot of that can be mitigated to the point where it’s acceptable. But I ended up deciding I didn’t want to invest the time for merely “acceptable” video. I am still planning to get it working “someday”, if only to have an inspection car for the subway and other hidden track.
So my next plan was to use a flash-memory camera. The cheap one I tried first wasn’t worth what I paid for it. The good one was better, but had some issues clearing structures on the layout. See the videos from both of them on my Movies page, or read on for the details of what I selected, why I selected it, and how well it worked.
Larger versions of photos on this page can be found in the Photography photo album.
Using a Flash-Memory Camera
After my initial interest some time ago, I never found time to follow up on the idea of a flash-memory camera, although the idea had appeal. Recently, the topic came up again on a thread on the JNS Forum, and that got me thinking about it again. These cameras can be had at relatively low cost, and record to memory using a battery. They won’t hide away inside a car, but one can ride on a flat car without violating the clearance restrictions. One poster was using a sports camera, designed for mounting on a helmet or vehicle roof, and it produced fairly good video. Unfortunately it was out of production, but it started me thinking.
I found a small camera for around US$80 that had built-in memory sufficient for my needs, and was only 18mm (3/4”) in diameter, well within the roughly 25mm (1”) I had available. I bought one, stuck it on a flat car (a KOKI 104 container flat, which is fairly low to the track), shot some video in the form of a “layout tour” around the two outer tracks of the layout, and posted it on YouTube (see my Movies page for the Layout Tour videos). But I wasn’t very happy with it.
SD camera on KOKI flat car
The camera is Standard Definition (SD) rather than High Definition (HD), meaning it shoots 480p video. That’s better than a VCR, in theory. But it was apparently heavily-compressing the video to maximize recording time on the limited memory, and probably using a lower frame rate than the 30 frames-per-second needed for smooth video. It was also using the AVI format to store the video, which isn’t the best such standard, but that’s typical of low-cost cameras.
The camera also had some functional problems: the flat mounting “base” wasn’t on the bottom (or even on the side), but was at about a 45° angle. And the mark on the “top” of the camera for getting it aligned wasn’t actually on the top (the CCD sensor was mispositioned inside the camera somehow). Plus the audio wouldn’t stay in sync with the video (that may be an issue with my computer; I’ve heard of iMovie having problems with AVI video/audio sync in the past, although I’d thought those were fixed).
A Better Camera
And all my past videos had been 720p (the lowest level of “HD” video), and I wanted that kind of quality, in part so I could mix “on track” footage with “from above” video shot with my old camera. More research turned up that HD cameras were available, but were larger, typically somewhat more than the 1” width of an NMRA clearance gauge. That was a problem. The cameras were also widescreen, and would show more of the off-layout junk in my basement, which was going to be an added distraction. But I already have a solution for that: curtains around the layout I use when making photographs, I just needed some more of them.
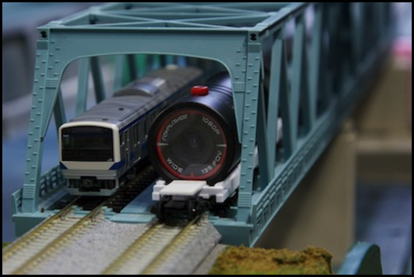
The smallest camera I could find was a cylinder just 28mm (1.1”) in diameter, with two buttons on top sticking up another 2mm. With some care, this would probably fit inside the NMRA clearance gauge, but not within a blue Kato clearance gauge, which could be problematic for my stations. So I built a cardboard circle of the same size (complete with bumps on top), taped it to my KOKI, and ran it around the layout. It cleared the station just fine, but I had a problem entering the bridges from a curve, as the front of the car swung wide and the circle hit the girder on the end of the bridge. But I had a plan for that, or so I thought, so I bought one.
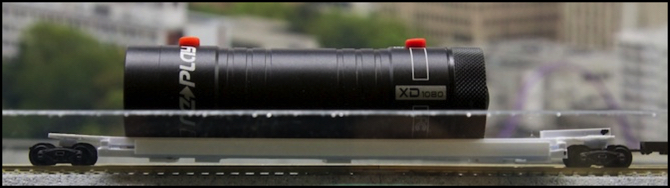
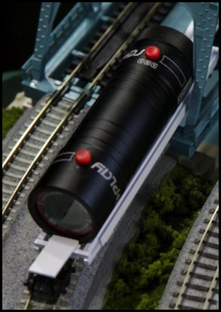
The camera I selected is a Replay XD1080, which can shoot 1080p video at 30 fps using a 5 MP sensor. It also has a number of settings that allow things like white balance, exposure compensation, bit-rate, and audio sensitivity to be adjusted. And it shoots H.264 video in a QuickTime-compatible .mov file, which should eliminate any problems with my software. The camera is 28mm (1.1”) in diameter, and 96.2mm (3.6”) long with the rear protective cap over the controls attached. And looking at some online high-speed action videos taken with one had me convinced of the quality. Quality that comes at a price, US$300, but that’s complete with 4GB of memory, which is enough for about 50 minutes of video at the highest settings.
It’s also not light, since it’s built to be rugged. I figure that’s good, as inevitably it will take a tumble off the layout at some point. But heavy aluminum and internal padding doesn’t make for lightless. The weight is 3.1 oz (89g), which may not sound like much but it is a lot for a flatcar load in N-scale. Total weight for a 5” car should (per NMRA standards) be just 1.25 oz (35g). The total weight of my camera and the final version of the car it rides on is 4.1 oz (117g).
The camera is easy enough to use, although installing a firmware upgrade is a bit tricky, and the instruction manual provides instructions that don’t appear to work (you must reformat the memory card after installing new firmware before you can turn on the camera, or it will just install the upgrade again, but the only way to format the card in-camera is to turn the camera on first; I ended up buying a memory card reader for my computer and erasing the file using that). In the end, I also bought a larger memory card (16 GB of class 10 memory, versus the 4 GB of class 6 memory included with the camera) for US$40. And settings go away if you change memory cards. But once past all that, taking video is dead easy.
Note: out of the box, the camera comes set to the wrong date. That likely doesn’t matter, but it confused my video software. You set the clock using the same method of editing a text file and then restarting the camera that is used to change the other settings. The only trick is that you have to set the time in the file to the time when you’ll press start on the camera after installing the memory card, since the change takes effect then.
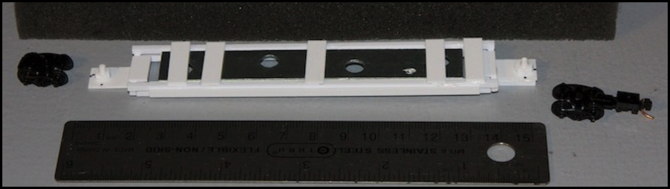
Making a Camera Car
But to get the camera to fit on my layout, I needed to change how I mounted it. I didn’t use any of the supplied mounts, and instead of the low-body flat-car, I’d thought about using a depressed-center flat car, but I couldn’t find one long enough. And the camera’s high center of mass makes it somewhat unbalanced. So I built a special-purpose “camera car” to carry it, essentially a well car such as is used for containers, but this one designed specific to the dimensions of the camera. This used small side rails to hold the camera in place, as there wasn’t clearance below the body for the rubber band I’d used on the KOKI.
I’d actually made an earlier one of these for the SD camera I’d first bought, which I thought I could use. But when I tried it with the new camera, the frame bent and hit the rails due to the weight of the camera, and the body kept hitting rail joiners and guard-rails on bridges. The camera was also a bit unbalanced, and there was one bit of track where it consistently rollled off the car when it overbalanced on the outside of a curve as the body hit the track. Part of that was because I’d made the well fairly narrow (16mm outside width) to maximize clearance.
On the plus side, my clever plan for putting the front of the camera behind the lead truck prevented it from hitting the bridge. On the minus, I could now see the tip of the front part of the car in the video.
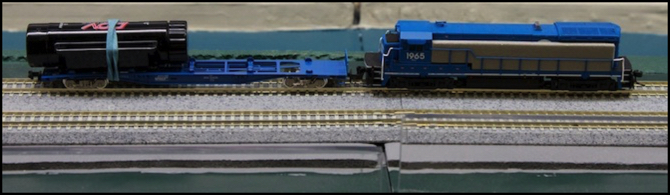
Camera Car #1 with HD camera (note bend in frame most apparent on right-end coupler mount)
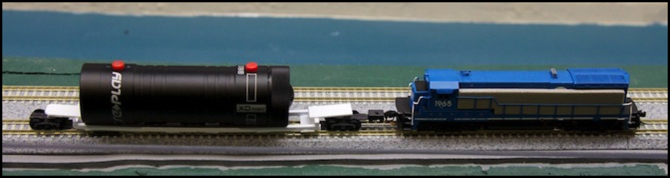
So, camera car #2 (that’s it at the top of the post) needed to be more rigid, ride just a hair higher, and have some superstructure to keep the camera in place. A side effect would be to raise the viewpoint a couple of mm, and that coupled with some care in design might make the front of the car invisible.
After searching local craft and hardware stores, I came away with a small bit of steel used for reinforcing joints on drawers and other wooden objects. This was 100mm (4”) long, 15mm (5/8”) wide and 2 mm thick. Placed in the well of the well car, it would be supported front and back, and thus the downward force from it and the camera’s weight would apply closer to the trucks, hopefully resulting in less frame bending. The added weight down low should also make the car less prone to tipping. I had to build a new well anyway (the weight was wider than the original one), so I considered making the well higher above the rails, but the camera was already being raised by the weight under it, and I decided that if the new well was rigid enough, the old height should work. Finally, I built some fairly high (~3mm) walls on either side of the well to hold the camera in place.
Camera Car #2 Side View
This is very simple construction, and it took just an evening, most of it spent waiting for successive stages of construction to have the glue set. It’s all made from Evergreen styrene: 1mm (0.040”) sheet for the ends, and 2mm (0.080”) square bars for most of the structure. Some 1mm x 6 mm strips are used on the bottom of the well to support the weight and keep the sides at a constant spacing, and a bit of H-girder is used along with the square bar stock to form the sides A tiny bit of styrene rod is used at each end as a post to center the trucks, and the car body rests loosely on two trucks with truck-mounted couplers (MicroTrains 1002 trucks, but I cut the coupler off the lead truck). I added bar stock above the trailing truck to reduce bending there, but didn’t add it on the front for visibility reasons.
I built the well separate from the two end truck-support assemblies, and then attached them before adding the sides to the well. The sides also serve to lock the weight in place, and provide a structure between the two end assemblies to keep them from moving towards each other if the car body tries to bend. I used a lot of care in keeping corners square and the much wider (22mm) well inside the 23mm bounds of the Kato gauge at the “below platform” level where it would ride.
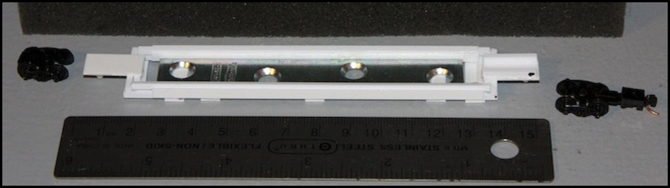
Camera Car #2 Assembled - Top
Camera Car #2 Assembled - Underside
Note: for comparison, there’s a similar underside photo of car #1 in the photo album mentioned at the top of the page.
Operation and Issues
This worked fairly well. The bending was significantly less, and only when cresting the hill at one end of the Riverside Station scene did the car body touch the rails even briefly. The camera didn’t fall off anywhere, nor did it hit the bridge. It also stayed in place and upright, and didn’t include the front of the car in the video.
But I’d made the mistake of testing on the outermost track, and neglected to consider the issue of overhang by the long car, coupled with the “right at the limit” width of the camera. The two combined caused problems in several places. Also, Kato’s Overhead Station has outside supports which are just a hair too close to the platform. On the outer track I’d squeezed by (although a “click” I’d overlooked watching the video should have clued me in that it was making contact there).
When I went to use it on the inner track, I discovered both the station issue, and the overhang issue: When exiting (not entering) the bridge into the inner curve, the camera hit the bridge frame. And then it hit all of the catenary poles on the inside of the curve. That’s a problem, as I use even tighter curves on the inner “commuter” pair of tracks and there are several bridges. I foresee some clever cuts in my videos to work around that problem in the future, and perhaps some redesign of my stations to allow a larger-than-Kato-standard clearance to the platform and supports.
Still, problems and all I’m pretty happy with the quality of video produced. I’ll just have to be a bit clever with how I use it.
Bridge Impact
I also discovered that while the camera clears the normal Kato catenary overhead structures on the poles, the ones on the station canopies are just low enough that they hit the buttons on the top of the camera. Not hard enough to turn the camera off, but they do knock it out of alignment, and the “click” is quite audible. I’m not sure how I’ll fix that problem, short of removing them (which I did for the video). The problem is that they’re clearly in violation of Kato’s clearance gauge, but placed in such a way that they can’t easily be moved, since they clip in sockets on the underside of the platform canopy.
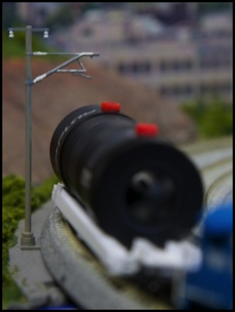
Camera clearing pole (left) and being knocked to one side (right)
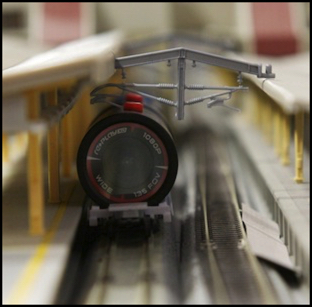
In terms of camera operation, the point-of-view is nearly identical to that of the SD camera on the KOKI (slightly higher, actually), due to the larger diameter of the HD camera. This is, surprisingly, almost exactly correct for a seated driver. Of course it’s centered between the rails, and a driver would be off to the side (the left side on a Japanese train), but it’s pretty darn close to what I wanted. The wide angle of view is a bit of a nuisance, since it reveals the overhead lighting and the curtains outside the layout (plus the clutter the curtains don’t cover).
Lens Height
At the same time, it’s oddly not wide enough: going around the “village” curve, you never see any of the village buildings, just the all-too-close scenic photo backdrop. There are some implications for layout design from that, which I’ll have to think more on in the future.
I found the auto white balance to be a bit flaky, and setting it to be a fixed “fluorescent” balance didn’t help as much as I expected it would. But part of that was due to my lights at the River Crossing having UV filters on them which tints the light slightly yellow (I’d suspected this in the past, but it’s easy to color-correct still photos). Filters removed, the light looks better, although the low-CRI CFLs still don’t look as good as the high-CRI fluorescent tubes over the Riverside Station scene. I guess I have more reason to upgrade the layout lighting now.
I don’t think the lens quality is quite as good as my hand-held video camera (but to be fair, that was an expensive one when new, even if it is limited to 720p) but the blurring at fast motion seems less. The two are close enough that I don’t anticipate problems making videos with the both of them. By the time it’s compressed for YouTube use, I suspect the differences won’t be apparent. Also, the “sharpness” setting defaulted to 3 on a 1-5 scale, setting it to 4 improved things somewhat.
The audio sensitivity is quite good, but is set low by default (33 dB gain on a 0-59 dB scale) and resulted in very quiet audio (never exceeding about 1/3 the range of the peak-level meters on my software except when scraping along the station platform on the inner track, where it got to about 50%). I adjusted this to 40 dB, which was a bit better. Part of the problem is that I think the microphone is on the underside of the camera, and thus blocked by the weight in the new car. Since I’m not planning to use actual layout noise in new videos, I’m not going to worry about that. They do make an external microphone I could use (it’s small enough to fit on a second flat car) if I wanted to.
Conclusion
The HD video camera isn’t quite small enough for 1:150 Japanese N-scale using Kato structures, and it poses some problems on curves due to the projection of the camera outside the clearance bounds. This would be less of a problem on a layout built to NMRA clearances (which, although 1:160, reflect larger western cars), although I expect it would still have problems on some of my commuter curves. And track-level video has some additional implications for what is visible, that may affect my future layout design plans.
But overall it works, and I definitely prefer the HD quality to that of SD video. This will give me a new way to examine and show off the layout. I’d have to rate this a qualified success. Despite the issues, it is usable if not as easy to use as I’d hoped. Maybe in a couple of years I’ll find another one that’s smaller and better, but I’ll stick with this one for now.