


Imperial Train
Japan’s Emperor is the head of the world’s oldest continuing hereditary monarchy, reputed to have been established in 660 BC. He is also the last monarch in the world reigning under the title of Emperor. Japan’s current constitution stripped the position of emperor of political authority and, although it still has formal duties, the holder of that title is largely relegated to a ceremonial role. However the Emperor, both the office and the individual, is still highly regarded in Japanese society, and his duties include diplomatic ones such as “receiving foreign ambassadors and ministers”.
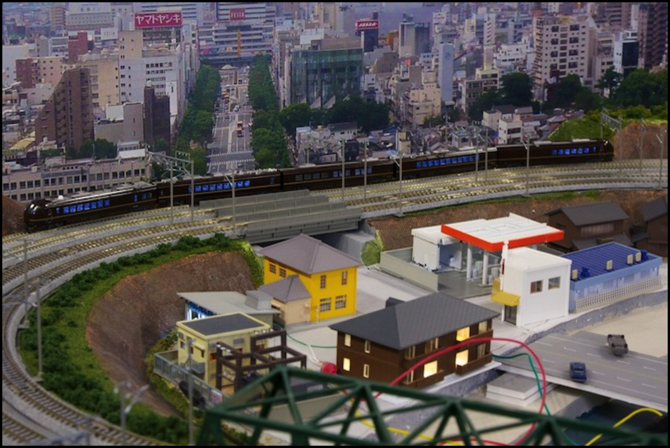
When the Emperor or his immediate family travel, they do so like any head of state, with a great deal of security, press coverage, and attention. Mostly such travel today is by car or plane, but given the predominant role of trains in Japanese transportation, this mode is sometimes used as well. If the Emperor travels by Shinkansen, a reserved car will be used. But for travel on the narrow-gauge network, there is a special Imperial Train. Since 2007, the E655 shown above has been used.
Strictly speaking, the E655 model by Kato (10-1123, Japanese description) is not a model of the Imperial Train but of the Nagomi, a five-car EMU set used for charters, particularly diplomatic and state charters. With the addition of a sixth, Imperial, car the train becomes the Imperial train. The sixth car is stored separately from the train for security purposes, and only used by the Emperor and his immediate family. And it would appear that making a model of it requires permission of the Imperial household, which isn’t given. The previous Imperial Train, which consisted of locomotive-hauled coaches, does not appear to have been modeled until after it was retired. Thus Kato’s model lacks the sixth car.
So what I have here is a model of the five-car Nagomi, and not an Imperial train. It lacks the headmark (the imperial seal and a pair of flags) that would be present on a train in Imperial service, as well as the emperor’s car. But it’s still a special train, and I’m glad to have it. And with a bit of modeler’s license, I can pretend it’s the complete train.
As with any complete Kato train, it comes in one of their green slip-cased boxes, this one with space for six cars. Should an Imperial car ever be modeled it could be stored in the same case. But don’t assume that means one is planned; Kato doesn’t have anything between their small four-car box and the full-size six-car box.
The prototype train (there is only one E655) is owned by JR East and based out of Oku depot in Tōkyō, which makes it a good fit for my layout. It is an electric multiple-unit (EMU) capable of operating on both 1,500V DC and 20,000V AC (at both 50Hz and 60Hz) or of being hauled by locomotive (reportedly a DD51 is used) on non-electrified lines. This means that it can travel over any of Japan’s 27,268 km (16,943 mi) of narrow-gauge tracks.
The model is a typical Kato N-scale EMU model, similar to their commuter trains in structure. It has working head and tail lights, a three-pole skew-wound DC motor with flywheels, and is designed to accept their new standard (V2) LED interior lighting (10-211 or 10-212). It has hatches to permit installation of Kato’s standard DCC decocders for cab lights (FL12) and motor (EM13). The lighting units can be used as-is on DCC, or equipped with interior lighting DCC decoders (FR11).
The body is finished in a metallic paint that is brown with purple highlights when struck the right way. This doesn’t exactly replicate the prototype, which seems to have more purple in its color from photographs, but it’s very close. The fine printing and the gold stripes along the body are crisply done.
The model is equipped with molded interior seating in a light blue color in four of the cars, and light gray in the motor car. As with other Kato EMUs, the motor is a low-profile one placed under the slightly raised floor of the motor car, so the interior is open to view through the windows. With the lighting installed, the interiors of the cars are not overly bright, thanks in part to the darker color than the beige used in most Kato EMU models. In fact, the motor car is rather dim, sufficiently so that I’m wondering if I have an alignment problem with the LED and diffuser.
I installed interior lighting in all cars, along with the DCC decoders (except the FR11, which I never install). Other than driver figures in both cabs I did not install any passengers at this time, although I’ll probably do that later. I also haven’t programmed the decoders yet, leaving them with factory defaults for now. This was easily the simplest DCC conversion I ever did. Every car came apart easily, every install was straightforward, every car went back together easily, and everything worked the first time.
Cab car with driver and interior lighting installed
One of the nice things about trains designed for the new V2 lighting sets is that the supports hold the lightboard and the plastic diffuser solidly in place and in alignment, so the LED is shining into the end of the diffuser. Also, there was absolutely no flicker in any car when the train was running, a far cry from the frequent strobing of the old interior lights.
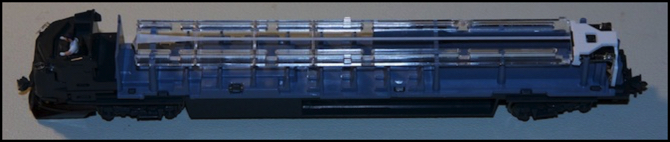
The cars are built in the typical EMU style, although the body shell wraps around part of the underbody, rather than stopping at the floor line. This is similar to how Shinkansen cars are constructed, and makes taking the body off and putting it back slightly harder. The most important issue to watch for is that the body-mount couplers are in housings that snap onto the underbody. These can be knocked loose, so it’s important to check them before and after removing the body, and press them back in place before they can spring apart and send the coupler and spring off into oblivion. I didn’t have that problem here, although one did become loose, but I’ve lost couplers before that way.
One car did have the floor separate from the underbody as I was taking the body off, and fall apart in my hands. It was easily put back together, and gave me a view into the structure of a non-cab/motor car, as I’d never had reason to take one of those apart before.
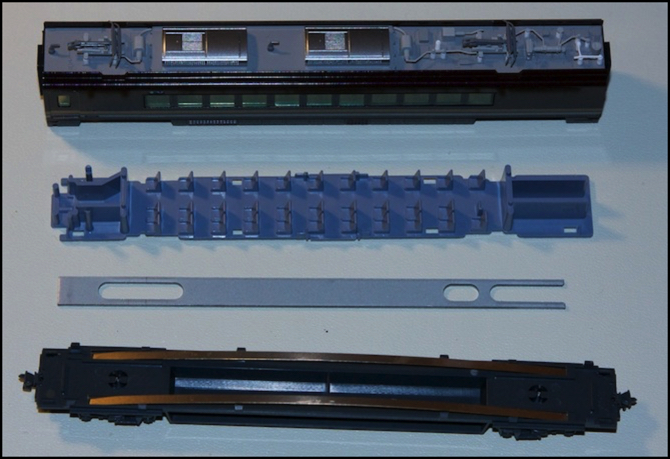
Non-cab car take-apart
The car includes a weight, which I haven’t seen on other Kato cars I’ve had apart. Although mostly those have been motor cars, which don’t require additional weight, I have had a couple of cab cars apart and have never seen a weight before.
Like any Kato train, it runs like a swiss watch, smoothly and without issue. I ran it for about ten minutes in each direction to break in the motor, ensuring the brushes had a chance to wear into good contact and any factory lubrication was distributed in the gears. After that, I did the DCC conversion.
This is the first car I’ve done before and after speed timings on. Prior to the DCC decoder install, I ran it on the outer loop of the layout using my Kato USA power packs. At maximum (which is about 13.8V) scale speed was about 254 kph, well above the prototype’s top speed of 130 kph. At 12V this reduced to 224 kph, and at 10V to 177 kph. After conversion to DCC, running at the top speed step (which is 12.0V, less loss in the decoder and track wiring) the speed was 154 scale kph. Set to 50% power it was 135 kph. At top speed, with all lights lit, power consumption was about 150 mA per the panel-mount RRampMeter.
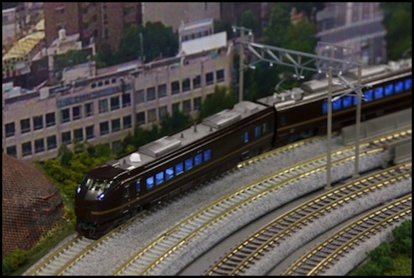
Nagomi in operation
So I have enough power to replicate the scale top speed, but the train speed isn’t linear with motor power, which will make setting up the speed table a bit complex. I suppose that makes sense, as the faster the train goes, the more power is being lost to friction in the gear train.
All told, a solid performer and a good model. I’m very glad I bought it.