


Decoder Wars I
Edit: see the comments for some additional notes; also, I’ve edited the text to correct some errors, but those edits are marked. I also somehow forgot to add keywords or categories to this post originally, and I’ve fixed that. Well, I thought I fixed everything; it turns out that while I can do strikethrough fonts in the editor, the strikethroughs don’t actually show up online, so I’ve now revised the revised version to put parentheses and quotes around all no-longer-true statements. It’s inelegant, and next time perhaps I’ll just rewrite that part of the post, but I really don’t like changing these after they’re posted.
On to the original, slightly modified, post:
A long time ago, in a distant land, titans met to do battle...no, wait, I mean recently, on my kitchen table, I started testing DCC motor decoders for N-scale EMUs. And as with most wars, after it started I began wondering why on earth I’d thought it was a good idea. Still, I have reasons for this, and the result is important: the winning candidate will go in my (so far) 27 trains that don’t support Kato’s plug-in decoders, and some have two motor cars, so it’s closer to 30 decoders.
If I choose the more expensive Lenz, I’ll ultimately pay more than $600 extra for it. Even the TCS carries a $300 premium over the DZ125. That makes it worth investing some of my modeling time in deciding just how much benefit the extra money gets me, if anything.
The basic issue is that I need to decide what motor decoder I’ll use for the motor cars of those EMUs I convert to DCC using wire-in decoders. There are several candidates, and some strengths and weaknesses to evaluate. I’ll also need to evaluate light decoders, but that’s going to be a simpler evaluation and I’ll come back to that at another time.
Another benefit of this work is that I’m going to explore some of the motor-control features (like BEMF) on each decoder, and see what kind of settings I ought to use with them, or whether they are useful at all.
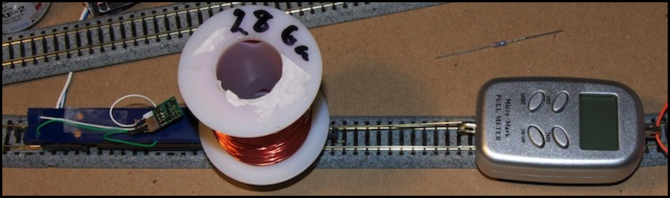
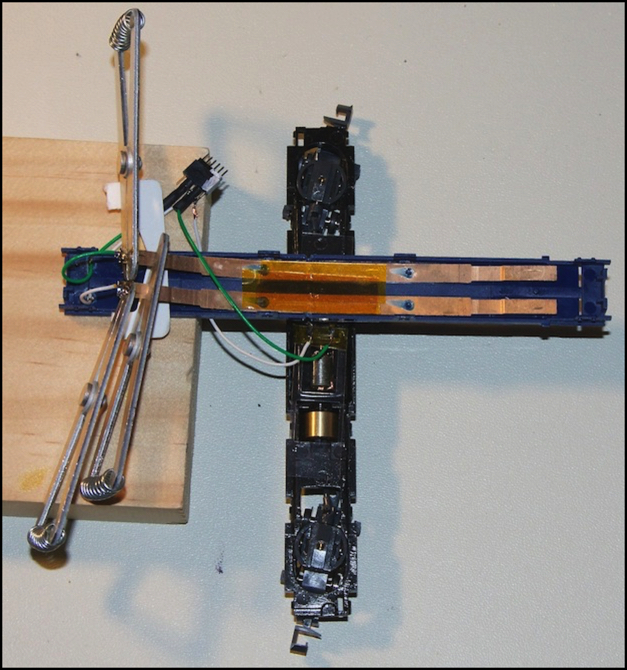
The photo above shows one of the tests I’d planned, although in practice it didn’t work out (results were too variable for comparisons), more on the actual testing down below.
But first, let’s meet the contenders (all prices are “street” via typical online stores).
The Contenders
All:
I didn’t need to do a lot of research to figure out what to use. Don’s list of motor-car decoders on Akihabara station was a starting point ( the matching list of Cab Decoders is also useful). And there’s been a fair amount of discussion relative to these on the two matching threads on the JNS Forum (Motor Decoders and Cab Decoders). I basically took that, and did a bit of googling to see if there was anything else obvious that leapt to mind, and other than adding the Z2 to Don’s list, there wasn’t.
All of these support a number of features I care about:
- “supersonic” (meaning high-frequency) PWM to control motors “silently”.
- Back-Electromotive-Force (BEMF) motor speed load compensation.
- 128-step operation with a configurable speed table.
- At least 500mA stall current protection (250mA might work, but it’s close).
- sized to fit inside an EMU chassis.
- Support consisting, which I may use for my 10+5 trains with two sets of cab and motor decoders.
And note that I’m not considering the EM13. Feature-wise, the DZ125 is basically the same, and without the under-floor mounting of Kato’s “DCC Friendly” trains this thing is too large by far, even if I wanted to solder wires to one (and I don’t). I will use those on all the Kato trains that support them, but that’s outside of this evaluation. The US$18 EM13 would save me a few bucks, but it’s less than a hundred over the full project, so that’s not sufficient motivation for the inconvenience. It’s also hard to find them in stock.
I also didn’t consider a couple of potential candidates that aren’t easily acquired in the U.S.: the Uhlenbrock and NGDCC decoders in particular, although also the ESU. All require a lot more work and/or lead-time than my usual “I need more decoders next weekend” approach to this and none seemed to have any offsetting benefit (unlike the Lenz, which is somewhat inconvenient but has value).
Finally, a couple of things I thought important are looking less interesting: availability in a NEM651 six-pin version and support for Advanced Consisting. The problem with Consisting is lack of support in Cab (light function) decoders that have bipolar light outputs. Without that, Consisting the motors is a whole lot less useful. And adding my own NEM651 sockets is turning out to be unreliable, and I will probably just solder the decoders in once I’m past the testing stage. Pity, as I really liked the idea.
Digitrax DZ125:
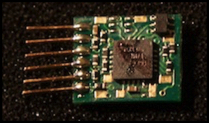
10.6mm x 8.70mm x 2.86mm (not counting pins)
Digitrax makes fairly good decoders. The US$20 DZ125, although it apparently had issues early in its life (and Don thinks its motor output is easily broken) has several appealing features, and few negatives:
Pro:
- Digitrax has a reputation for quality products for a reason.
- The feature set is very similar to the EM13 I use on many of my Kato models.
- Its BEMF is configurable.
- There’s an automatic “torque compensation” feature (important with supersonic BEMF).
- The speed table can be overridden for low-speed fine control (“switching speed”)
- Available in both NEM651 (6-pin socket) and wired forms.
- Potential use of ride-through capacitor*
Con:
- Potential reliability issue.
- No support for RailComm (and I’ve given up on Transponding**).
* doing this isn’t official, but I’ve seen one online report that it can be done fairly easily.
** I tested Transponding over a year ago, and had quite a lot of trouble. I’ve given up on that technology.
Lenz Silver Mini+:
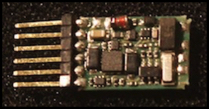
10.6mm x 7.5mm x 2.6mm (not counting pins)
The rather pricy US$42 Silver Mini+ (henceforth “SMP”) is the premium product:
Pro:
- If anyone does DCC “right”, it’s Lenz. They invented it.
- Available in both NEM651 (6-pin socket) and wired forms.
- Selectable “motor type” tuning plus additional fine-tuning.
- Configurable motor PWM.
- Ability to set a “constant braking distance”.
- “Shunting Speed” (apparently identical to Digitrax’s Switching Speed).
- RailComm (not needed today, but nice to have for the future)
Con:
- price.
- The “constant braking” seems to depend on external systems.
- Did I mention the price?
If I ever do move to use of RailComm, having it built in will save me both money (US$16 ea) and time in adding additional RailComm only decoders. That’s a significant offset of its high price, even if it is conditional on other things.
TCS M1:
The US$30 M1 is a solid performer, although it doesn’t really have a lot of offsetting value for the extra $10.
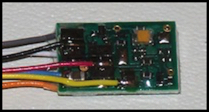
14.4mm x 9.12mm x 3.43mm
Pro:
- I can’t really think of anything special. It “meets requirements”.
Con:
- Price to a lesser extent.
- The M1 is a bit large.
- BEMF is not configurable (maybe that’s not really a “con”).
- Wired only, but that is less of a “con” than I’d thought.
- The 28-step speed table isn’t listed as a feature, but is listed under CV29.
TCS Z2:
12.95mm. X 6.65mm. X 2.79mm
The US$34 Z2 is apparently functionally identical to the M1 except in size and that it has 60mA function outputs instead of 100mA. But since motor cars don’t have headlights, it’s basically $4 more for a smaller decoder. For some reason the M1 doesn’t list “motor trim” CVs associated with the speed table, but the Z2 does. I don’t really care about trim, but I want to take a look at this. If I use either, I’d probably end up using the Z2 just due to size reasons. (edited to add: Don notes that the Z2 motor outputs are much more fragile than the M1’s).
Aegaeon:M:
and the dark horse, the US$25 Railstars Aegaeon:M, assuming Don ever makes enough to ship me one for testing. :-)
(no photo yet)
“11mm x 6.7mm x ??mm”
Pro:
- Smallest size decoder (smaller even than the Z2).
- “Shunting Mode” (likely same as Digitrax and Lenz)
- (“RailComm support planned.” incorrect, not planned)
- (edited to add): BEMF supports tuning and separate consist values.
- (edited to add): Consisting supported.
Con:
- Brand new (I’m beta-testing it) from a “new” supplier***
- (“Configurability of BEMF unclear.”, incorrect, configurable)
- Supersonic torque compensation unclear.
- (“The specs don’t actually list Consisting as a feature.” Incorrect, Consisting supported)
- Only available in wired form (but again, less of a “con” than I’d thought).
*** Don has a fair bit of DCC experience, and I beta-tested his LOLBooster a couple of years ago, but this will be the first thing I’ve actually bought from him, so he’s new in that sense as well as Railstars being new relative to the other three companies. He’s developed his own command station software for the Arduino, so in that sense he’s not exactly new to DCC. But any new supplier is a risk: he could decide it’s not profitable and stop making these, or raise the price. He might make a mistake and have a serious bug hidden away in the firmware, waiting to pounce on me after I’ve installed 30 of the things (to be fair, so could any of the others). In the end, there’s a bit of risk I need to count as a Con, but it’s not keeping me up at night.
Candidate Summary
The TCS Z2 is looking like a strong contender, although price-wise it doesn’t have an advantage over the Lenz SMP if I consider RailComm important. The Digitrax DZ125 has the price advantage, plus “switching speed” (also a Lenz feature), which I can see being useful for parking trains in a yard or at a platform. If it works well, the Agaeon has the potential to give me the DZ125 features plus (NO“RailComm and”) Z2 size at a $5 premium over the cheapest decoder (that’s $150 over the planned set of decoders), which makes it very interesting indeed.
Testing
What do I need to evaluate? Well first, does it work (can I figure out the documentation, and does the feature actually have an effect)?
But beyond that, I’m going to look at how well the decoder drives a live train, meaning both top speed and ability to control that with a speed table, as well as slow-speed starting operation and slow-speed running (into a station, for example). Torque and BEMF need to be evaluated, and I’ll do that by timing runs with a full train, both a full loop of the layout and a short run (at speed) up the 2% grade on my layout’s outer loop.
I’d wanted to do some direct drawbar-force measurements to evaluate torque, and the rather rube-goldberg arrangement at the top of the page was an attempt to do that. However without artificial weight the meter read zero (mostly, sometimes it read 5-15 grams; it reads in multiples of 5g). Sitting a 1 pound coil of magnet wire above one truck got me a 75g reading, which would have been a good metric. Except that the second time I tried it I got 20g. It seems to be very sensitive to exact placement, and thus useless for comparative testing. EMUs just don’t develop a whole lot of pulling power, nor do they need it for 6 - 16 car trains (although I suspect my long Shinkansens aren’t going to run as fast as I want, no matter what I do).
So I’m basically going to test the effects of running a full-size commuter train (10-car E231) around my large layout with various things turned on and off and adjusted. I’ll also run some tests on the short loop of flat track on my “workbench” (the kitchen table).
System Under Test
My testbed is the MicroAce E231 I’d mentioned back in Decoder Programming Prep in November and subsequent posts, but first it needed some work. I wanted to use 6-pin decoders, and I’d had issues with the poor soldering job of the 4-pin connector to the motor causing the floor to buckle, so I wanted to rewire the train with an NEM651 six-pin socket. Some of my decoders will fit that natively, others can have pins added.
Soldering in the NEM651 Socket
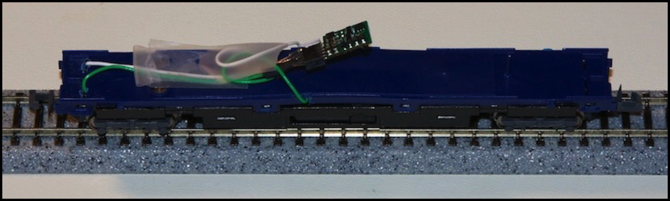
The above is me installing the socket; there’s a placeholder set of pins inserted in it, which I used for continuity testing before I installed the socket into the car, and after. The white paint designates “pin 1”.
Note the cardboard under the heat-sink clamp. The first time I did this, I melted a small notch in the blue plastic (those aluminum heat sinks get fairly hot fairly quickly). The orange color in the middle of the brass strips is the Kapton tape that insulates them where the motor tabs used to touch. I didn’t have correctly-colored wire to hand, so I used green for “right rail/right motor” and white for “left rail/left motor”. I really need to buy a few spools of wire.
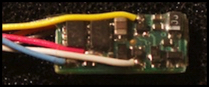
And the finished car, with DZ125 installed (the scotch tape keeps the decoder in place, a final design will use something else)
So now I just need to test them. This weekend I began the first set of tests, for the DZ125. In the course of this, I learned that my “NEM651” socket wasn’t working as well as I hoped. The decoder kept pushing pin 1 out of the socket (and only pin 1, for some reason). A likely problem is that the connector I use for the socket is designed for square pins (the DZ125 correctly uses round ones), coupled with either a poor soldering job or mechanical damage during it by me. I’d also had a bear of a time soldering the wires to the socket itself (it’s really easy to bridge adjacent pins).
I wasn’t fond of the one commercial socket I found either (the wires were too small, and it cost too much). I suspect I’m going to give up on the idea of using sockets, and just wire the decoders in.
After this, I throughly cleaned both the test track and the car’s wheels with isopropyl alcohol to ensure I had the best pickup possible. I also confirmed that I hadn’t affected the ability of the trucks to move and turn when I added wires to the pickup strips (which could add drag on curves, affecting the results).
Note that I’ll be testing with the body off. The weight of that is negligible in the overall scheme of things (9g out of a total train weight of 315g), and shouldn’t significantly alter drawbar force. The real weight is the black steel frame around the motor (the car is 54g w/o the body).
Top speed, with 13.7V DCC and the factory-default configuration, was a scale 290 kph in one direction and 300 kph in the other with just the one car.
I did some initial tests with PWM set to non-supersonic, “Torque Compensation” turned off, and BEMF disabled or set to maximum (by default it’s set at 6/15 intensity) individually. None of them made a measurable difference with just the one car.
After that, I realized that I really needed to set a speed table first, as BEMF at full throttle doesn’t have anything extra to work with (if it’s already at 100% output, it can’t raise it to compensate for extra load). So I set a speed table, eventually settling on a setting of 91 (36%) (I set the whole table to 91 so any throttle setting other than zero would get me the maximum for testing). With that, speed in both directions dropped to 221 or 224 km (the two are close enough to be within my measurement error). Which is pretty high for 36% throttle.
Layout Testing
Then I took the train to the layout, which had 11.7V DCC reading on its meter. First I ran both directions with just the motor car. This produced top speeds of 122 and 125 scale km/h, which is about right for an E231. However I noted that in making a loop of the layout, there were two spots with poor electrical pickup where the train slowed significantly, and this biased the numbers. When I did the short “hill climb” grade, average speed was 165 kph, which is probably more accurate.
As long as the “poor pickup” sections affect every train equally, that wouldn’t be a problem, but as we’ll see in a bit they don’t. I probably need to do some track work to solve that problem (I suspect a bad feeder and/or track joint).
But in any case, I proceeded with testing using the full 10-car train. This put in essentially identical loop (124 and 116 scale kph) and hill climb (162 kph) speeds. On the DZ125IN BEMF is enabled by default at 6/15 intensity (6 in CV57, for 40%). And clearly, BEMF is compensating for the extra load of the full train.
So my next test was to turn BEMF off. This had a drastic effect. Loop speeds dropped to 50 and 49 kph, about 1/2 of previous, and the train nearly halted on one of the two bad sections. The hill climb dropped to 67 kph, about 1/3 of previous. BEMF has a very large effect compensating for even a ten-car train’s friction, and even more on upward slopes.
So after that, I set BEMF to maximum (15 in CV57). Now the train put in a loop speeds of 140 kph (I only measured one direction), and a hill climb of 183 kph. It also sailed through the bad spots without even noticing them, which was a rather surprising result. Perhaps there’s something there causing the wheels to bind, rather than a power problem, as BEMF shouldn’t compensate for a power supply issue. I think.
I didn’t do a lot of experimenting with BEMF to see if there was any “surging” behavior with it set high, but clearly BEMF is something I want, and there’s at least some benefit to trying to tune it (and I need to tune it before settling on a final speed table for the train).
Summary
So, in summary, I now have my test bed ready for decoder testing. And preliminary tests are showing a clear benefit to BEMF, at least with a Digitrax decoder. I need to take a look at Torque Compensation and non-supersonic PWM with a full train (although, just to be clear, I’m not sure “turning off” supersonic actually did anything; the motor didn’t sound any different).
There’s more DZ125IN testing to do, and then I’ll turn my attention to another decoder and see how it compares. This is proving to be more interesting than I’d expected it to be.