


Hilltop Backdrop
11 June 2013 23:55 Filed in: Construction
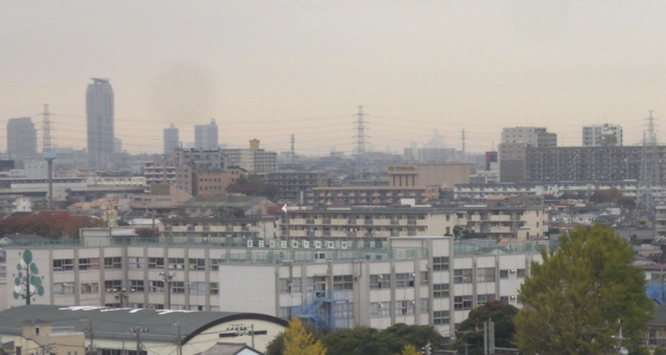
Photographer: jam_232
The image above may not look like much, but then it’s not supposed to. This is what I’ve chosen to use as the backdrop for my Hilltop Scene. I’ve been procrastinating about this for almost six months now, although I had a rough plan back in January. I’d even picked out the source photo for the backdrop after a search on Flickr, although at first I wasn’t sure it was what I wanted. But with time, I became convinced its apparent weaknesses where actually strengths for what I was doing.
But first, it occurs to me that I haven’t said much about my plans for the hilltop scene. In fact the page I created to describe it is essentially blank. That’s mainly because I don’t have anything there yet to photograph, although I ought to add something showing the current appearance, if only as a “before” image. I do have a Construction page describing my plans and the current extent of work.
Below is the rough plan for this area. The idea is that this is a removable “cap” that sits above the location of the future helix down to staging tracks. The blue tracks at the lower left come from the Riverside Station scene, and lead into both the helix and the subway line. The yellow and green tracks are my upper level commuter and express lines, which will largely be hidden behind the mountain. The base of the mountain will rise up 2-3” (50 - 75 mm) above the tracks to a level with a street and houses on the front, and then behind this rise up to a flat top (probably only 3” or so higher) with some kind of temple scene (every Japanese layout needs a temple scene; I think it’s in the rulebook). The back of the mountain can be fairly abrupt as it won’t necessarily be visible, but I’ll probably decorate the lower portion with a retaining wall of some kind, and then greenery above that to represent treetops up the backside of a steep hill.

Hilltop Scene plans
Now to the backdrop. This will be “behind” the mountain and tracks, on the right side in the plan above. It’s more to provide something for the eye to pass over behind the mountain, rather than to be noticed in it’s own right. And for that, I finally decided that was I wanted was a bland and distant cityscape.
And itt’s a very bland photo, with an overcast and hazy sky, and low resolution. It was taken with a point-and-shoot camera, and a rather old one: the source photo was only 8 MP. And that meant it was only about 3200 pixels wide. To make matters worse, the foreground was quite close and blurred (I think it was taken from a train on an elevated line), and the visible buildings would be too large to match trains closely in front of them. So I ended up cropping a 2025 pixel wide strip from the upper portion (above), which gave me about 45 dpi when enlarged to fit the backdrop. A photo viewed closely is usually 300 dpi, and one viewed from several feet should probably be not less than 150 dpi, although I used slightly less in the backdrop for the River Crossing scene.
I am going to be viewing this from in front of either the Riverside Station or the Urban Station, so it will be about nine feet (3 m) away at the closest normal viewing location. And for that, I decided that if I enlarged it 3x to get an effective 135 dpi it would be okay. Some tests on my computer monitor, viewed from across the room, convinced me the detail would look acceptable.
Decision made, I cropped the section I wanted (click on the image above to see the original I found on Flickr), and ran it through my enlargement software (see Enlarging Photos for more about how I do this; I used Perfect Resize on this one). Now I have a 2.4 MB JPEG of the requisite size, which I am going to take to my local photo shop to get printed. Then I’ll let it sit a week or so for the ink to fully dry before mounting it (see Making Backdrops for an overview of my approach).
At the same time, I began working on the backdrop itself. I already had the materials cut to size for a 45” x 24” backdrop and two supports, so it was just a matter of assembly. First, I’m using a sheet of 3/16” (5 mm) tempered hardboard (aka., “Masonite”). To this I glued two 1x3 pine boards as vertical supports, which will bolt to the layout when I’m done. Although the layout is 48” wide (122 cm), there’s an electrical outlet on the wall in one corner of the layout, so I made the backdrop 45” (114 cm) wide to clear it. The height of 24” (61 cm) is high enough to rise above the mountain and provide a decent backdrop from where I’ll be viewing it.
Once in place, the lower six inches or so will be largely hidden by the mountain, except perhaps at the far right and left, where the tree and the arched roof of the building (a school gymnasium?) won’t provide any obvious scale to confuse the eye. What will be visible is the large building, which I think is a school, and the distant apartments, fading off into the haze. I think that’s a good look for something seen far away from the viewer, as the haze will reinforce the idea that it’s a distant view.
After the glue (ordinary yellow carpenter’s glue) had been allowed to set for a day, I started painting. Tonight I painted the back side with one coat of primer to seal it. This is going to be located adjacent to a concrete wall that gets cold in the winter, so I want to minimize the risk of moisture getting into the hardboard and deforming it. Tomorrow night, when the paint has dried, I’ll flip it over and put two coats of primer on the front, which not only keeps moisture out, but keeps any acids in the wood away from the photo.
Once the photo is ready, I can glue it in place (using Paper Mod Podge, an acid-free white glue designed for attaching photos to things; I’ve used it on all of my current backdrops, and it’s served well). That won’t be until sometime next week. In the interim I’ll finish the mounting supports for the backdrop (I just need to drill some holes and cut a couple of small bits of 1x3 to use as support spacers).
And then I’m ready to start actually building the mountain top itself. That may not get started before next week, as I have some more measuring and planning to do, and some modifications to make to the layout to support it (and I need to remove a chunk of wood that’s in the wrong place, which unfortunately means re-doing some wiring).
But forward motion on the layout has resumed. We’ll see how long I manage before something derails me or I’m off chasing some other interesting project. But I’m hopeful that by midsummer I’ll be working on buildings for the mountain top itself.