


Plywood and Sawdust
19 September 2013 23:34 Filed in: Construction
Building a new railroad starts with the planning, obviously, but it doesn’t really feel like it’s started until the sawdust starts to fly. Last week, after much re-thinking and dithering, I bought some plywood and let fly. Construction has officially begun on the One Point Five Meter Line (and I really need to think up a name for it). The concept has changed slightly since I first wrote about it a month ago. Then it was going to be three small sections (or maybe two) that connected together, and I was still thinking of a high-level platform line that would work for either light rail vehicles like my Setagaya trams, or single-car commuter trains.
I now have a Construction photo album with larger versions of construction photos.
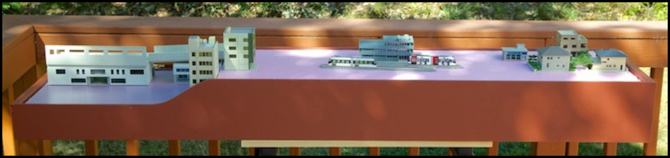
The current concept, which could still be modified, uses low-level platforms and street track, and is more suited to light rail vehicles like the Portrams I covered last time. But what won’t change is the shape: that’s cut, glued and painted, as you can see above. It’s a single assembly, one foot (30 cm) wide and five feet (1.5m) long, standing six inches (15 cm) tall at the high end.
I always find construction goes easily once I start it. That’s partly practice: my Dad taught me to use power tools when I was twelve, and I’ve been building things ever since. Nothing complex, or overly fancy, but bookcases, work-tables, and frames to hold air-conditioner units in windows they weren’t meant to fit have all been done. After that, a model railroad structure is fairly simple. And I’ve built a number of those, using a variety of construction methods, over the years. Another reason it goes easy is that the cost of failure is low, which keeps me from second-guessing myself into paralysis for months on end. At worst if I screw up, I’m out a few tens of dollars. And usually I can salvage something from the rubble. It’s not the same as messing up the install of a $40 DCC decoder in a $300 train.
The crucial change in the design, from sectional to single-unit, came when Tossedman on the JNS Forum pointed out that I didn’t need to be limited by the 4’ size of small plywood sheets (I didn’t want to buy a whole 4x8) and that I could get Baltic Birch plywood in 5’ sheets. I acquired a sheet of it in 1/4” (actually 6mm; it’s metric), and had the lumber yard slice off two 6” (150mm) strips 5’ (150 cm) long.
Baltic Birch is a furniture-grade plywood, and uses Birch for all layers, not just he outside faces. There’s some cheap stuff that doesn’t actually come from the Baltic though, and reportedly uses inner layers of other wood, with a tendency to curl, so you have to be careful what you buy. The use of Birch throughout, coupled with more layers (mine had five, where often 1/4” plywood will only have three) makes it both strong and dimensionally stable (i.e., it won’t warp easily). Mine wasn’t stamped with a grade, but from appearance is the highest (“B”) grade, with no patches or large knots. If you’re interested, here’s some more information on it.
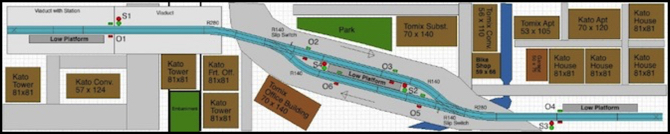
Track plan (left end is lowered so track comes out on the raised viaduct) - Revision B5
After deciding on the final track plan, I clamped the two sides together and used my saber saw to cut down one end, where street level will be a couple of inches below the track grade. A final track plan doesn’t presume that I’m done with other details. The diagram above is my latest take on what goes where, and I’m refining my thoughts, but while the track should stay put, the rest may move yet. Eventually I’ll have to carve foam for the stream, and that will be another stage in making the design more fixed.
With the sides cut, a file was then used to remove any burrs and round the edges slightly. Then I glued 5/8” square dowels on the inner sides, along the bottom and slightly below the top, as well as at the ends. These provide rigidity, to keep the sides in alignment (I was careful to pick out non-warped dowels) and serve other purposes.
These were glued with yellow carpenter’s wood glue (which isn’t water-soluble once set, unlike white glue). As with any wood glue construction, the parts were clamped until the glue had a chance to set (the manufacturer says 30 minutes to an hour for joints not under stress), and then I moved on to clamp the next part (I have lots of clamps, but never enough). After the two sides were done, I left them to set for 24 hours to fully cure the glue (actually, that could take a couple of days, but 24 hours is long enough that stressing the joints is safe). And then I glued the two sides to the ends and cross-braces, and again left it to set for 24 hours.
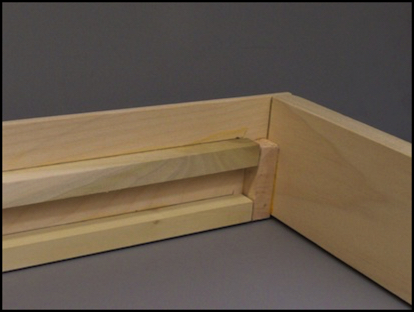
Corner, showing end board glues to side and to short square dowels
There was an embarrassing halt to construction before gluing the sides together, when I realized the bar clamps I’d been planning to use didn’t open a full 12”. After a bit of rummaging I found my longer bar clamps, and resumed construction. Someday I’ll have enough room to keep the tools more organized. Yeah, sure. I’d just fill more room with more tools.
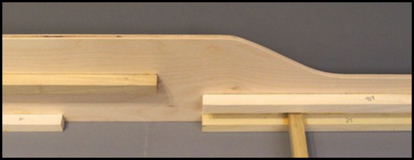
Side with square dowels
The dowels along the bottom will be where I attach “feet”, to keep the wood up off whatever table or shelf the layout is placed on. The ones near the top are recessed to serve as supports for the insulation foam forming the upper level. And the ones at the ends are glue blocks for the boards used at each end. I used poplar boards for the two ends, roughly as high as the ends (1x4 and 1x6 boards, giving me 3.5” and 5.5”).
The insulation foam along the short end will be 1” thick, partly because there wasn’t room for more,and partly because it’s short and will be rigid enough given that length. The longer section will be 2” foam, to provide greater rigidity along the length of the layout, and to allow the top to be cut away to form a small stream or drainage ditch to help break up the flat surface.
In addition to the ends, three cross-braces keep the box sides exactly 12” apart. The end result is both light and rigid. I can lift it with one hand, but shaken it shows no tendency to flex.
After the glue had set up for several days, and all of the moisture should have migrated out, I painted the exposed parts of the wood: the outside, the edges, and inside the top down to the dowels. First with two coats of primer to hide any wood grain or knots (there are some pin knots even on Baltic Birch) and then once that had dried for a day, two coats of my finish color, a red-brown called “Sweet Tea” by the manufacturer.
The color paint dries in a couple of days to stop being tacky, but doesn’t fully set for several weeks to a month. During that time, the chemical bonds that create a solid protective layer haven’t fully formed, and the surface can be marred. I’m going to leave it sitting out of the way for the next month, although I will be working on the upper foam layer and perhaps some of the electrical wiring, I’ll just be careful when handling the structure.
Once it had set for a few days, I took it outside, set it up on a folding work-table, and took some photos with buildings arranged atop the foam to convey the general feel of the urban center (tall building), commercial (still urban, but shorter buildings and more space, and suburban (compact houses and narrow streets) sections. The photo at the top of the post is the result of that. Those specific buildings may not be used, or may be arranged in other ways, but this kind of mock-up lets me get a feel for how the design will look in real life, before I get too committed to it. There will be many more such mock-ups done, not all with photos, before I finish this effort.
But the important part is that it’s begun. Now I can move on to getting the track working, and finishing up my plans for where buildings will go, and then start making roads (out of sheet styrene), sidewalks, and similar things. I’ll likely scenic a small park to have a splash of urban nature, and eventually add some vehicles. I have some non-Tokyo bus and taxi models I picked up in collections that I can use here, since unlike my main layout this isn’t specifically set in any city, and those will add some interesting detail to the larger urban station portion.
I can see all the little tasks ahead of me that will go into “finishing” this layout, as much as any layout is ever really finished. There’s a lot to do, and much of it will serve as a dress rehearsal for things I plan to do on the big layout, but in small manageable chunks that make it less daunting to start, and more likely to be completed reasonably quickly. The goal is to have it mostly done before next summer. Even with my sporadic approach to scenery, that should be possible.