


Airbrush III - Plan A
29 November 2013 23:43 Filed in: Tools
Before every “Plan B” there is a Plan A. I have a sneaking suspicion that I’m not done yet, but I decided I wanted to try a Plan A that might cost a bit less than where my thoughts had been heading. So the idea is to see just how well my decade-old 20 psi (1.4 bar) Badger compressor would work as a supply for a simple, bottom-feed, wide-nozzle Paasche airbrush spraying modern acrylic paint.
I’m not expecting much, honestly. The bottom-fed airbrushes are reported to need a lot of air, since they have to suck the paint up rather than letting gravity feed it from below. That’s probably why they have large nozzles: medium on this is 0.7 mm, roughly twice the diameter and 4x the area of a medium nozzle on a gravity-fed airbrush. And acrylics are likewise noted for being heavy, and needing more air to spray. On the other hand, they throw a wide spray of paint, and for the kind of priming and color-coating I’m going to do, at least initially, that’s what I want to have. And some online info suggests you can paint with this stuff, suitably thinned, at pressures below 20 psi.
Plan A and Concerns
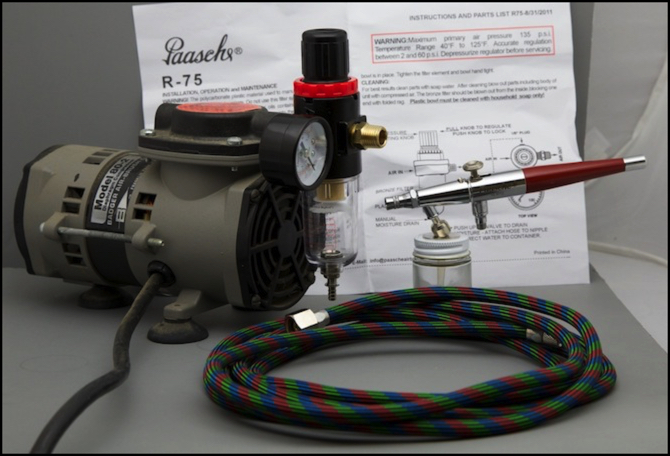
So that’s Plan A: old compressor, new paint and airbrush. What I’ve done is bought a Paasche VL airbrush (in the VL-SET form, US$122 list, but $73 online) and combined it with a Paasche R-75 regulator (list US$35, online $23), and attached the regulator to my compressor. This will let me adjust pressure (down), as well as keeping condensation out of the brush and will allow me to get a feel for how well the brush will work at low pressure.
If I go to Plan B, I’m really only out the cost of the regulator (unless I can find a way to reuse it) and some hoses. It’s probably ~$50 or so I’ll waste if I end up going to Plan B. I can live with that for a test (I’ve also spent a lot on adapters and other hoses I’ll likely never use, but I was going to do that anyway, just so I could see what they looked like to satisfy my curiosity).
Now even if all this works, it’s still going to be a bit less than optimal. Here are the potential problems:
As mentioned, my 20 psi compressor is below the minimum 30 psi (2.1 bar) I want to have. It’s also rated for just 0.4 CFM (11 l/m), which is about half of many current entry-level compressors, which are more likely to be around 0.8 CFM (23 l/m) at 30 psi. Were I buying a starting compressor today, that’s probably what I’d have ended up with, as that seems to be the minimum pressure outside of specialist compressors, although there are some base models rated for just 0.5 CFM at 30 psi. But back when I bought this, 20 psi was the entry-level. And this single factor is the one most like to cause me to go to Plan B eventually. This was free however, since I already owned it, so giving it a try is worthwhile.
The initial airbrush isn’t one for subtle painting, although it can be used to make relatively narrow bands of color if desired. If I later decide I want to be able to paint multiple small amounts of color quickly, I may supplement it with a gravity-fed brush for more sophisticated control and faster color-changes. But I’m pretty sure I’m going to want something like the VL I bought anyway, for priming and similar use, so that part of Plan A will be retained if I move to Plan B. And realizing that was what started me on Plan A in the first place.
I chose the Paasche VL because it’s been widely recommended for hobbyist use, and it is a double-action airbrush, so I’ll be able to get some experience with that form of control. It also has a fairly short paint path, and it’s a lot easier to swap paint bottles than my old Badger was (you just slide the bottle and tube out, and slide another in; I’m going to keep one bottle full of thinner to clean the paint path between colors).
With no tank, I’ll see pressure variations at the brush (commonly called “pulses”), which can cause uneven color coverage. These are likely less serious with a brush used for broad-stroke painting, which is what I’m going to do. The regulator will also mitigate this to an extent since I can set pressure at a pound or two below the sustained airflow pressure, and that will make the regulator act as a small buffer. A long rubber hose with give in it will also tend to damp out pressure fluctuations. Since I’m not doing anything sophisticated, at least not to start, I’m not too worried about pulsation even if all of that doesn’t dampen it out.
I still don’t have a quiet compressor. It’s not as bad as I recall it though, probably around 60 dB although I didn’t check it with a meter. I have thought about building a plywood box with some foam lining and a large but indirect air path. This could significantly reduce the noise level. I’ll do that if Plan A ends up being used for an extended period.
In humid weather, lack of a tank may lead to condensation in the hose, after the water-trap. I could fix this with a separate trap at the brush, but what I’ll probably do is use a hose with 1/4” connectors at both ends to put the regulator/water-trap at a distance from the compressor. This will let the air cool and make it more effective. Then I can use a short hose (likely the 6’ one that came with the brush, but perhaps the 4’ one instead) to connect the airbrush to the regulator. This will give me a regulator at the workbench top, where I can easily see and adjust it, and where it will be more effective in catching condensation.
In the current iteration of the plan, I need to use the Paasche hoses on the compressor. I am going to see about hunting up some adapters to let me use either the Grex or Harder & Steenbeck hoses from the regulator to the brush, as I think I like those better. Although the Paasche hose is pretty flexible, and I could stick with it. Adapters for this aren’t common. Although Harder and Steenbeck make some, I haven’t found them in U.S. stores (I need to look more though).
Hoses and Connections
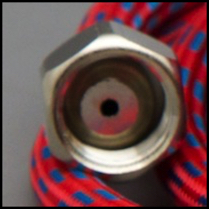
One concern I had was that Badger uses an odd connector on the compressor which looks like a 1/4” NPSM (non-tapered) male, and Paasche’s 6’ hose has an O-ring and looks like it uses a 1/4” NPT (tapered) connector, and that’s what they claim it uses. An NPT can screw onto a NPSM, so connecting the hose to the compressor would work. But what about the regulator? Its input is a female, and if it’s a NPT, well you can’t screw an NPSM male into an NPT female and expect a very good fit. However, it seems to have gone together alright, with a little bit of Teflon thread tape to help seal it.
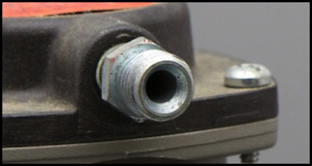
Badger Compressor output (left, with beveled edge); 1/4” NPT and Badger hose (right)
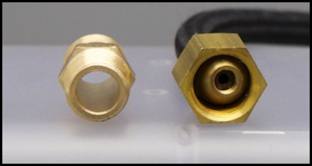
I do have one mystery here though. My 6’ hose that came with the airbrush has an O-ring 1/4” connector, and thus looks like it goes on an NPT link, and the regulator output is clearly an 1/4” NPT, so that makes sense. But the 4’ and 10’ Paasche hoses I bought use a connector just like Badger uses, which doesn’t look designed to seal with the NPT connector. I’m very confused. However, it also has a lip at the base of the conical part, so perhaps it’s a newer hose design intended to work with either Badger or Paasche compressors.
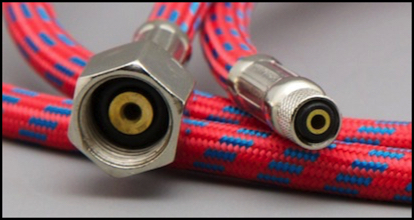
Paasche 6’ (left) and 10’ (right) hoses, note different 1/4” connectors (right has no rubber O-ring)
Pressure Test
Other activities have conspired against an actual test of the airbrush, but I did put the pieces all together and do a simple pressure test.
The regulator screwed onto the compressor with a loop of Teflon tape to ensure a good seal, and it seemed to make a fairly solid connection. It’s not a perfect seal, but it’s adequate for my purposes. You can see that much in the photo at the top of the page.
I then attached one of the red Paasche hoses (not the red/green/blue Iwata hose in the photo) between the compressor and the brush and plugged it in. With the airbrush off, pressure climbed to about 45 psi (3.1 bar) by the dial on the regulator. When I pressed the airbrush trigger it rapidly fell to 22 psi (1.5 bar) and held there as I ran air. So despite the wide opening of the nozzle and low-rated CFM of the compressor, the compressor can deliver its rated pressure through the brush.
Also, when I unplugged the compressor, with the pressure at 45 psi and the airbrush off, it dropped slowly over the course of ten or more seconds (I let the air out before it completed). So I know I’m getting a fairly good seal on the compressor-regulator, regulator-hose, and hose-airbrush connections.
If my compressor’s 0.4 CFM at 20 psi is enough to airbrush with, this rig will work.
Summary
So where does that leave me? Well, so far Plan A is working out. What I need to do now is spend some time to clean out my spray booth (which has been used as storage in recent years), do a bit of reading up on paint, solve the “where and how do I do this painting problem” (a topic for another post), and then try some out. I have some acrylics I’m going to test as a primer on two sections of station viaduct I plan to use with the One Point Five Meter line (I’ll test on some scrap plastic first, but once I know the basics I want to paint something real). I have enough spare viaducts around that it I wind up destroying a couple, it’s no big deal.
With luck, I’ll get to that in the next week. And if it works, painting for the new buildings going on the One Point Five Meter line will follow, including the urban station entrance building and the viaduct it supports, which I need to finish before I can really work on the track above it.