


Simple Structure Lighting
It’s been a REALLY long time since my last post, since I got caught up in several other things after I started this review. I also planned to do more real-world testing with the lighting system reviewed here. I haven’t found time for that either, but I kept procrastinating on posting hoping I’d find a spare weekend. I didn’t. So I’m going to post what I have, and I expect I’ll eventually do a follow-up when I’ve had a chance to light a couple of buildings.
Before starting, I will note that anything I review is something I’m either using or thinking about using on my layout and I buy my own review samples. I don’t take free samples or any other kind of remuneration from anyone. I also don’t make money doing this: there are no ads or affiliate links on my website, or anything else like that. This is my hobby. These are my opinions. Nothing more, and nothing less.
Working on this post started me thinking about the general problem of varying LED intensity, and why resistors don’t do a great job of it. That led to some research, and testing of circuits I’d found online, and was another cause of the delay. It ended up with me adding a page on LED Intensity Control to my Electricity for Modelers section. Now on to the review:
Just Plug Lighting
Woodland Scenics came out with their Just Plug building lighting system a couple of years ago, and I’ve been meaning to take a look at it, and see how useful it would be ever since. On the surface, it appears to be a dead-simple plug-and-play method of lighting buildings that you can power off any low-voltage AC or DC supply, such as the AC accessory outputs on a DC power pack or a simple “wall wart” power adapter. And it is.
It’s not cheap. A pair of stick-on LED lights with wires sell for US$10, the basic hub goes for US$17 without lights, and the expansion unit for a similar cost, and they’ll happily sell you a 1 Amp power supply for US$20 (about three times what you’d pay from a good electronics shop). A large system, with two expansion hubs, eight light hubs, and 32 lights would cost about US$348, or US$10.88 per light (with power supply). You could build the same thing yourself for less than a tenth of the cost. Except for two things.
First, it comes with an intensity adjustment knob for each light. Now you can do the same thing to an extent by varying resistor sizes, but that’s inexact and one heck of a lot of work to adjust to fit a scene. There are also circuits you can make to do the same thing that they do, but I’ve found these to be relatively hard to make work in practice.
Both of those add time to lighting buildings. If you don’t really enjoy that kind of fiddling about, the extra money may be worth the time saved.
The second is that it’s nearly foolproof. If electronics isn’t your thing, this can be the difference between lighting a scene or not.
In my opinion, that’s the real value of this system: it makes something you might not otherwise do at all simple and convenient.
I won’t say this is priced well: it’s still at least 4 times a cost I’d call reasonable if you just want lights, maybe more. And there are other systems available that will provide simple lights. Some of the components (like the power supply and the individual LEDs) are way overpriced. But if adjustable lights are important to you, this may actually be priced acceptably.
Also, while the cost is high, keep it in perspective: Thirty-two lights are about ten multi-story houses or four or five multi-floor commercial buildings. A model structure runs about US$25 to US$75 for a ready-built or kit, depending on type, detail and size. That means the structures cost anywhere from $100 to $750. So the lights are around one-quarter to three-quarters of the finished cost of a scene, assuming you don’t add more details, such as cars or people. That’s still not cheap, but if the lights really add to the scene, and you wouldn’t have done them otherwise, then it’s on the edge of acceptable.
That’s ultimately my chief complaint about this system: it’s overpriced in ways I don’t think it needs to be. I understand that retail costs are complex and not simply based on component cost, and that small-volume manufacturing (which is what this hobby requires) has costs that are higher than something sold to tens of thousands of customers. But still, Woodland Scenics usually gives value for money, and here they seem to have made decisions that unreasonably inflate the cost to the consumer. I’m disappointed in a company this is otherwise one of my favorite suppliers.
Summary
This is going to be a fairly long review, so to provide some context and for those who don’t like huge masses of words, I’ll note the high points here before I dive into the details.
The system works as advertised. It will happily run off rather high train power pack voltage (18 V AC at least) and the light intensity controls work well. The “hubs” (boxes) can be mounted in several ways, and wires clip into them. Unclipping them is a bit harder, and requires fingernails or some prying with a screwdriver. It’s also obvious which wire goes where, even without reading the instructions. It’s not foolproof, but it’s darn close.
It’s also a quality product. All of the parts I bought were correctly assembled and in working order, and the wires were well-soldered and insulated. The two hubs (light and expansion) have a solid feel to them, and were well-designed for ease of use under layouts. Thought clearly went into the design and manufacturing of these.
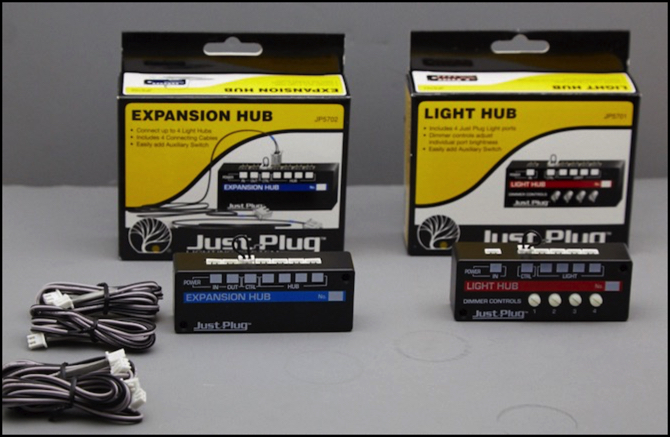
There are some things I don’t like: the Expansion Hubs (blue-striped box in the photo above) use the same wire as the lights, but carry a lot more power. Too much for that wire in my estimation (but wire capacity is somewhat subjective). They’re also overpriced for what is basically a junction box with no active electronics. And they don’t make a wire for connecting the system to a DC power pack; you have to buy a set of two Connecting Cables, cut one in half, and strip the ends. Not exactly plug-and-play there, particularly for the entry-level users most likely to use a power pack.
Their power supply and wires are also way overpriced. That’s probably due to the markup required for retail hobby-store sales but still far out of line with what similar things in other fields retail for. I’ll discuss more cost-effective alternatives to these in the review.
The Light Hub (red-striped box in the photo above) contains all of the electronics. At US$17 it’s a bit pricy for four lights (and that’s without the lights themselves, or a power supply), but you get a lot for that. It’s hard to call the price reasonable, but it’s not terrible either. Again, wiring it up is well documented, intuitive, and hard to get wrong (but not impossible).
I’m probably going to end up using the system for some of my buildings, due mainly to the ability to adjust light intensity without requiring me to do a lot of soldering, but I’m not certain. My yankee frugality objects to the cost, even as my practicality points out that I pay that much for the train in front of the buildings and I’m going to buy more of those than I will light sets.
The lights are part of a system, although for me the other parts mostly aren’t of interest. They have several models of streetlights, but all are what I’d call “historic”. None look right for even contemporary U.S. streetlights, and certainly not for the Japanese scenes I model. They have a number of lit cars as well, but those all seem to date from the steam era, and would look really out of place on a contemporary layout. So my perspective on this is based on using it for interior lighting for structures.
Lighting Structures
When lighting structures, you don’t need to light every room or floor, that depends on the effect you are going for. You might have scenes in one or two rooms, and leave others unlit, or you could mask off the other windows with curtains have have a general light behind all of them, with scenes in a room or two where the curtains were open. Houses often have only a couple of rooms lit in the evening, and that can also be true of large office buildings where most people don’t work late (although there’s usually some kind of dim light, for security reasons).
If you want to illuminate an interior scene in a building with full-length windows (e.g., a commercial building such as an office tower) you may need two or even three lights positioned just inside the window on the ceiling, where they can’t be seen from outside, to evenly front-light figures and furniture. When lighting a house with small windows, particularly in N scale, it may be sufficient to have light in one or two rooms of the structure, and hide any interior details behind curtains. Lights in houses will also typically be “warmer” (more red, less blue) than lights in commercial structures.
There is also external lighting. In addition to streetlights, large parking lots are usually lit, as are some park walkways, station platforms, and other places. Lights can be used “bare” or inside small plastic beads to represent visible lights, or hidden under platform awnings or other over-hanging structures to provide area lighting. For long stretches like station platforms, LED Strip Lights are probably going to be a better choice than individual LEDs, and much more economical than any commercial product since you’d need dozens of LEDs for a modern, well-lit, platform.
Much of what I’ve learned about model lighting came from reading posts by Jerry over at Quinntopia. His Skyscraper series (part 1, part 2, and part 3) is particularly notable, but if you’re interested in the topic, look at all of his LEDs posts.
Woodland scenics provides a variety of lights that can go inside buildings and outside, including self-adhesive for ceiling mount and tiny “nano” lights for more constrained spaces. These come in two “white” colors, which will work best for building lighting. They also have some colored LEDs, although applications for those are likely to be uncommon. Even the self-adhesive ones are fairly small “surface mount” (or SMD) LEDs, not the usual big, bulky, dome-shaped kind. All of these plug into the lighting hubs, which provide power and intensity control.
Intensity control might not seem like a big deal, but I think that it is. You can control the brightness of a LED light by selecting a more or less powerful (in millicandelas) LED or by reducing the current, which is done by oversizing the resistor (using a “correct” resistor on a lower voltage than it was intended for is essentially oversizing the resistor, and that’s in essence the method used by this system). You can also modify light output by placement within the structure, by painting the interior in more or less reflective colors, or by adding a translucent diffuser (fogged transparent plastic sheet) in front of the LED.
But all of those techniques require trial-and-error (or a LOT of experience) to get the “right” intensity of light for a model to match its neighbors. And having one room or building in a scene lit too brightly or too dim can be jarring. I’ve had that problem with some of my past lighting experiments. Being able to precisely control the intensity of an individual light with a twist of a knob is a very handy control for balancing lights within a scene. The value of that ease-of-adjustment should not be underestimated.
Even though I’m quite handy with electronics, I find this system rather tempting, just from the simple approach it brings to lighting. Put a light or two in a building, drill a hole in the baseboard, drop the wires down and plug in. Turn the room lights off or dim them for a “twilight” look, adjust the brightness, and done.
I’d been thinking about these for a couple of years, ever since I first saw them, and on a recent trip to my local hobby store, I impulsively bought a number of lights and the hubs shown here. After some more considered thought on how I’d use them, I went back and bought another couple of hubs and more lights. I didn’t bother with the power supply. I’m up to my ears in DC power supplies. But I did buy some extra connector cables, so I could make a wire or wires to connect hubs to my supplies.
System Overview
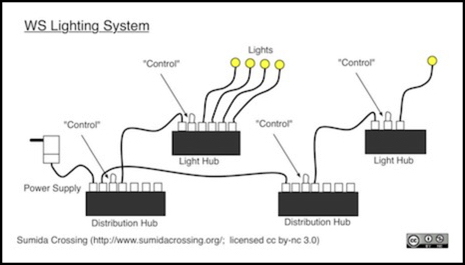
The system design is fairly simple: connect a power supply (yours or theirs) to an expansion hub (or directly to a light hub if you only want four lights). If you use the expansion hub, you can chain other expansion hubs off its “output” jack. Then you plug a light hub into each “Hub” socket on any expansion hub (each expansion hub comes with four Connecting Cables for that, but you’ll need to buy additional ones at US$6 each to add more expansion hubs). Lights plug into the sockets labelled “Light” on the light hub. It couldn’t be more obvious. And that’s a hallmark of good design. Whoever designed this was thinking about how people could mess it up, and kept it simple and obvious. Well, mostly, I have a couple of complaints I’ll get to.
The expansion hub is basically used to distribute power to light hubs, so I think of it as a “distribution hub”, and that’s how I’ve labeled my diagrams.
The standard power supply they sell provides 16 V AC at up to 1 Amp (1,000 mA). With a power draw of up to 120 mA per light hub if you used four of the 30 mA lights, there’s 480 mA per expansion hub, so you really wouldn’t want more than two of those (32 lights) on one power supply according to their numbers, although at lower voltages you can use more and draw the same current. More on this below.
The System: Hubs and Lights. Etc.
Each “hub” is a small black box, with two holes through it for mounting screws (supplied) so it can be attached to benchwork. There’s also a short length of double-sided tape included for people who prefer that. As I’ll note below, the sockets on these are clearly labeled and use should be obvious in practice, but they come with a folded single-page of text and diagrams that lay everything out.
What you need, at a minimum, is one Light Hub, a power source (AC or DC) and some lights (up to four separate ones, or four sets of streetlights). They sell a 16V AC, 1 Amp power supply, but the lights will work fine on most model train pack accessory outputs (you’ll need an extra “Connecting Cable” to cut and strip to connect to the power pack) or other power supply. The lights also work on a DC supply, and will work fine on 12V DC, for example, although maximum intensity is slightly less than with higher voltages.
Lights and other wires plug into the light hub using a simple slide-in two-wire connector. This appears to be a JST XH-series header and plug, although I don’t have one handy to test. It’s not the best connector, but it does have a simple friction lock, so the wires aren’t likely to vibrate out (in fact, pulling a light cord out involves a bit of effort, and fingernails). That connector costs about a dime each, half that in bulk. You could make your own lights with these connectors quite inexpensively, if you wanted to deal with all the crimping and soldering. There are some important details if you do that, more about that in the testing section below.
The connector, while very good for plugging into the hubs, has one downside: it’s huge compared to an N-scale building. This makes running the self-adhesive lights a bit difficult, as you need to cut large holes between floors. The nano lights are easier to run, since you can drill a 3mm or so hole for them, but then you have to find a way to attach them (a dab of glue on the cord is probably the best choice there, but don’t use super-glue, as it will fog plastic windows).
This isn’t just a product for North America either: the power supply is available in North American, European, UK, and Australian designs. Although the North American model is rated for 60 Hz, that doesn’t matter in a simple transformer, so it should also be usable on 50 Hz systems. However, unless it’s properly certified a U.S. supply shouldn’t be used on Japanese or other similar power, even if, as in Japan, they use essentially the same utility plug.
Of course the LEDs themselves don’t care, as long as the wall-wart or DC power pack is stepping the voltage down to the 12 - 18 VAC or VDC range they’ll just work. I don’t see the system on my usual Japan-based supplier’s website though, so it’s probably not sold there. And buying mail-order from the U.S. would make the already high price stratospheric.
Because the light hub contains a rectifier, you could even connect the hub to a DCC track bus, provided it was not one of the higher-voltage ones (A Digitrax Zephyr should work just fine, since it puts out 14V DCC track power, although I haven’t tested that). But if you do, be careful: some DCC systems have track voltages higher than 20 volts DCC; those could blow the LEDs although they seem to be pretty tolerant. Test with one, and run it for a few hours turned up to maximum brightness, if you aren’t sure of your track voltage but want to power lights off it.
To expand the system, you need more light hubs, plus one or more Expansion Hubs. The expansion hubs tie multiple light hubs to one power supply, assuming you don’t want to buy a power supply for each hub. At US$16 for the expansion hub, it’s not cheaper to buy even small wall-wart power supplies per light hub, since each expansion hub lets at least four light hubs share a single supply. Of course, you could do your own power bus wiring in place of the expansion hubs to share one larger supply, which is what I’d probably do.
The lights themselves come in several different kinds. I’ll cover the choices in more detail below, but they include both some exterior fixtures and lights suitable for building interiors or colored special-purpose (e.g., advertising) lights. A couple even flash.
I am also disappointed that they don’t sell a version of the Connecting Cable with bare wires or crimped-on spade lugs at one end, for hooking up to DC model train power packs (this, too, should be heavier gauge than the wires used for lights themselves). Omitting that forces people to buy two connecting cables, cut the end off one, and strip the wires, which really detracts from the “keep it simple” approach if you want to use these with a DC power pack. Yes, most model railroad hobbyists are well-acquainted with cutting and stripping wire, but many modern systems use plugs or at least wires with crimped-on spade lugs and screw terminals. If they want to target entry-level customers, this is an omission.
One final bit: they sell two useful accessories as part of this system: one is a kit with black paint and putty, that can be used to coat the inside of a structure to keep light from shining through it. The other is a set of two films to cut and apply to the inside of windows, to act as a diffuser and light dimmer, so you can see that the building is lit, but you can’t see the interior detail. Each of these goes for US$17, but contains enough to treat very many buildings. Although I regularly spray-paint my buildings to create a light-block, there are some cases where I don’t want to do that, and the putty could be very useful. And since I don’t really want to detail every room in every building, the window-film seems like a very sensible idea, at least for smaller windows in N-scale. I’m not sure it would work as well for large windows.
The Lights
They sell several varieties of LED for use with this system. This includes a number of pre-built streetlights. These are actually a bit more economical, as you wire each set of three (which costs US$24) up to one output on the Lighting Hub, and the whole set draws 20 mA, so you could actually have 72 streetlights for about US$10 per light, but that includes the lightpole too. (Note: in O scale you only get two lights per set). All of these use “Warm White” LEDs, so they’re more suitable for older lighting, rather than modern high-intensity (cool white) or sodium (yellowish) streetlights. Unfortunately they don’t look much like contemporary streetlights in most places, and none of them look the least bit like Japanese streetlights, so I won’t be using these.
There are also a pair of similar lights to mount on the outside of buildings, a “gooseneck wall mount” suitable for older industrial structures and an “entry wall mount” design that looks fairly modern and suitable for a residence. These come as a pair for US$15, and again you wire up both of them to one output on the hub. I might use the “entry wall mount” type on houses as an outside light; the problem is that I’d have to wire up two houses next to each other as one set (or light two doors on one house), which complicates the wiring a bit.
The other kind of light is a single LED on the end of a wire with a plug on the other end. There are two forms of this, and each is available in a variety of colors. The two forms are a self-adhesive light (the “LED Stick-on Light”) and a tiny bare LED (the “LED Nano Light”). The nano light will fit through a 2.3 mm hole, if you need to get one into an awkward location. The wires are 24” (60 cm) long, so you can easily place one hub under the layout and reach it from separate buildings (they also sell an extension cord, although I doubt most people would ever need it).
Both kinds of light are available in Warm White, Cool White, Red, Yellow, Blue, Green and Orange. The Nano lights are also available in flashing red and flashing yellow (e.g., for emergency lights on roadworks or vehicles, except that they missed the obvious need for flashing blue lights).
As I mentioned, the connector appears to be a standard kind of JST connector, so you could buy your own LEDs, wire, and connectors and still use the hubs. That would save you at least $4 per light, reducing the cost significantly (it also means more work for you). You’d need to be sure that you were choosing LEDs that match the 685 Ohm resistors inside the hubs for the supply voltage you were using (see my LEDs page for some info on LEDs and resistors). That includes using low-current (e.g., 20 - 30 mA) white LEDs, to avoid overpowering the resistors, not the ultra-bright 50 mA+ LEDs often found.
Cost Considerations
Let’s look at the cost a bit more. LEDs are dirt cheap: a typical white surface-mount LED goes for US$0.41 each in quantity 100 and I’ve seen even cheaper ones, so I’m sure they pay even less. Charging US$10 for what are essentially two LEDs and 8 feet (2.4 m) of wire is more than a bit on the high side. And that’s before you add in the hubs and power supply. The real cost of something like this isn’t so much the component cost though, as it is the assembly, packaging, distribution and retailer markup. So simply looking at the cost of bare LEDs doesn’t tell you anything about what makes a reasonable price, unless you want to build your own. However, they could have made this a lot more valuable by selling the LEDs in 10-packs at the same price, and probably would have made a similar profit margin. Selling them two at a time is a rather odd choice. It does make the system very profitable for hobby store owners, I expect.
Soldering tiny surface-mount LEDs is something of a craft skill compared to the usual kind of soldering modelers do; not impossible to pick up, if you are dexterous and have good eyesight, but a challenge for many of us older modelers. So there’s obviously a market for pre-assembled lights. But how much do you want to pay for that convenience?
If you factor in a hub, the cost per light for four lights is $9.25 per light (not counting power supply, which would add a couple of dollars per light). But if you use expansion hubs to share the fairly expensive supply, this rises to US$10.25 per light (with 32 lights) or US$10.50 per light with a power supply. This isn’t cheap, but how does it compare to other pre-built lights?
For that comparison: MicroMark sells a set of 20 “LED Lamps” that are fairly large LEDs in a base with a peel-and-stick adhesive for US$23. They’re too large for N-scale use (one advantage of the WS Nano lights is their tiny size), but at US$1.15 per light (without power supply) they’re about 12% of what WS is charging for the lights on a per-light basis. Oh, and the MicroMark ones include resistors (but not intensity-adjustment, nor do you get a choice of color). There are other choices out there, generally between the two in cost. Some increased cost for plug-and-play and intensity control is reasonable, but this seems to be excessive.
The intensity-control electronics obviously add to the cost. They also appear to be using some high-spec LEDs to allow for the flexibility to support a wide range of power supplies, and that, too, adds to the cost.
Let’s look at the components that make up the light hub: the rectifer/capacitor combo is a typical AC-to-DC power supply circuit, and something I’ve done before, in my car lighting project. The capacitor is the big part, even in bulk (quantity 100 for me) this was US$1.70, although I paid extra for a larger and surface-mount one. A can-type capacitor of the size used here costs about a nickel each in bulk. Similarly, the component cost of a transistor (used to control the intensity) is dirt cheap unless they’re using something very specialized.
The potentiometer (intensity control knob), however, is another story. These are inexpensive plastic ones, but seemingly of decent quality. The cheapest I could find of a similar form went for a bit less than $1 each in bulk, although some good ones cost closer to $2. That’s US$8 for four of them, or half the cost of the Light Hub. I expect they don’t pay that much, but they probably don’t pay a lot less than a dollar. By the time you factor in the other costs, the light hubs actually seem like they may be reasonably priced. Assuming you want intensity control.
The Distribution Hubs, alas, are not: there’s nothing inside the box except air and a simple circuit board with the sockets on it. There’s probably some tooling cost for the plastic box factored into the price, shared with the light hub since the same box is used for both. But given that the electronics in the light hub probably cost close to half of the price of the whole thing, they could easily have sold the distribution hub at a much lower price, rather than one dollar less than the light hub, and should have. All they really are is a wire with some sockets on it.
They do include a set of four wires with the hub, which nominally would cost US$20 if bought separately, but of course you’re paying twice for all the overhead costs when you buy separately. The actual cost per wire is measured in pennies, so getting four of them with the hub doesn’t really make it a better value.
The LEDs themselves, as I’ll get to in the Testing section, don’t seem to be the usual white LEDs. These may command something of a premium cost. Still, US$5 per LED seems high, even assembled with wire and plug.
So, they’re overcharging for the distribution hub and LEDs, but perhaps undercharging slightly for the light hub, counting on the user purchasing lights at their markup to provide a reasonable margin. At least, that’s how I read it, but I will note that I don’t do this kind of design professionally, so I’m just guessing; educated guesses, but guesses.
Bottom line: if you want intensity control and plug-and-play convenience, the light hub is a reasonable way to get it, even if you also buy their lights to go with it. It’s still expensive on a per-light basis though. The rest of the electronics are less cost-effective and not terribly interesting, at least not to me.
The light block kit and window-film kits are a separate matter. You can use either without the lighting system, and the lighting system without them. And each kit can treat many buildings. I can’t really compare their prices to anything, but they don’t feel unreasonable to me.
Power and Capacity
The system is flexible in terms of lights. If you need more, just add another light hub, or an expansion hub and a light hub if you’ve filled the last expansion hub slot. Ultimately you are limited by two things: the size of the power supply, and the capacity of the distribution wiring (the wire between expansion hubs).
Their standard power supply provides 1 Amp. It’s generally a good idea to derate a power supply to 80% since there is individual variation in components, and internal fusing can trip at slightly lower currents (and often that gets lower over time). If you use 20 mA lights, the 800 mA (80% of 1 Amp) will support 40 lights. You can likely get away with more, as actual current per light will be lower on that power supply’s voltage.
But regardless of power supply, the wire from power supply to the first expansion hub, and from one expansion hub to the next, also needs to be large enough to carry power to all of the downstream expansion hubs without excessive voltage loss or overheating. Voltage loss comes first, and will cause lights further down the chain to be dimmer, but in practice that might not be very noticeable before wire capacity becomes a problem.
Wire and Current
As I mentioned above, using the supplied 30-ga wire for the Distribution Hubs is a bit questionable. Wire Ampacity is a very uncertain and complex area though. And lots of people use 30-ga wire for DCC decoders with stall currents well above 1 Amp. So, why am I more conservative here?
Constant-current lighting is different from variable-current power use in a motor. DCC decoder wiring is rated based on the maximum (stall current) level, but motors rarely operate at stall current continuously, so you can cheat a little here; if you run for a long time at stall current, something other than the wire is probably going to fail first. Also, wires inside a loco are usually touching a large block of metal that acts as a heat sink, which helps to cool them. Lights in a building are in enclosed spaces made of styrene, which can deform at 100°C, a temperature below what’s often considered “hot” in an electrical circuit.
How much current a wire can carry depends on how hot you’re willing to allow it to get, and that depends on many factors, including the limits of the insulation. A wire at 150°C might not cause the insulation or a LED’s semiconductor junction to fail (although it will last longer if it’s cooler), but it’s probably going to melt the plastic building it’s attached to. If the distribution hub to hub wiring is always under the layout, in open air and away from plastic, you can run the wires much hotter than if they’re sandwiched under a road or inside a closed structure. My ampacity table linked above assumes “adjacent to plastic” heat levels would limit you to 416 mA (twenty lights at 20 mA each), and otherwise suggests a limit of 520 mA (26 lights) in an enclosed space, and 860 mA (43 lights) in open air, but you can easily come up with different numbers using different assumptions.
But 800 mA is probably a good “worst case” for the Power Supply to Distribution Hub and the Distribution Hub to Distribution Hub wires since those normally won’t be inside structures, and those are the only wires carrying lots of current and the ones that limit you. It also matches the derated power supply capacity suggested above. But not everyone derates power supplies, and the casual user will assume a one amp rating means that they have one amp of usable power.
And that’s why I think a rating of 1 Amp is incompatible with 30-ga wire in for the Distribution Hubs. If they’d made those out of 26-ga wire, it would be fine, and even 28-ga would be okay assuming open air. But 30? That could be okay assuming the insulation won’t fail at whatever equilibrium temperature you get when pulling an Amp through it in open air, but it seems risky to me. The wire would be more than hot enough to boil water, and losing a fair bit of power as heat.
Now that does assume you’re operating at or near their maximum voltage. At lower voltages, LEDs draw less than their rated current, and in my testing that was true even on my 18 VAC power pack supply. They’re probably assuming everyone will run them at 18V or less (ignoring the fact that some packs have higher voltages), and at that level the lesser per-light current provides a safety margin. But it’s still troublesome: wire should be “safe” even at the worst supported voltage.
The Light Hub Circuit
As I’ve mentioned, the light hub and how it allows for control over the intensity of the LEDs is the most important part of this system. If you’ve read my site often, you’ll know that curiosity is one of my basic traits, you might even call it a vice. The first thing I think when seeing something like this is “how does it work?”. The second is “how do I take it apart and find out?”. So I did.
I’ve written this up on a separate page, as I think it’s worth keeping for reference, so I won’t repeat all the detail here. See my WS Lights page if you want the blow-by-blow description.
The short form is that I tested this on a typical DC Power pack (my MRC 220) that puts out 18.0 V AC on the accessory terminals when unloaded, and the lights worked fine. I also tested on a variety of voltages from an adjustable DC bench supply, to replicate how different regulated DC wall-warts would work. The lights need at least 9 volts DC to work, and more to have a reasonable brightness. I found 12 V (DC) to be fairly good, but 15 V was brighter, and 18 V even brighter. They might be safe at higher voltages up to around 21V, but I didn’t try that and wouldn’t advise it. That’s DC, which isn’t quite the same as AC, but the range is probably similar. I don’t have the equipment to test a bunch of AC voltages, so the 18 VAC power pack was my only AC test.
I also found the intensity control knob to work well. It needs to be turned up about 1/4 of the way for the light to come on (the exact amount depends on the voltage of the power supply). But from there it goes smoothly from “quite dim” to “very bright” as you turn the knob up. And even with my large hands I could turn the knobs easily (plus they’re slotted for a screwdriver, if you want to turn them from a distance).
In short, the light hubs work exactly as claimed, and provide a useful degree of control over light intensity.
Alternatives
As far as I know, nobody else makes an adjustable-intensity LED lighting system today. You could, of course, do this yourself, and I’ve put together a list of methods for controlling LED intensity. I expect you could do this for about US$1 per light, not counting your labor cost. That’s about 10% of what the WS system costs per light. But it’s also a lot more work.
You can assume some of the added cost in the commercial product covers assembly labor and packaging, as well as the plugs, sockets and hub boxes, and then there is margin for both distributor and dealer markups (which can be large). But I’d still estimate the WS cost is at least twice what it could be. Maybe that’s necessary for low-volume products, but the existence of other, lower-priced, systems mentioned earlier suggests that it is not.
Alternate Power Circuit
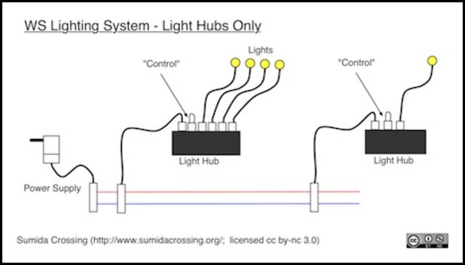
As I mentioned in the circuit section, the expansion hub doesn’t really do much, it’s just a way to plug other hubs in to share the power supply. And yet it costs almost the same as the light hub that contains all of the electronics. One way to bring the cost down is simply to wire light hubs to a power bus in parallel yourself. Then you can also use larger wire (26 ga, for example, for a 1 Amp supply) to avoid current limit issues. Their power supply is also overpriced, so I’d buy my own.
So if I want to use this system, I’d want the Light Hub and lights, but I’d roll my own power system. What does that mean?
First, I’d start with a regulated wall-wart power supply (like the 12V, 600 mA, Sparkfun TOL-09442 for US$6) and fuse it to 500 mA. If that’s not enough voltage, you can find 15V models around 800 mA from electronics suppliers for a few dollars more if you shop around.
I’d add an inline fuse, possibly in a small box, as I did for my earlier Lighting power system, or perhaps just a automobile-type inline holder. The fuse provides a safety net against the risk of fire from a short if something severs a wire on the layout (inside or under a building). The fuse should be at least 20% below the power supply rating, so a 0.5 Amp fuse would be good for an 800 mA power supply, and a 3/4 Amp fuse (if you could find one) for a 1 Amp supply.
Wall-warts typically contain fuses to protect the high-voltage side, but not to protect the low-voltage side. A broken wire somewhere that shorts, without a fuse on the low-voltage side, could potentially cause a fire on layout scenery materials. I always add fuses to my power systems.
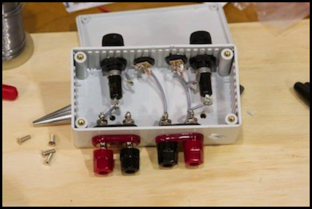
Simple fusebox for two “wall wart” circuits (jacks and fuses top, bus connections bottom)
I’d run a power bus off that (using wire of 26-ga or better), and connect Light Hubs to it in parallel, as seen in the following diagram:
How many hubs?
Nominally, each hub can drive up to four lights of 30 mA each. However, on a 15V DC supply the LEDs are somewhat underpowered, and actual draw of the “20 mA” lights is about 5 mA each, or 20 mA per hub. That means about 25 light hubs (and 100 lights) would fit in a power budget of 500 mA. You want to underload the fuse though, and there could be higher use per light for some LEDs; it’s not an exact science. Still, you can probably drive 20 hubs and 80 lights off one supply if you really want to.
The tricky part is connecting the wire from the light hub to the bus. The wire itself can be a Connecting Cable cut in half with the cut end stripped. With two connecting cables at US$10, that’s only $2.50 per half-cable, so it’s fairly inexpensive. They don’t make suitcase-style crimp connectors for 30 ga wire, so either I’d have to solder it to some kind of pin and socket connector, or I’d use a screw terminal strip, probably the latter as I have a lot of experience using them for power distribution and they work well.
At list price this means that four lights costs me US$17 for the hub, US$20 for two sets of two lights, US$2.50 for the Connecting Cable, and under US$10 for a power supply shared by multiple hubs (let’s assume 10 of them, so $1 per hub). This means that the cost per light is about $10 each. It’s still not cheap.
Summary
So, first, I like the system. The lights and intensity adjustment work. The specs are honest. The cost, while high, has some relation to the value.
It appears that this should be safe when used with most DC power pack outputs (18 real volts or less, anyway). I wouldn’t run it off DCC track power unless you know your voltage is on the low side, but that could be possible, but to be fair, they don’t suggest that as an option. The use of 30-ga wiring on the distribution hub connectors is questionable for larger systems, although fine for the light hubs. I’d be worried about over-loading the distribution hub wire as you approach 1 Amp of current. The light hubs and lights will never exceed the limits of the wire though.
The negatives: the expansion hub and power supply are seriously overpriced. Don’t buy either. The lights are also overpriced, but only by about a factor of 2 - 4 for what you are getting. Yes, you can make your own much cheaper if you want to buy and assemble the parts, but I may still buy these just for the convenience, and some stores will discount them. I’d be much happier if the list price of the lights was less though, or if they sold discounted ten-packs (or eight-packs or whatever) of them.
The Light Hub itself, as I mentioned, seems to be a bit of a bargain if what you want are adjustable-intensity lights for precision scene lighting, and way too expensive if you don’t.
Overall, I ended up with a more positive opinion of the system than I’d expected going in from comparing it to build-it-myself lighting. Yes, that’s still the cheapest way to light a lot of scenery. And I’m sure with practice I’d get pretty good at balancing intensity through resistor selection and light placement. But for quick precision control, and the ability to adjust things after I’ve looked at them for a while, this system wins hands down. And that doesn’t mention the convenience of the lights being pre-assembled. I’m no fan of precision soldering of surface-mount components.
There are some things, like train platform lights, where LED Strip lights would be better for ease of installation, and where the cost of dozens of lights would be a more significant factor. But otherwise, I’m probably going to end up using the WS Light Hubs and lights for foreground models where I’m most concerned with getting the lighting “just right”, and making my own lights for background models where precision lighting is less of an issue.