


DCC Power II
The DCC Power work continues, but it’s still not done, as I have to do the power panels for the urban scene and the unsceniced return loops, but with the panel I built and tested back in September/October finally installed under the tables of the River Crossing scene, I’m at the halfway mark (having done the Riverside Station scene back in March).
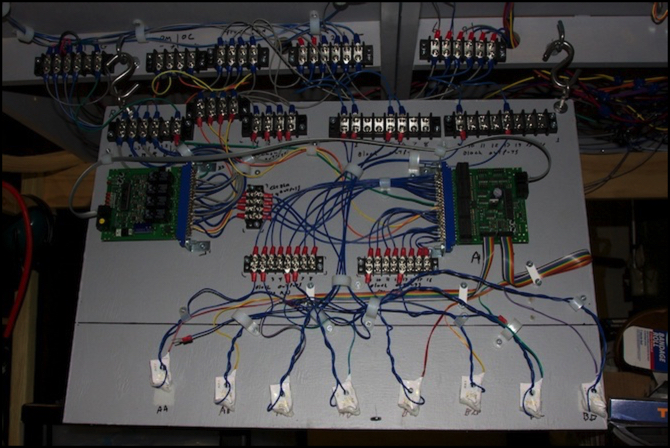
To recap, the board contains a PM42 DCC circuit breaker that provides four separate circuit breakers and a BDL168 occupancy detector that can provide up to sixteen occupancy detectors and eight transponding sensors (see my pages on occupancy detection and the BDL168 for more details). This board provides occupancy detection for six electrical blocks, two each on the commuter tracks and one on each subway track where it loops below the expressway. Although I’m also wiring up the transponding sensors, as mentioned previously I’m having doubts about them due to problems in testing and the anticipated low power draw of my trains being borderline to register on them.
It’s a lot of wire for what it does, but that’s in part because I wanted it to be general, so I could reuse it in the future. So all 16 occupancy detectors and all eight transponding sensors are wired up on the board (two of the transponding sensors on this one aren’t actually connected to anything, but can easily be wired into any output).
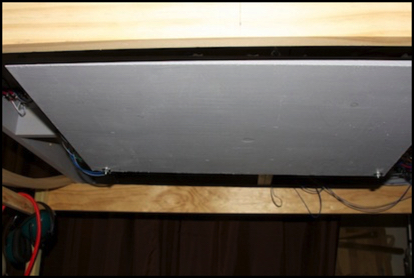
The board is attached to the tables by a number of short wires run to terminal strips on the tables. By disconnecting 19 screws, the panel can be removed for maintenance or if the layout needs to be taken apart for a move. The board hangs from two eyebolts by S-hooks that easily detach, and the whole thing folds up against the underside of the table (with sufficient clearance for the transponders) where it’s out of the way (there’s a hook to hold it up).
Power Panel Folded Up
Actually wiring it up also required running wires from each track feeder to those strips adjacent to the board, and connecting the two DCC inputs (DCC #1 for the commuter tracks and DCC #2 for the subway tracks) and the two power supplies for the PM42 and BDL168, which I haven’t quite completed as I need to run the new power bus for the PM42.
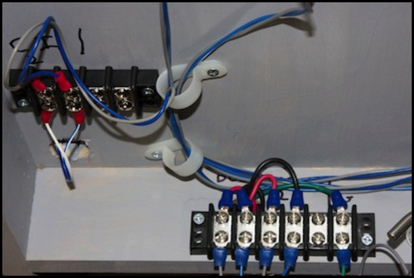
Feeder (left) and DCC power connections (right)
I already have two power busses, one used for the DS64 turnout controls and a second for the BDL168s and future SE8C signal controller. But as I discovered last month, it’s recommended to keep the BDL168 separate from other things, and there’s also some uncertainty about whether 12V DC is adequate. It seemed to work fine, but since I need to change anyway, I’m switching to a 15V supply for these.
For power, I’m using a pair of 1.5A 15V regulated “wall wart” transformers, and a 2A 12V standalone transformer. And for safety, I want fuses between those supplies and the wires I might manage to short-circuit somehow. So I built a box that connects the inputs from the supplies to output posts I can easily connect to the bus wiring, with a simple automotive-type fuse in the middle of the positive wire.

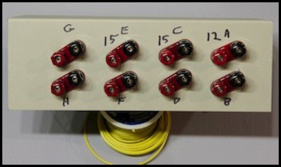
As you can see, this has 8 sets of wires, six using a standard 2.1mm socket that matches the typical wall-wart output, and two that use binding posts, for connecting to separate power supplies. That’s quite bit more than the three I need. I’d previously built a simple two-circuit box for my LED lighting supplies. I’m adding a third lighting supply, and putting all three on this box, so I can free up the other one (it will eventually end up on the Urban Tram layout), and I included two more inputs, one of each type, since I had room on the faceplate of the box and I might need more lighting or something eventually.
Administrivia
Note: If you’re seeing any odd behavior with the site, or in particular these musings pages, clear your browser’s cache (typically there’s a menu item for that, or it may be hidden in Preferences or some similar place). The reason is that I’ve made a couple of changes to the site structure, and if your browser is remembering any of the old structure, it could be confused.
You may have noticed a change on the website. The URLs displayed for each page (except these musings darn it) no longer have index.html stuck on the end. That file is still there, but I’ve turned on the “cruftless links” feature in my page-generation software that hides it to make things cleaner. I’d hoped to also do it for the Musings pages, but it turns out those don’t actually use a file named index so it doesn’t work for them, and turning the feature on has no affect on the URL.
That’s unfortunate, as all of those pages just changed from “.html” to “.php”. I’d planned to also do something to prevent old bookmarked URLs from breaking when that happened. Unfortunately that something was a Mod-Rewrite rule, and after a week spent getting that to work, I discovered that my provider doesn’t seem to have enabled that module (I should have checked that earlier). I can probably change that, but I’ll need to check. And I want to publish this update now, so I’m going to go ahead anyway.
And a consequence of that is that any bookmarked links to musings won’t work (since the bookmarks point to .html pages that no longer exist, and the new pages end in .php). And without a working mod-rewrite ruleset, I can’t hide that from the browser. I did, however, finally get a working 404 error page, so anyone following such a link will at least get a helpful error message. This is far from the seamless change I’d been planning, and it rather annoys me.
Ah, well, sorry about that. You can bookmark the new URLs safely, as I can’t imagine any reason they’d change again after this. With any luck I will be able to get that fixed in a day or two; we’ll see.
Update 11/28 10:45 PM: I fixed that problem (which turned out not to be a problem, the feature was already enabled), and links to missing html pages will now find the replacement php page.
At the moment PHP is only used to create the tag cloud entries on the sidebar, through a method known as “Dynamic PHP Tags”. But it’s also going to be needed to enable the commenting system when that’s ready. So this is all laying groundwork for that, as well as cleaning up the URLs.
As for the comments system, it’s making progress. The user interface (CSS and PHP) is mostly working on my test server, although there are a few bits to add or elaborate. And last week I started working on the database itself, which is making progress, although it turned out to be a bit more complex than anticipated. I’m far behind my original schedule, but at this point I’m fairly sure it will be operational before New Year’s.
