


Modeling Subways
I realized that my subway material was scattered over several pages, and I didn’t really have anything that tied them all together. Also, some of the pages were a bit out of date. The main page is the Subway Line page. I’ve updated the outdated material, and here’s a post to describe what I was trying to do, how I went about it, and what I’d do differently next time. I’ll link to other pages in the text below.
A subway isn’t something you find on a lot of model railroads, but then most model railroads are focused on freight operations. Even ordinary railroads back in the steam era had underground stations (New York’s Grand Central Terminal has 44 platforms, all underground). Property costs in modern cities make it even more likely for structures to be built above the tracks, partially or wholly covering the station. Boston’s Back Bay station used to be above ground, largely in a cutting, but today is mostly out of sight below ground except for the entrance building and ventilation stacks.
Despite the high property values in Tōkyō today, most of the stations are surprisingly at or above ground level. In part that’s because the rail lines’ growth came after dense urbanization, so elevated lines were a more practical solution for expanding them. The city does have subways, and most of them use the same gauge track and same voltage power supply as the above-ground commuter lines, so some of these subways provide access to the city center for suburban commuter trains. Several subway lines have underground stations below or near surface line stations, to allow transfers.
I’ve used that as an important aspect of my modeling to capture the “layered” feel of urban railroading. Cities rarely exist on a single level, even ignoring multi-story buildings. There are often below-ground open plazas and hidden shopping arcades, and highways and rail lines exist and cross on multiple levels. Cities aren’t flat, and models of cities shouldn’t be flat either.
As I’ve noted before, I’m not trying to model an exact prototype, although real stations in the city have served as inspiration for most of what I’ve done. You won’t find everything in one of my stations in a single prototype station though. That’s not the kind of modeling I’m doing.
I should mention that the idea of an underground subway line isn’t original to me. Plenty of people of have had partially or largely-undergound lines, and there are modelers who specialize in subways (I’ve seen articles on models of both the London Underground and the NYC Subway System). I didn’t originally plan to have a subway line, but took inspiration from some of the other modelers on the JNS Forum. In particular the work SubwayHypes did in early 2009 shaped my thoughts that summer as I was working on the final to-be-built design.
Issues with Subways
In modeling a subway, what is different from modeling above-ground track? There are two significant issues: visibility and access. I’ll cover each of these below.
Visibility
A subway isn’t very interesting if you can’t see it. And by definition it’s underground. There are several ways to deal with this.
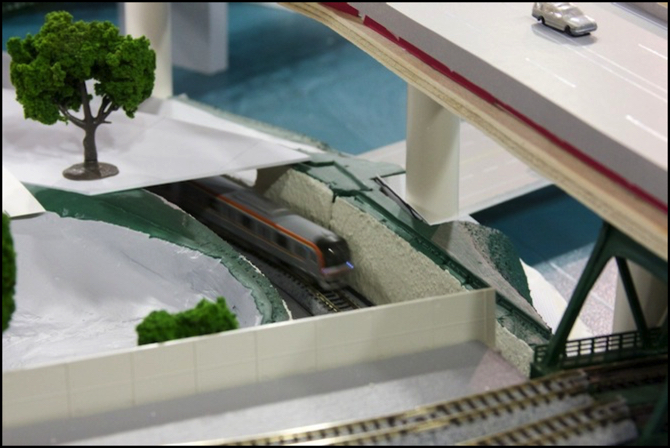
First, even underground lines are sometimes above ground. I’ve used that in my Urban Station Scene to put the subway line at ground level below the raised station, with a tunnel entrance at one end (the other currently disappears into the “unsceniced” portion of the layout, but will eventually be below ground there). I also used it in the Riverside Station Scene with a small bridge crossing the river, with otherwise underground track.
Tōkyō Metro 10000 running on the Subway line below the Urban Station
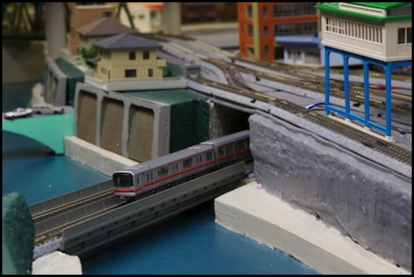
Marunouchi Series 02 Crossing the River
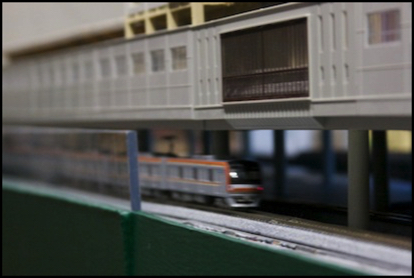
Next is the window approach. If the subway is adjacent to the front of the layout, you can make a cut-out in the fascia to expose the hidden station. This requires lighting inside the station. I used two strips of LED Strip Lights running the length of the station, which throws a very bright light (I used two so I could mix warm-white and cool-white LEDs for a better color of light).
Underground station seen through a window
Note that in both of these, there’s a sheet of 1/4” plexiglas at the front of the layout, to prevent trains that derail from going off the edge of the table. In the window approach, the plastic extends down to below the level of the window (the fascia is attached to the layout at the bottom) so that it fills the window opening.
Finally, there’s the camera approach. I haven’t done this yet, but I’ve been thinking about it. The basic idea is to use one of those small video cameras, which you can get with either yellow RCA plugs for simple video use, or USB connectors for digital video to computers, and put it in an underground station, where it can see the track and platform(s) without blocking the tracks, then feed the video to an LCD panel above the layout or on the layout fascia. I don’t really need this on the current layout, although I’m considering eventually doing it in the Urban station, as there will someday be a lot of detail below the elevated station, which won’t be easily seen by someone standing in front of it. Depending on how you do it one large LCD could display the output of several cameras, and look like a surveillance system monitor in a station-master’s office. I think that would look pretty neat.
Actually there’s a fourth solution, which I’ve seen on one model, that I’ll call the “cut away” approach. Like those pictures in books that cut away part of the outside of buildings or other structures to show what’s going on inside, you can do the same thing in the middle of a layout. I’ve seen one layout that used transparent plexiglass for the “street” above an underground station. You can do the same thing with walls or any other solid objects that are in the way, to suggest that they are still there while letting the viewer see past them. It’s an interesting idea, and essentially the window method is a simple form of it. But applied on a large scale I think it only works if you want the subway station to be the focal point of the scene, rather than just one of several elements that make up the scene.
Access
The other big problem with underground track is that you can’t easily access it. This is essential, for both cleaning and fixing derailments. If there’s a place on your layout that isn’t accessible, you’re pretty much guaranteed to need to access it for something sooner or later.
Access panels are one solution. Simply make part of the wall (or layout fascia if it’s at the front) of the tunnel removable, so you can reach in from an adjacent space. I didn’t use this, as the only place my underground track is near the edge of the layout is in the underground station. And while the fascia can be removed to access the front track, the platform blocks access to the rear track. I have a similar problem in the Urban Station Scene, as access to the back track under the elevated station is blocked by the platform in front of it, and the buildings behind it.
Removable roof panels are a similar concept, and I used this method everywhere I had underground lines, but made one big mistake. My roofs are sheet styrene (see the Subway Cover page for details) and on the River Crossing Scene (photo at top of page) I just need to remove a couple of buildings then they can be lifted off. Unfortunately on the River Station Scene, nearly all of the underground track is below above-ground track. And while it’s Unitrack and can be broken down for access, this isn’t easy, particularly where I have power feeders or switches with wiring. This was a big design mistake.
In both areas, the roof (and also the elevated station viaduct in the Urban Station scene) is in theory removable, but the presence of track and wiring on top makes actually removing it a choice of last resort. I do have access if something’s really broken, but using it will add hours of work. I really should have done that differently.
In part I’ll address cleaning through use of my Tomix vacuum-cleaner car and my CMX wet cleaning car (see my recent post on track cleaning), but derailments are still going to be an issue.
I also need to deal with spider webs, although I’m hoping that a simple bit of plastic in the shape of a clearance gauge stuck on the front of the cleaning train will serve to clear these out (I haven’t operated the subway enough with the cover in place to have to deal with this yet).
Construction
So how to make a subway? Well, either you need a two-layer layout, with an upper surface somehow held above a lower one, or you need to put the track “inside” the surface. I choose the latter method, as it allowed the track to be closest to the surface and that looked more realistic where it was exposed.
My layout’s structure is essentially a flat layer of plywood (atop a box structure) with layers of insulation foam above it. I made one change from the diagram below, in that the cover is only above the subway tunnel, inset into the foam in notches to make it level with the top of the foam elsewhere (see photo at top of post). So the tunnel sits atop one layer of foam, to place trains above “water” level for bridges, and inside the other layer.
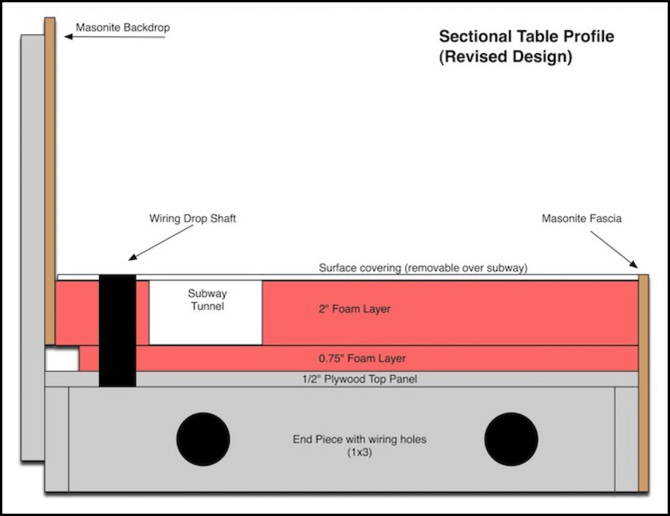
Inside the tunnel, I put down cork or vinyl-foam roadbed and paint the inside walls a neutral concrete-like color (flat black would also work) and beyond that there’s no scenery outside of stations.
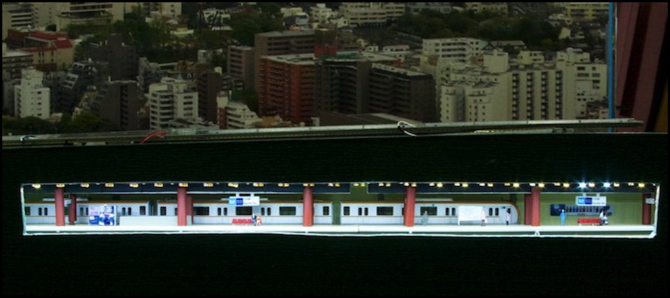
Inside the station, I installed a back wall of patterned styrene, painted yellow to evoke the feel of tile used in older station construction. I also used Kato Platforms with the overhead structure (except for the roof, which I removed) to provide some support for the upper surface, as well as a place to hang signs. The support girders were encased in sections cut from a drinking straw that had been painted, so make them look more like concrete columns.
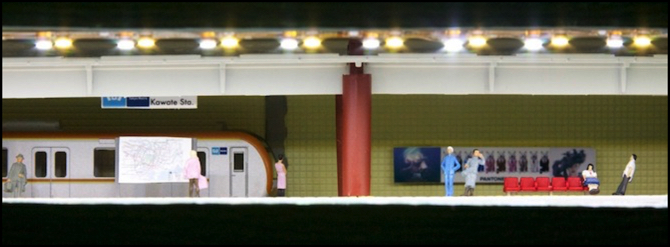
Subway Station and back wall
This photo also shows the two sets of LEDs, which are mounted at the very front (on the underside of the aluminum strip holding up the roof) so they will throw light on both the front and back tracks (as you can see, they are far enough forward to illuminate the whole train on the back track, as well as the lower portion of the wall). When viewed from a normal standing position, the LEDs themselves can’t be seen.
My Urban Station is in a sense a two-layer layout, with the viaduct held above the subway tracks on strips of aluminum carpet edging held up by 1/4” carriage bolts encased in PEX tubing. However the upper layer is only about half the width of the layout.
Lessons Learned
Well, lesson #1 is to do a better job planning for access. I have several problems noted above, and while I might not have been able to fix all of them given other constraints, I probably could have done better.
One thing I might have done was to make cut-outs in the viaduct structure of the Urban Station, hidden below platforms, and ensure that my subway tracks ran below them. This wouldn’t have been ideal (too narrow) but could have helped in cleaning and fishing out derailed cars.
Lesson #2 is that windows work best for kids, and adults are too tall and close to the layout for that to be a great solution. I’m thinking that the camera solution, coupled with exposed track in cuts and other normal outside exposures, is going to be a better method of making underground stations visible for a larger scale subway system on some future layout.
Another lesson is that foam is not made to exact dimensions, or perhaps it is but those change with age. Measuring during construction is essential to avoid surprises, and designing for exactly the clearance desired is probably not a good idea. Leaving a larger safety margin on clearance might have helped. However, in the station, the low roof makes it feel more realistic if you do look closely, so that’s a tradeoff to make.
In the end, my subway works fairly well, and definitely provides the sense of a complex and multi-level transportation system that I wanted to achieve, so it’s a success. There are things I could do differently, and things I didn’t do at all that I’ll do someday, either on this layout or another once. But I’m still quite happy with the results.