


Bike Shop II and May 2012 Status
The nice thing about the “Bike Shop” is that it’s a small model, and hence fairly quick work (by my standards a month really is quick). I’d written about this model a couple of weeks ago. At that point I’d finished the structural work, and given it several coats of paint from spray cans, providing a solid flat black layer to make it light-tight, and then a white interior layer for reflectivity, followed by a colored outer coat to give the “stone” a concrete look.
Note: the Village Photos album has larger versions of the photos shown here.
Following that, I did some brush painting, making the back room and the underside of the ceiling flat black to minimize internal reflections, and painting the two doors I added, as well as the window trim. I also made the side wall a bright yellow, and the back wall white. Finally I painted the valence inside the window tops blue on the outside, and flat black (again for reflections) on the inside. I also touched up the silver color of the air conditioning unit that would go on the roof, and painted the front door handles silver. Finally, I painted the cash register silver to provide contrast to the beige counter, which I left unpainted in its original color.
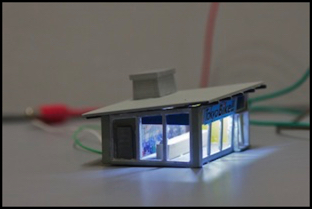
After the paint had dried, I printed and glued the back wall, floor, and sign in the usual manner. The back wall is actually the front window from the bike shop photo Don posted in the comments a couple of weeks ago. You can’t tell it’s a window, but if you look close you see bicycles and japanese advertising, which to me look like things hung on the wall behind the counter. The floor photo was made by finding a top-down photo of a floor tile on Flickr, cutting it to be a square containing one tile, and then replicating that to make a JPEG of the appropriate size. Aside from providing a pattern to hide the floor, the “tile” also covers the part of the big hole in the floor that sticks in front of the wall (the part behind is open, and that’s where the wires run out).
The sign, by the way, is a graphic from a real Tokyo bicycle shop. I edited it a bit to remove some other text, so I could fit it to the signboard. And, you’ll note, it’s mounted in front of the windows, not on the valence behind them. At the last minute when I decided to use this sign, I realized I needed a front signboard so the window mullions wouldn’t block large parts of it. I cut a strip of styrene to length, painted the edges and exposed portions of it silver, filed the paint off two of the mullions, and glued the signboard to the building. Once that dried, I glued the sign to the signboard.
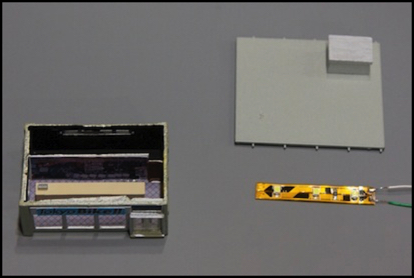
Preparing to install the LED Lights
Next I tinned and soldered two 6” wires to a 2” LED strip. This was my first attempt at soldering to a LED strip, and went easier than I expected. By tinning the wires, and putting a small dab of solder on the end of the iron, I just needed to press the wire to the contact pad with the iron, and hold it for a second until the bead of solder spread, then lift off the iron and let it cool. I did use a small aluminum heat-sink clamp on the strip between the contact pads and the first LED, to minimize the risk of damage.
I’m using one of the Bright White strips from the spool I bought last year for my subway station build. This simulates harsh fluorescent lighting quite well. I have room to add a second strip of warm white (3100K) lights from the other spool if I want to tone it down a bit, but initial testing looks good as it is.
Before installation I tested the lights on a 12V supply to make sure I hadn’t damaged them during the soldering. The strip was then glued to the roof just inside the front, using the adhesive backing, and the wires run through the hole.
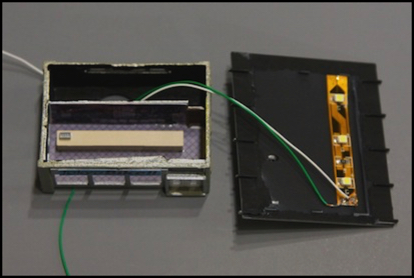
LEDs installed and wires run
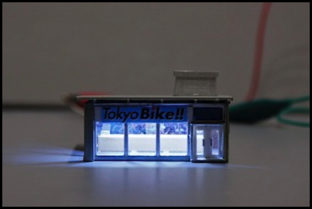
After putting the roof on, I hooked it up to my 12V supply with a couple of alligator-clip cords, and away it went.
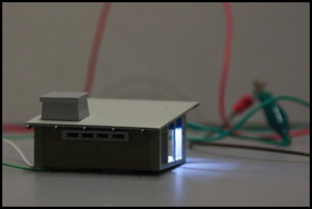
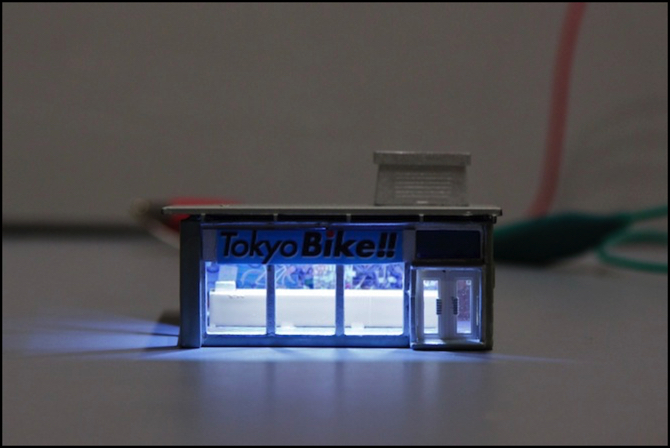
Lighting Test: note that no light leaks out the back window, even though it’s open and the interior wall doesn’t go all the way to the roof. The flat black back there really worked to prevent reflections!
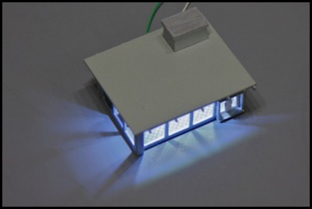
More lighting test: notice how opaque the roof and walls are to the bright light.
I had to edit the photos to dim the interior light a bit. Even with the room lights on, those LEDs are bright! Photos may be a bit problematic, but to the eye it looks pretty good.
Next I’m going to think about adding front windows. At present the “glass” is open air, and that’s good for cooling the LEDs, but I could leave the side windows open for that, and put in “glass” (thin sheet plastic) with advertising signs glued to it, for a more realistic Japanese scene (I don’t think I’ve ever seen a store window not used for advertising space).
Once I make up my mind on the windows, some bicycles will go inside the front window, and a clerk behind the counter. I may also add some strip plastic to the roof to help hold it in place (the original tabs were removed in several places to clear the valances, and as a result the roof tends to rotate out of position if bumped).
And then it will get set aside until I finish (well, start and finish) making the streets and sidewalks of the village area, so it will have a place to sit. But except for a bit of finish-up work, this represents the second completed building for the village, after the electrical substation. I really need to get those apartment buildings done...
Monthly Status for May 2012
May didn’t see a lot of work on the layout. I’ve been poking away at the apartment buildings, and put in a fair amount of work on this Bike Shop model. I’ve also been doing a bit of work on the website, getting caught up with some of the updates to pages I’d been meaning to work on since the move from iWeb a year ago (check out the RSS feed on the main page if you want to know what changed).
But that’s it. The wiring work continues to languish, and the rest of the work on the Village area remains in the “planning” stage.